# Callback & Events
Source: https://docs.cookiechimp.com/docs/advanced/callbacks-events
Customise the user's experience programmatically.
# Event Broadcasts
You can use this to read user's consent to cookie categories and services.
View our docs on [Consent Callbacks & Events
›](/block-scripts-cookies/callbacks-events)
## Consent Callbacks
### `cc:onFirstConsent`
Triggered the first time user expresses their choice of consent (accept/reject).
```js
window.addEventListener("cc:onFirstConsent", function (event) {
var detail = event.detail;
// detail.cookie
// do something
});
```
### `cc:onConsented`
This event is triggered the very first time the user expresses their choice of consent — just like `onFirstConsent` — but also on every subsequent page load.
```js
window.addEventListener("cc:onConsented", function (event) {
var detail = event.detail;
// detail.cookie
// do something
});
```
### `cc:onUpdate`
This event is triggered when the user modifies their preferences and only if consent has already been provided.
```js
window.addEventListener("cc:onUpdate", function (event) {
var detail = event.detail;
/**
* detail.cookie
* detail.changedCategories
* detail.changedServices
*/
// do something
});
```
## Modal Callbacks
### `cc:onModalShow`
The consent modal is visible.
```js
window.addEventListener("cc:onModalShow", function (event) {
var detail = event.detail;
/**
* detail.modalName
*/
// do something
});
```
### `cc:onModalHide`
The consent modal is hidden.
```js
window.addEventListener("cc:onModalHide", function (event) {
var detail = event.detail;
/**
* detail.modalName
*/
// do something
});
```
### `cc:onModalReady`
The consent modal is created and appended to the DOM.
```js
window.addEventListener("cc:onModalReady", function (event) {
var detail = event.detail;
/**
* detail.modalName
*/
// do something
});
```
# Actions
### `show`
Shows the consent banner. If consent was previously expressed, the consent modal will not be generated; you'll have to pass the argument `true` to generate it on the fly.
```js
CookieConsent.show();
// show modal (if it doesn't exist, create it)
CookieConsent.show(true);
```
### `hide`
Hides the consent banner.
```js
CookieConsent.hide();
```
### `showPreferences`
Shows the preferences modal.
```js
CookieConsent.showPreferences();
```
### `hidePreferences`
Hides the preferences modal.
```js
CookieConsent.hidePreferences();
```
### `acceptCategory`
Programmatically accept or reject a cookie category.
```js
// accept all categories
CookieConsent.acceptCategory("all");
// reject all (accept only categories marked as readOnly/necessary)
CookieConsent.acceptCategory([]);
// accept currently selected categories inside the preferences modal
CookieConsent.acceptCategory();
// accept only the "analytics" category
CookieConsent.acceptCategory("analytics");
// accept only these 2 categories
CookieConsent.acceptCategory(["analytics", "marketing"]);
// accept all categories except the "analytics" category
CookieConsent.acceptCategory("all", ["analytics"]);
// accept all categories except these 2
CookieConsent.acceptCategory("all", ["analytics", "marketing"]);
```
### `acceptedCategory`
Returns `true` if the specified category was accepted, otherwise `false`.
```javascript
if (CookieConsent.acceptedCategory("analytics")) {
// "analytics" category was accepted
} else {
// not accepted
}
```
### `acceptService`
Accepts or rejects services.
```javascript
// accept all services in the 'analytics' category
CookieConsent.acceptService("all", "analytics");
// reject all services
CookieConsent.acceptService([], "analytics");
// accept only specified service and reject all the others
CookieConsent.acceptService("Google Analytics", "analytics");
// accept only these 2 services and reject all the others
CookieConsent.acceptService(["service1", "service2"], "analytics");
```
### `acceptedService`
Returns `true` if the specified service was accepted, otherwise `false`.
```javascript
if (CookieConsent.acceptedService("Google Analytics", "analytics")) {
// "Google Analytics" service was accepted
} else {
// not accepted
}
```
### `validConsent`
Returns `true` if consent is valid.
Consent is **NOT** valid when at least one of following situations occurs:
* consent is missing (e.g. user has not yet made a choice)
* CookieChimp's cookie does not exist/has expired
* CookieChimp's cookie is structurally not valid (e.g. empty)
```javascript
if (CookieConsent.validConsent()) {
// consent is valid
} else {
// consent is not valid
}
```
### `getUserPreferences`
Returns user's preferences of accepted/rejected categories and services.
Type: `function(): object`
```typescript
function(): {
acceptType: string,
acceptedCategories: string[],
rejectedCategories: string[],
acceptedServices: {[category: string]: string[]}
rejectedServices: {[category: string]: string[]}
}
```
Possible acceptType values:
* `'all'`
* `'custom'`
* `'necessary'`
```javascript
var preferences = CookieConsent.getUserPreferences();
if (preferences.acceptType === "all") {
console.log("Everything has been accepted!");
}
if (preferences.acceptedCategories.includes("analytics")) {
console.log("The analytics category was accepted!");
}
```
### `reset`
Resets CookieConsent by dropping all internal pointers and config. You can pass the argument `true` to delete CookieChimp's cookie which holds the user's consent & preferences. The user will be prompted again to express their consent.
Once this method is called, CookieChimp won't be functional on the page. The
webpage needs to be fully reloaded to re-initialise CookieChimp.
```js
CookieConsent.reset(true);
// Reload the page
window.location.reload();
```
# Custom CSS
Source: https://docs.cookiechimp.com/docs/advanced/custom-css
Customise the look and feel of the CookieChimp banner & modal.
CookieChimp's dashboard allows you to customise the look and feel of the banner and modal. However, if you want to go beyond the options provided, you can use custom CSS.
## Color Schemes
The widget includes light and dark themes. Enable dark mode by adding `cc--darkmode` class to the HTML element.
You can also enabled auto dark mode by in the CookieChimp dashboard. This will automatically enable dark mode when the user's device is set to dark mode.
## CSS Variable Customisation
Develop your own theme by modifying/overriding CSS variables.
```css
/** Default color-scheme **/
:root {
--cc-font-family: -apple-system, BlinkMacSystemFont, "Segoe UI", Roboto,
Helvetica, Arial, sans-serif, "Apple Color Emoji", "Segoe UI Emoji",
"Segoe UI Symbol";
--cc-modal-border-radius: 0.5rem;
--cc-btn-border-radius: 0.4rem;
--cc-modal-transition-duration: 0.25s;
--cc-modal-margin: 1rem;
--cc-link-color: var(--cc-btn-primary-bg);
--cc-z-index: 2147483647;
--cc-bg: #ffffff;
--cc-primary-color: #2c2f31;
--cc-secondary-color: #5e6266;
--cc-btn-primary-bg: #30363c;
--cc-btn-primary-color: #ffffff;
--cc-btn-primary-border-color: var(--cc-btn-primary-bg);
--cc-btn-primary-hover-bg: #000000;
--cc-btn-primary-hover-color: #ffffff;
--cc-btn-primary-hover-border-color: var(--cc-btn-primary-hover-bg);
--cc-btn-secondary-bg: #eaeff2;
--cc-btn-secondary-color: var(--cc-primary-color);
--cc-btn-secondary-border-color: var(--cc-btn-secondary-bg);
--cc-btn-secondary-hover-bg: #d4dae0;
--cc-btn-secondary-hover-color: #000000;
--cc-btn-secondary-hover-border-color: #d4dae0;
--cc-separator-border-color: #f0f4f7;
--cc-toggle-on-bg: var(--cc-btn-primary-bg);
--cc-toggle-off-bg: #667481;
--cc-toggle-on-knob-bg: #ffffff;
--cc-toggle-off-knob-bg: var(--cc-toggle-on-knob-bg);
--cc-toggle-enabled-icon-color: var(--cc-bg); // yes (v tick)
--cc-toggle-disabled-icon-color: var(--cc-bg); // no (x tick)
--cc-toggle-readonly-bg: #d5dee2;
--cc-toggle-readonly-knob-bg: #fff;
--cc-toggle-readonly-knob-icon-color: var(--cc-toggle-readonly-bg);
--cc-section-category-border: var(--cc-cookie-category-block-bg);
--cc-cookie-category-block-bg: #f0f4f7;
--cc-cookie-category-block-border: #f0f4f7;
--cc-cookie-category-block-hover-bg: #e9eff4;
--cc-cookie-category-block-hover-border: #e9eff4;
--cc-cookie-category-expanded-block-bg: transparent;
--cc-cookie-category-expanded-block-hover-bg: #dee4e9;
--cc-overlay-bg: rgba(0, 0, 0, 0.65);
--cc-webkit-scrollbar-bg: var(--cc-section-category-border);
--cc-webkit-scrollbar-hover-bg: var(--cc-btn-primary-hover-bg);
--cc-footer-bg: var(--cc-btn-secondary-bg);
--cc-footer-color: var(--cc-secondary-color);
--cc-footer-border-color: #e4eaed;
}
/** Dark mode color-scheme **/
.cc--darkmode {
--cc-bg: #161a1c;
--cc-primary-color: #ebf3f6;
--cc-secondary-color: #aebbc5;
--cc-btn-primary-bg: #c2d0e0;
--cc-btn-primary-color: var(--cc-bg);
--cc-btn-primary-border-color: var(--cc-btn-primary-bg);
--cc-btn-primary-hover-bg: #98a7b6;
--cc-btn-primary-hover-color: #000000;
--cc-btn-primary-hover-border-color: var(--cc-btn-primary-hover-bg);
--cc-btn-secondary-bg: #242c31;
--cc-btn-secondary-color: var(--cc-primary-color);
--cc-btn-secondary-border-color: var(--cc-btn-secondary-bg);
--cc-btn-secondary-hover-bg: #353d43;
--cc-btn-secondary-hover-color: #ffffff;
--cc-btn-secondary-hover-border-color: var(--cc-btn-secondary-hover-bg);
--cc-separator-border-color: #222a30;
--cc-toggle-on-bg: var(--cc-btn-primary-bg);
--cc-toggle-off-bg: #525f6b;
--cc-toggle-on-knob-bg: var(--cc-btn-primary-color);
--cc-toggle-off-knob-bg: var(--cc-btn-primary-color);
--cc-toggle-enabled-icon-color: var(--cc-btn-primary-color); // yes (v tick)
--cc-toggle-disabled-icon-color: var(--cc-btn-primary-color); // no (x tick)
--cc-toggle-readonly-bg: #343e45;
--cc-toggle-readonly-knob-bg: #5f6b72;
--cc-toggle-readonly-knob-icon-color: var(--cc-toggle-readonly-bg);
--cc-section-category-border: #1e2428;
--cc-cookie-category-block-bg: #1e2428;
--cc-cookie-category-block-border: var(--cc-section-category-border);
--cc-cookie-category-block-hover-bg: #242c31;
--cc-cookie-category-block-hover-border: #232a2f;
--cc-cookie-category-expanded-block-bg: transparent;
--cc-cookie-category-expanded-block-hover-bg: var(--cc-toggle-readonly-bg);
--cc-overlay-bg: rgba(0, 0, 0, 0.65);
--cc-webkit-scrollbar-bg: var(--cc-section-category-border);
--cc-webkit-scrollbar-hover-bg: var(--cc-btn-primary-hover-bg);
--cc-footer-bg: #0c0e0f;
--cc-footer-color: var(--cc-secondary-color);
--cc-footer-border-color: #060809;
}
.cc--darkmode #cc-main {
color-scheme: dark;
}
```
You can also customise very specific elements by using inspect element in your
browser and copying the CSS selector to override the styles.
## Disable transitions
You can disable all transitions simply by setting the transition duration to 0:
```css
#cc-main {
--cc-modal-transition-duration: 0;
}
```
# Custom Update Consent Button
Source: https://docs.cookiechimp.com/docs/advanced/custom-update-consent-button
{/* TODO */}
# Create account invitation
Source: https://docs.cookiechimp.com/docs/api-reference/account-invitations/create-account-invitation
post /account-invitations
Create a new account invitation
# Delete account invitation
Source: https://docs.cookiechimp.com/docs/api-reference/account-invitations/delete-account-invitation
delete /account-invitations/{id}
Delete account invitation by ID
# Get account invitation
Source: https://docs.cookiechimp.com/docs/api-reference/account-invitations/get-account-invitation
get /account-invitations/{id}
Get account invitation by ID
# List account invitations
Source: https://docs.cookiechimp.com/docs/api-reference/account-invitations/list-account-invitations
get /account-invitations
List all account invitations
# Update account invitation
Source: https://docs.cookiechimp.com/docs/api-reference/account-invitations/update-account-invitation
put /account-invitations/{id}
Update account invitation by ID
# Delete account user
Source: https://docs.cookiechimp.com/docs/api-reference/account-users/delete-account-user
delete /account-users/{id}
Delete account user by ID
# Get account user
Source: https://docs.cookiechimp.com/docs/api-reference/account-users/get-account-user
get /account-users/{id}
Get account user by ID
# List account users
Source: https://docs.cookiechimp.com/docs/api-reference/account-users/list-account-users
get /account-users
List all account users
# Update account user
Source: https://docs.cookiechimp.com/docs/api-reference/account-users/update-account-user
put /account-users/{id}
Update account user by ID
# Get account
Source: https://docs.cookiechimp.com/docs/api-reference/account/get-account
get /accounts/{id}
Get account by ID
# List accounts
Source: https://docs.cookiechimp.com/docs/api-reference/account/list-accounts
get /accounts
List all accounts
# Get AI action
Source: https://docs.cookiechimp.com/docs/api-reference/ai-actions/get-ai-action
get /ai-actions/{id}
Get AI action by ID
# List AI actions
Source: https://docs.cookiechimp.com/docs/api-reference/ai-actions/list-ai-actions
get /ai-actions
Audit log of all actions performed by the AI
# API Overview & Authentication
Source: https://docs.cookiechimp.com/docs/api-reference/authentication
Access all the data on CookieChimp through our RESTful API.
Welcome to the CookieChimp API. We provide a RESTful API that allows you to access all the data on CookieChimp. You can use our API to integrate your applications, services, and workflows with our platform.
# Authentication
To authenticate with the CookieChimp API, you will need an API key. This key is a unique identifier for your account and is used to ensure that only authorized users have access to the data.
## Obtaining Your API Key
Currently, you cannot generate the API key yourself. To request an API key, please [contact our support](mailto:support@cookiechimp.com?subject=Access%20to%20API) team.
Once you have your API key, you can use it to authenticate your requests to the CookieChimp API. Include it in the header of your HTTP requests like so:
```http
X-API-Key: YOUR_API_KEY
```
# Rate Limits
To ensure fair usage of the API, we limit the number of requests you can make to the API. The rate limit is 100 requests per minute. If you exceed this limit, you will receive a `429 Too Many Requests` response.
# Create category
Source: https://docs.cookiechimp.com/docs/api-reference/categories/create-category
post /categories
Create a new category
# Delete category
Source: https://docs.cookiechimp.com/docs/api-reference/categories/delete-category
delete /categories/{id}
Delete category by ID
# Get category
Source: https://docs.cookiechimp.com/docs/api-reference/categories/get-category
get /categories/{id}
Get category by ID
# List categories
Source: https://docs.cookiechimp.com/docs/api-reference/categories/list-categories
get /categories
List all categories
# Update category
Source: https://docs.cookiechimp.com/docs/api-reference/categories/update-category
put /categories/{id}
Update category by ID
# Get consent
Source: https://docs.cookiechimp.com/docs/api-reference/consents/get-consent
get /consents/{id}
Get consent by ID
# List consents
Source: https://docs.cookiechimp.com/docs/api-reference/consents/list-consents
get /consents
List all consents
# Create group
Source: https://docs.cookiechimp.com/docs/api-reference/groups/create-group
post /groups
Create a new group
# Get group
Source: https://docs.cookiechimp.com/docs/api-reference/groups/get-group
get /groups/{id}
Get group by ID
# List groups
Source: https://docs.cookiechimp.com/docs/api-reference/groups/list-groups
get /groups
List all groups
# Update group
Source: https://docs.cookiechimp.com/docs/api-reference/groups/update-group
put /groups/{id}
Update group by ID
# Create storage item
Source: https://docs.cookiechimp.com/docs/api-reference/storage-items/create-storage-item
post /storage-items
Create a new storage item
# Delete storage item
Source: https://docs.cookiechimp.com/docs/api-reference/storage-items/delete-storage-item
delete /storage-items/{id}
Delete storage item by ID
# Get storage item
Source: https://docs.cookiechimp.com/docs/api-reference/storage-items/get-storage-item
get /storage-items/{id}
Get storage item by ID
# List storage items
Source: https://docs.cookiechimp.com/docs/api-reference/storage-items/list-storage-items
get /storage-items
List all storage items
# Update storage item
Source: https://docs.cookiechimp.com/docs/api-reference/storage-items/update-storage-item
put /storage-items/{id}
Update storage item by ID
# Block Script Tags
Source: https://docs.cookiechimp.com/docs/block-scripts-cookies/script-attributes
Only enable scripts when a user has given consent.
If you are using **Google Tag Manager** to trigger tags, follow the instructions here.
## Script Attributes and Usage
Control your scripts using these attributes:
* `data-category`: Assigns the script to a consent category. You can find the ID of each category from your CookieChimp dashboard.
* `data-service` (optional): Name of the company, service or a group of scripts. Can be used to disable a single service in a category while leaving others enabled - or the other way around.
* `data-type` (optional): Defines a custom script type.
* `data-src` (optional): Can be used instead of `src` for validation purposes.
## Code Examples
```html
```
You can also run scripts when a category or service is disabled (if it was
previously enabled) by prepending the '!' character to the name.
```html
```
# FAQ
Source: https://docs.cookiechimp.com/docs/faq
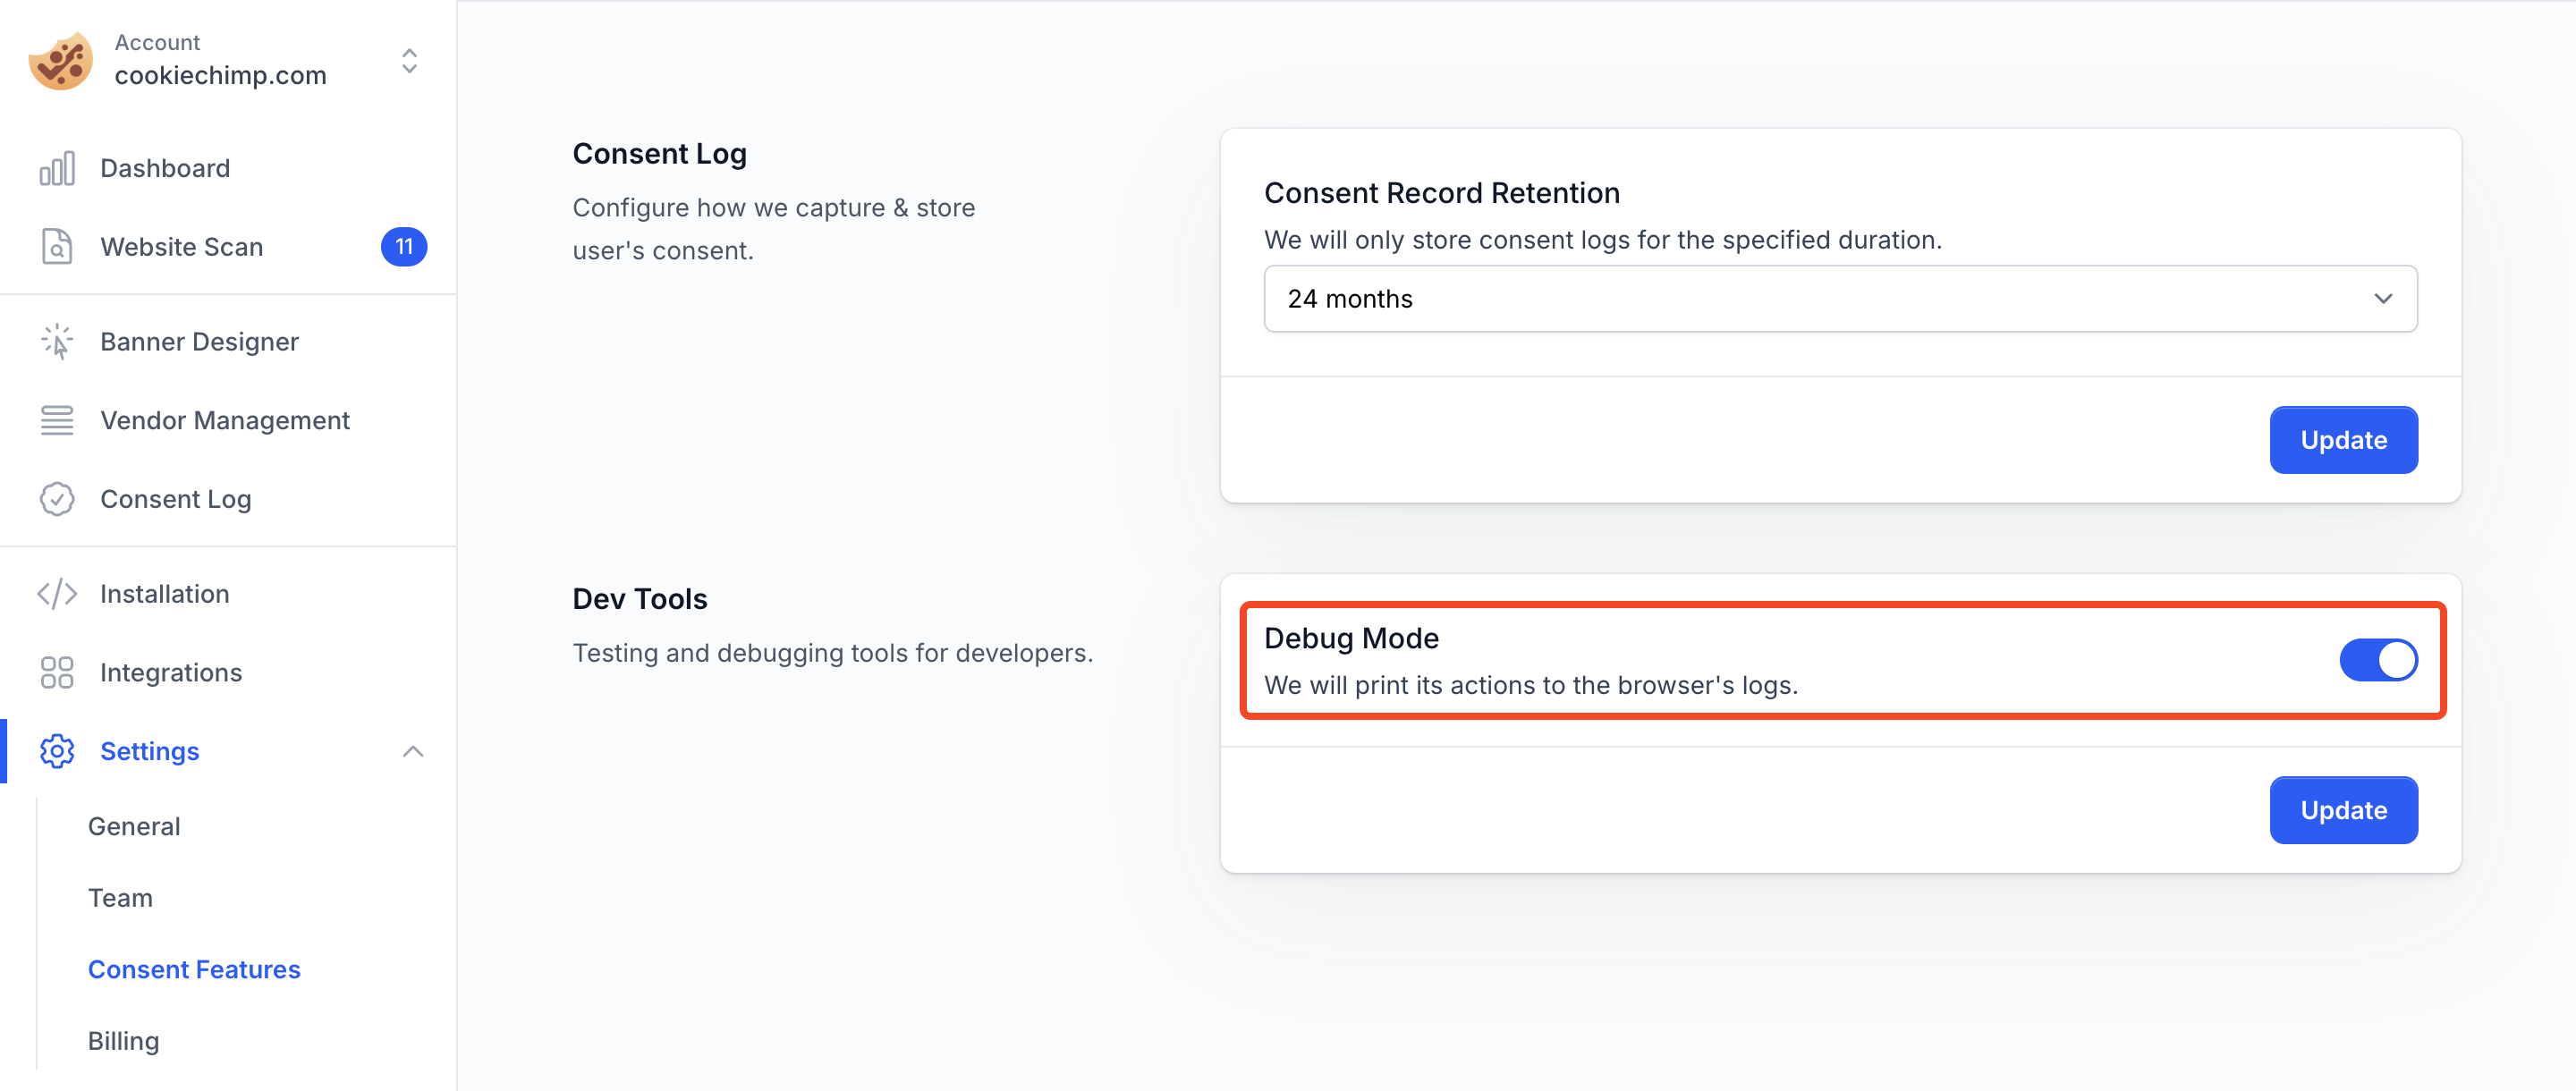
### How do I verify if everything is working correctly?
Go to "Settings" > "Consent Features" and enable Debug Mode.
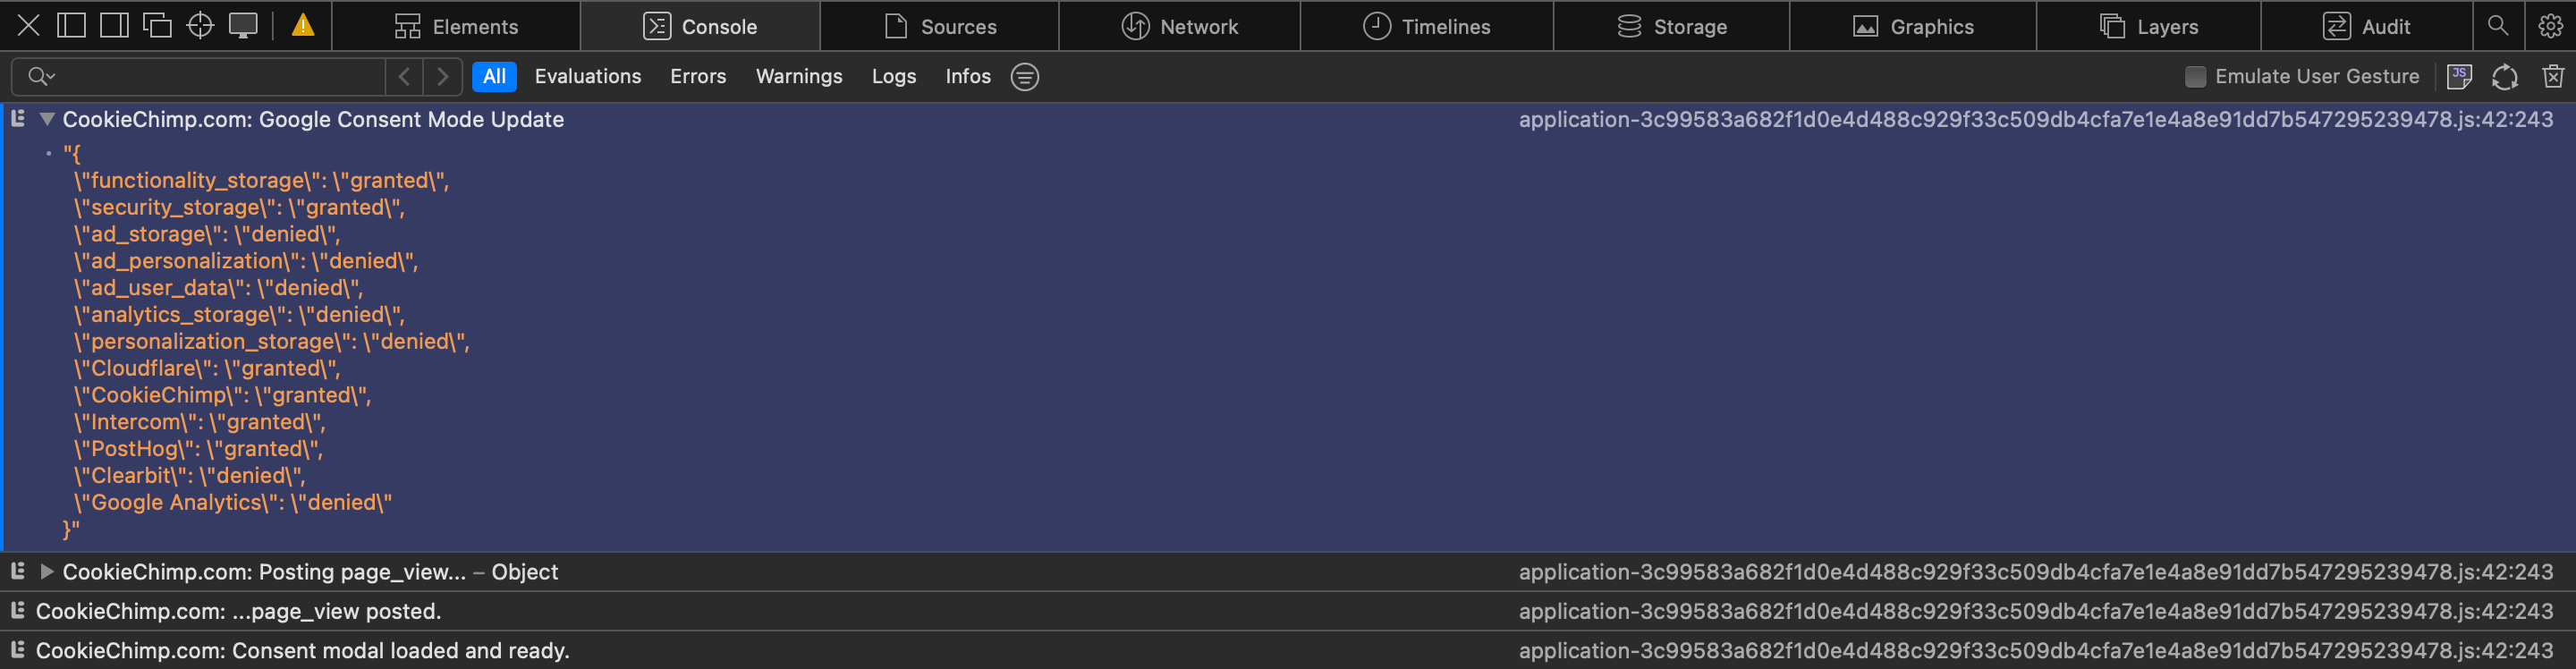
Now when a page view or consent is recorded, the banner will log the details in the browser console.
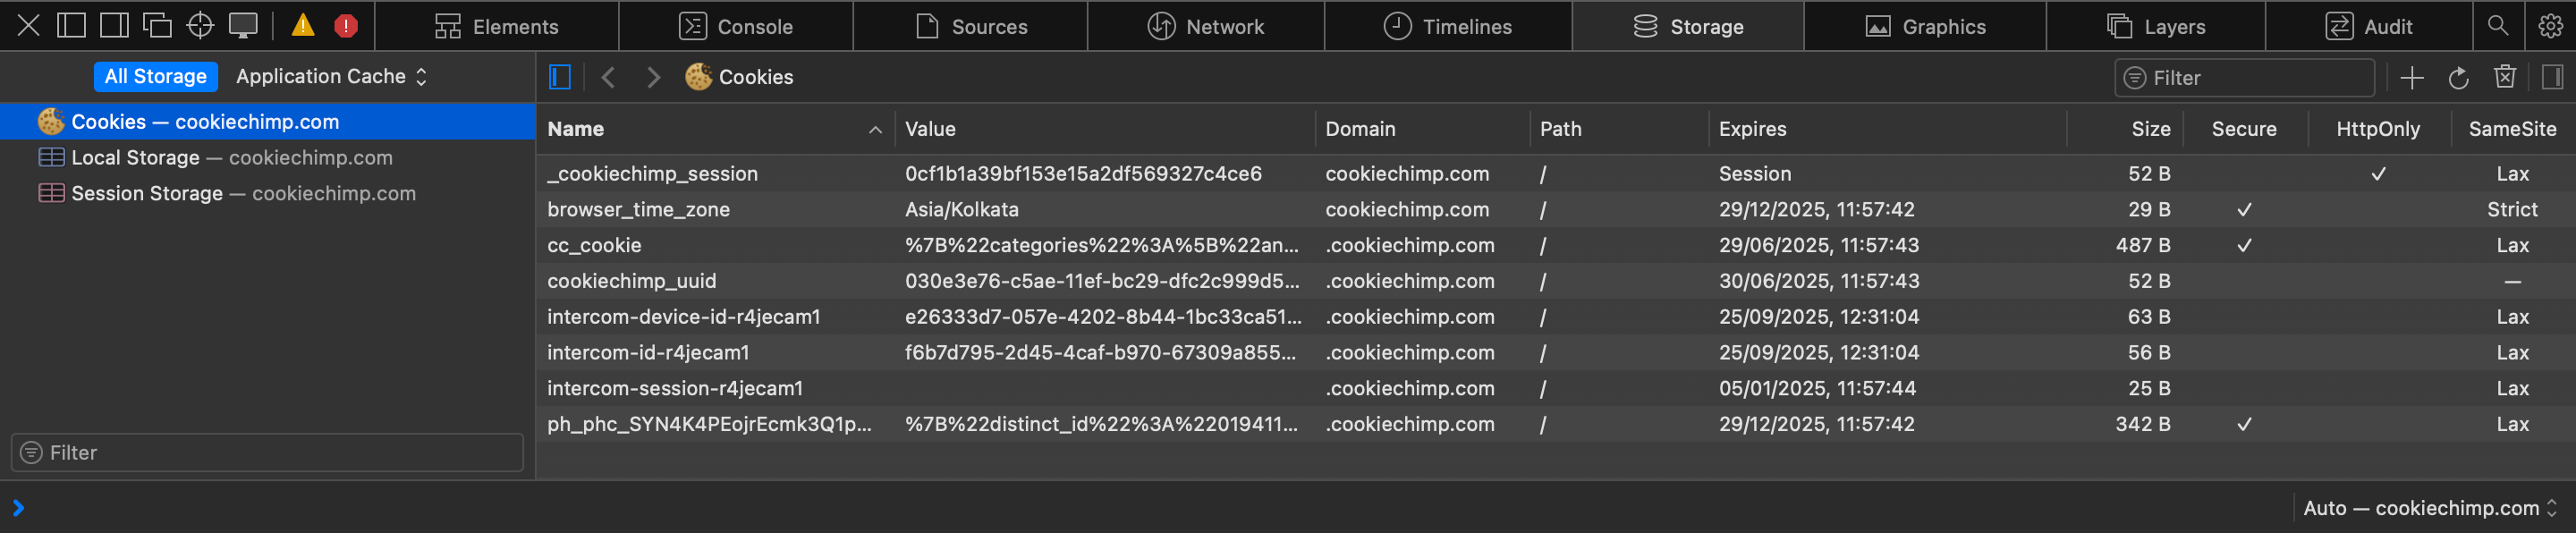
To ensure that the cookies are blocked and added when the consent is recorded, you can use the developer console of your browser.
First, load your website after clearing all the current cookies on the browser or checking from a private browser window.
After the site has been loaded, check the "Storage" tab in the browser console if any cookies have been set.
### Why aren't CookieChimp cookies marked as `HttpOnly`?
`HttpOnly` cookies can only be used in server-side communication.
Since the CookieChimp script is client-side code, in order for it to read these cookies, these cookies cannot be marked as `HttpOnly`.
### Do we support cross-domain consent?
No, we do not support cross-domain consent sharing.
Cross Domain Consent is a type of consent where visitors’ consent preferences are recognised across multiple domains.
To implement this feature, a third-party cookie must be installed and read from all associated domains.
We do not support this feature as many browsers do not allow setting/sharing of third-party cookies.
However, we do support consent sharing across subdomains when the same CookieChimp script is installed in the subdomain.
This is enabled by default.
### How can I obtain the consent ID?
The consent ID is shown in the preferences modal of the banner.
### How do I enable Global Privacy Control?
Go to the "Integrations" page and enable the Global Privacy Control integration.
Now if we detect a Global Privacy Control signal from the browser, the opt-out preferences will automatically be set.
# Banner Designer
Source: https://docs.cookiechimp.com/docs/features/banner-designer
Customise the consent banner & preferences modal to match your branding.
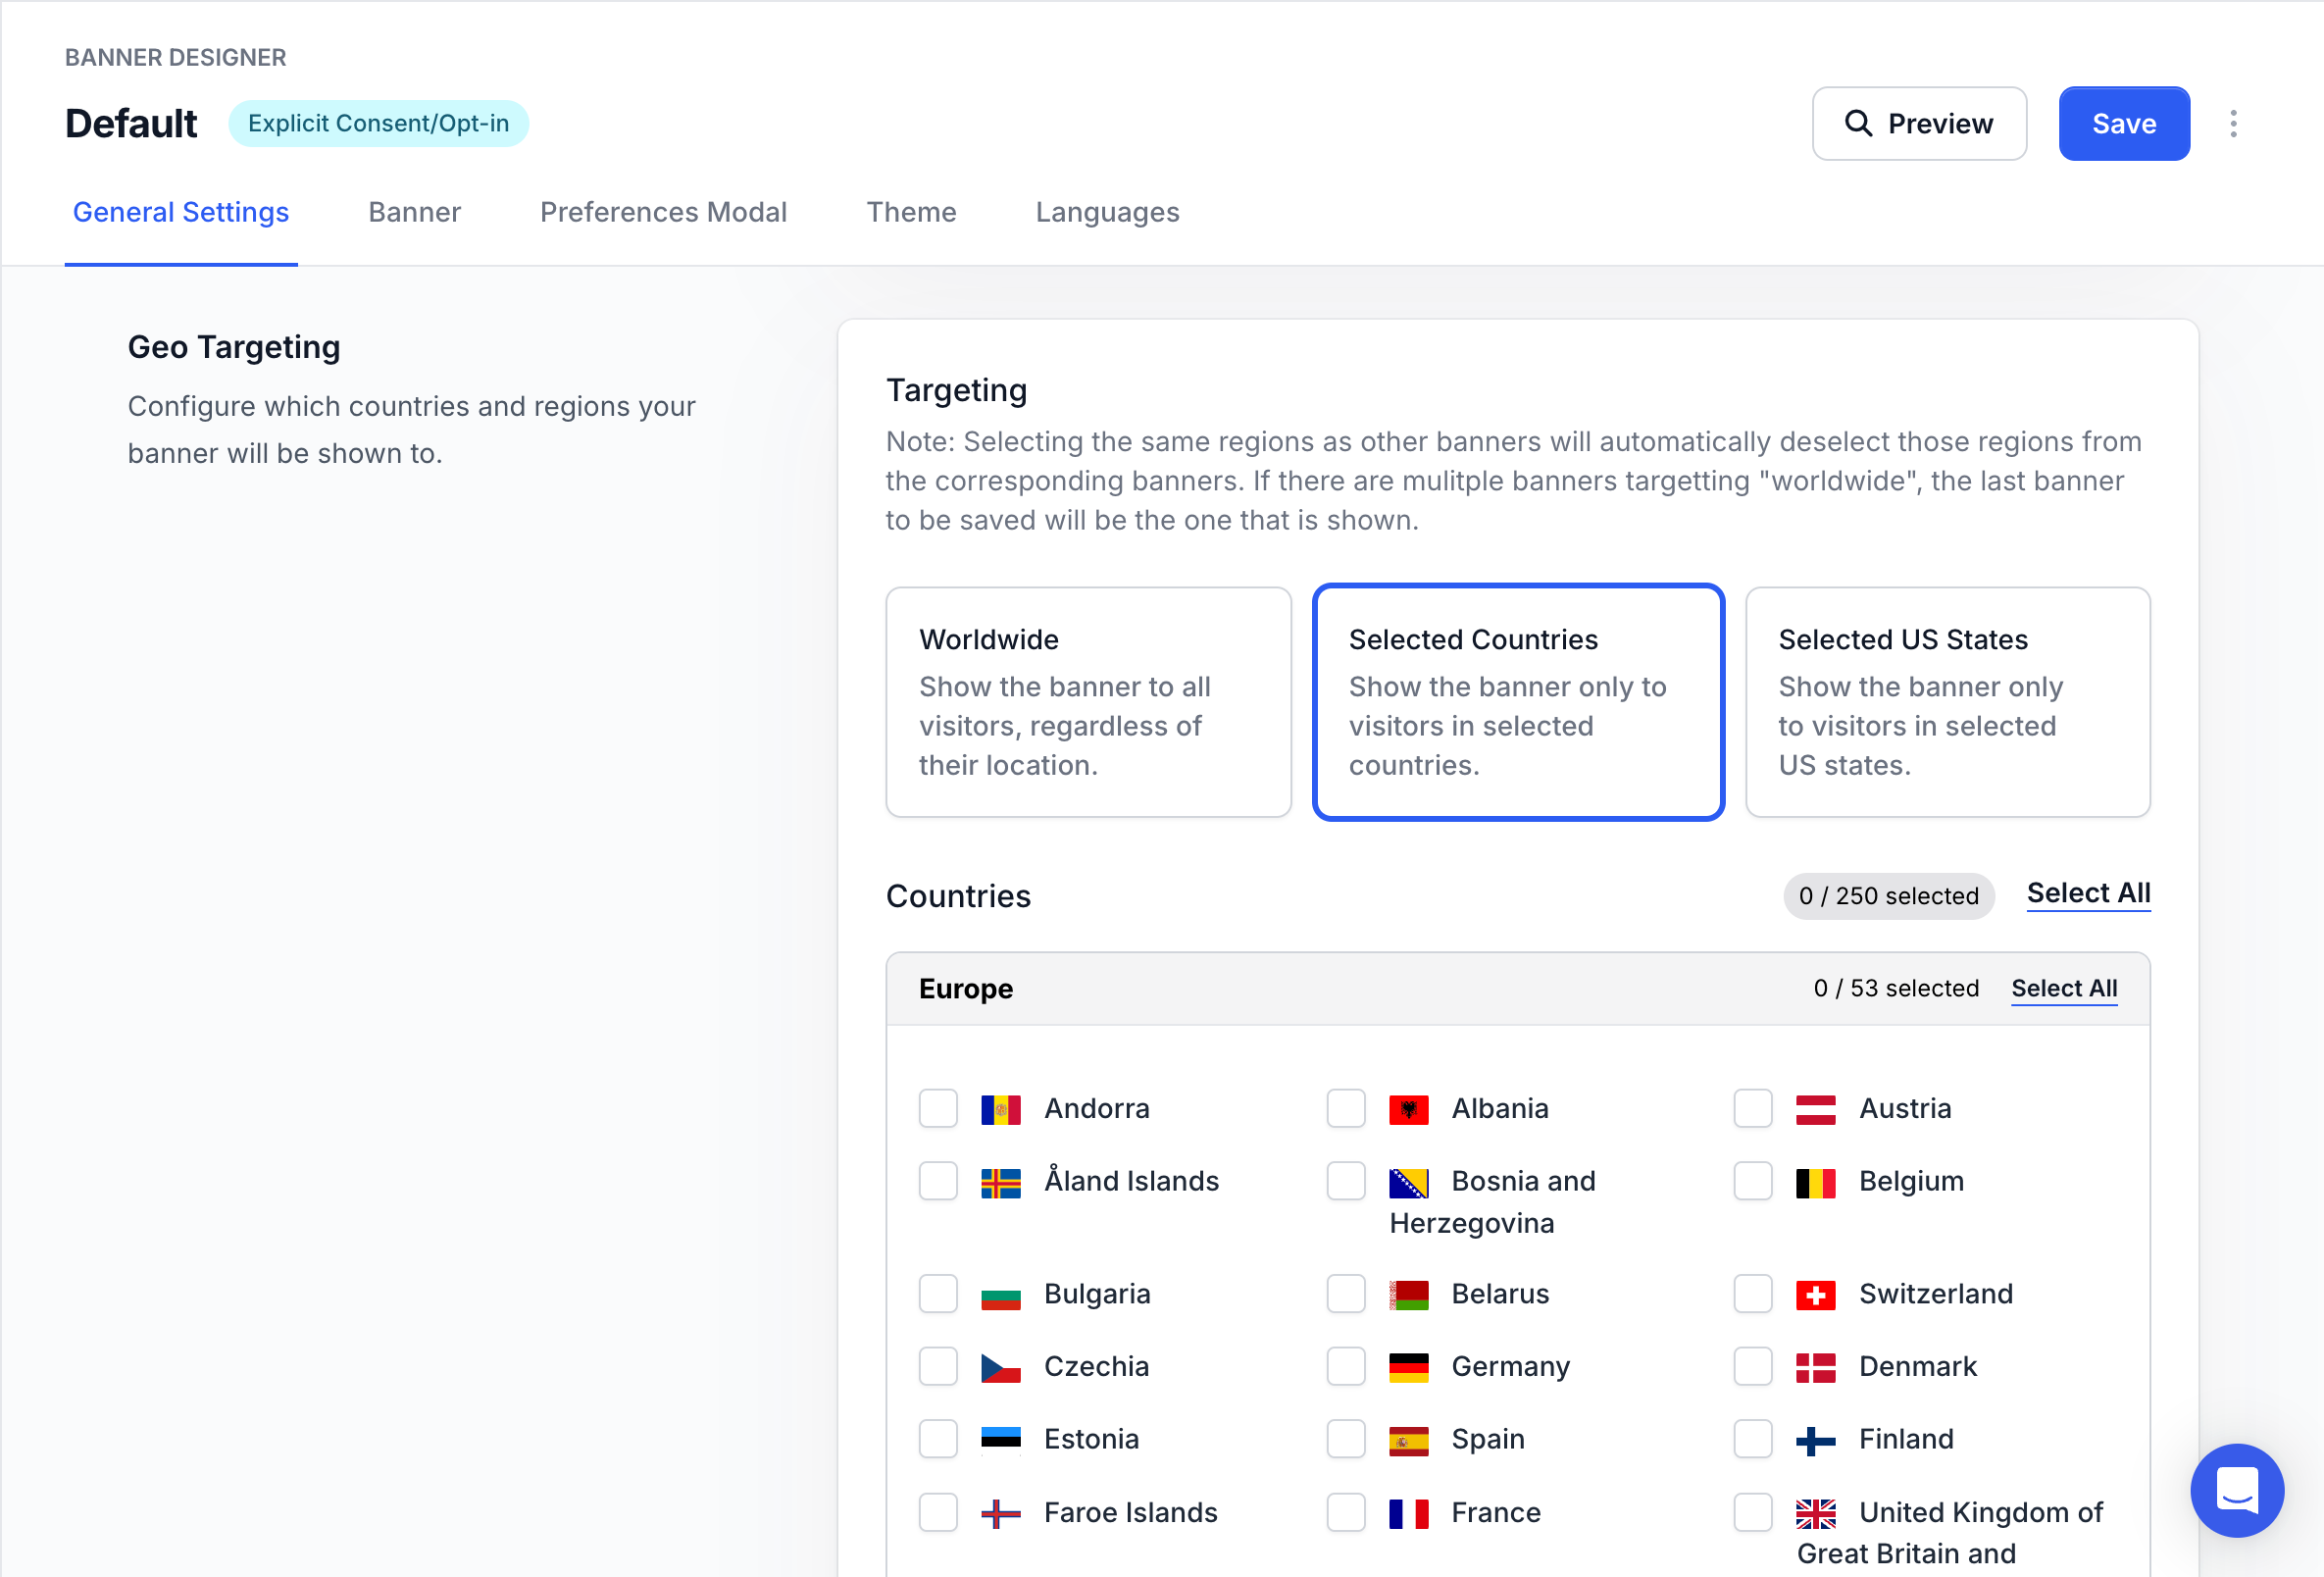
## Geo Targeting
Banners can be configured to show only in specific countries or U.S. states. This lets you create multiple banners customised for different regions and their regulations.
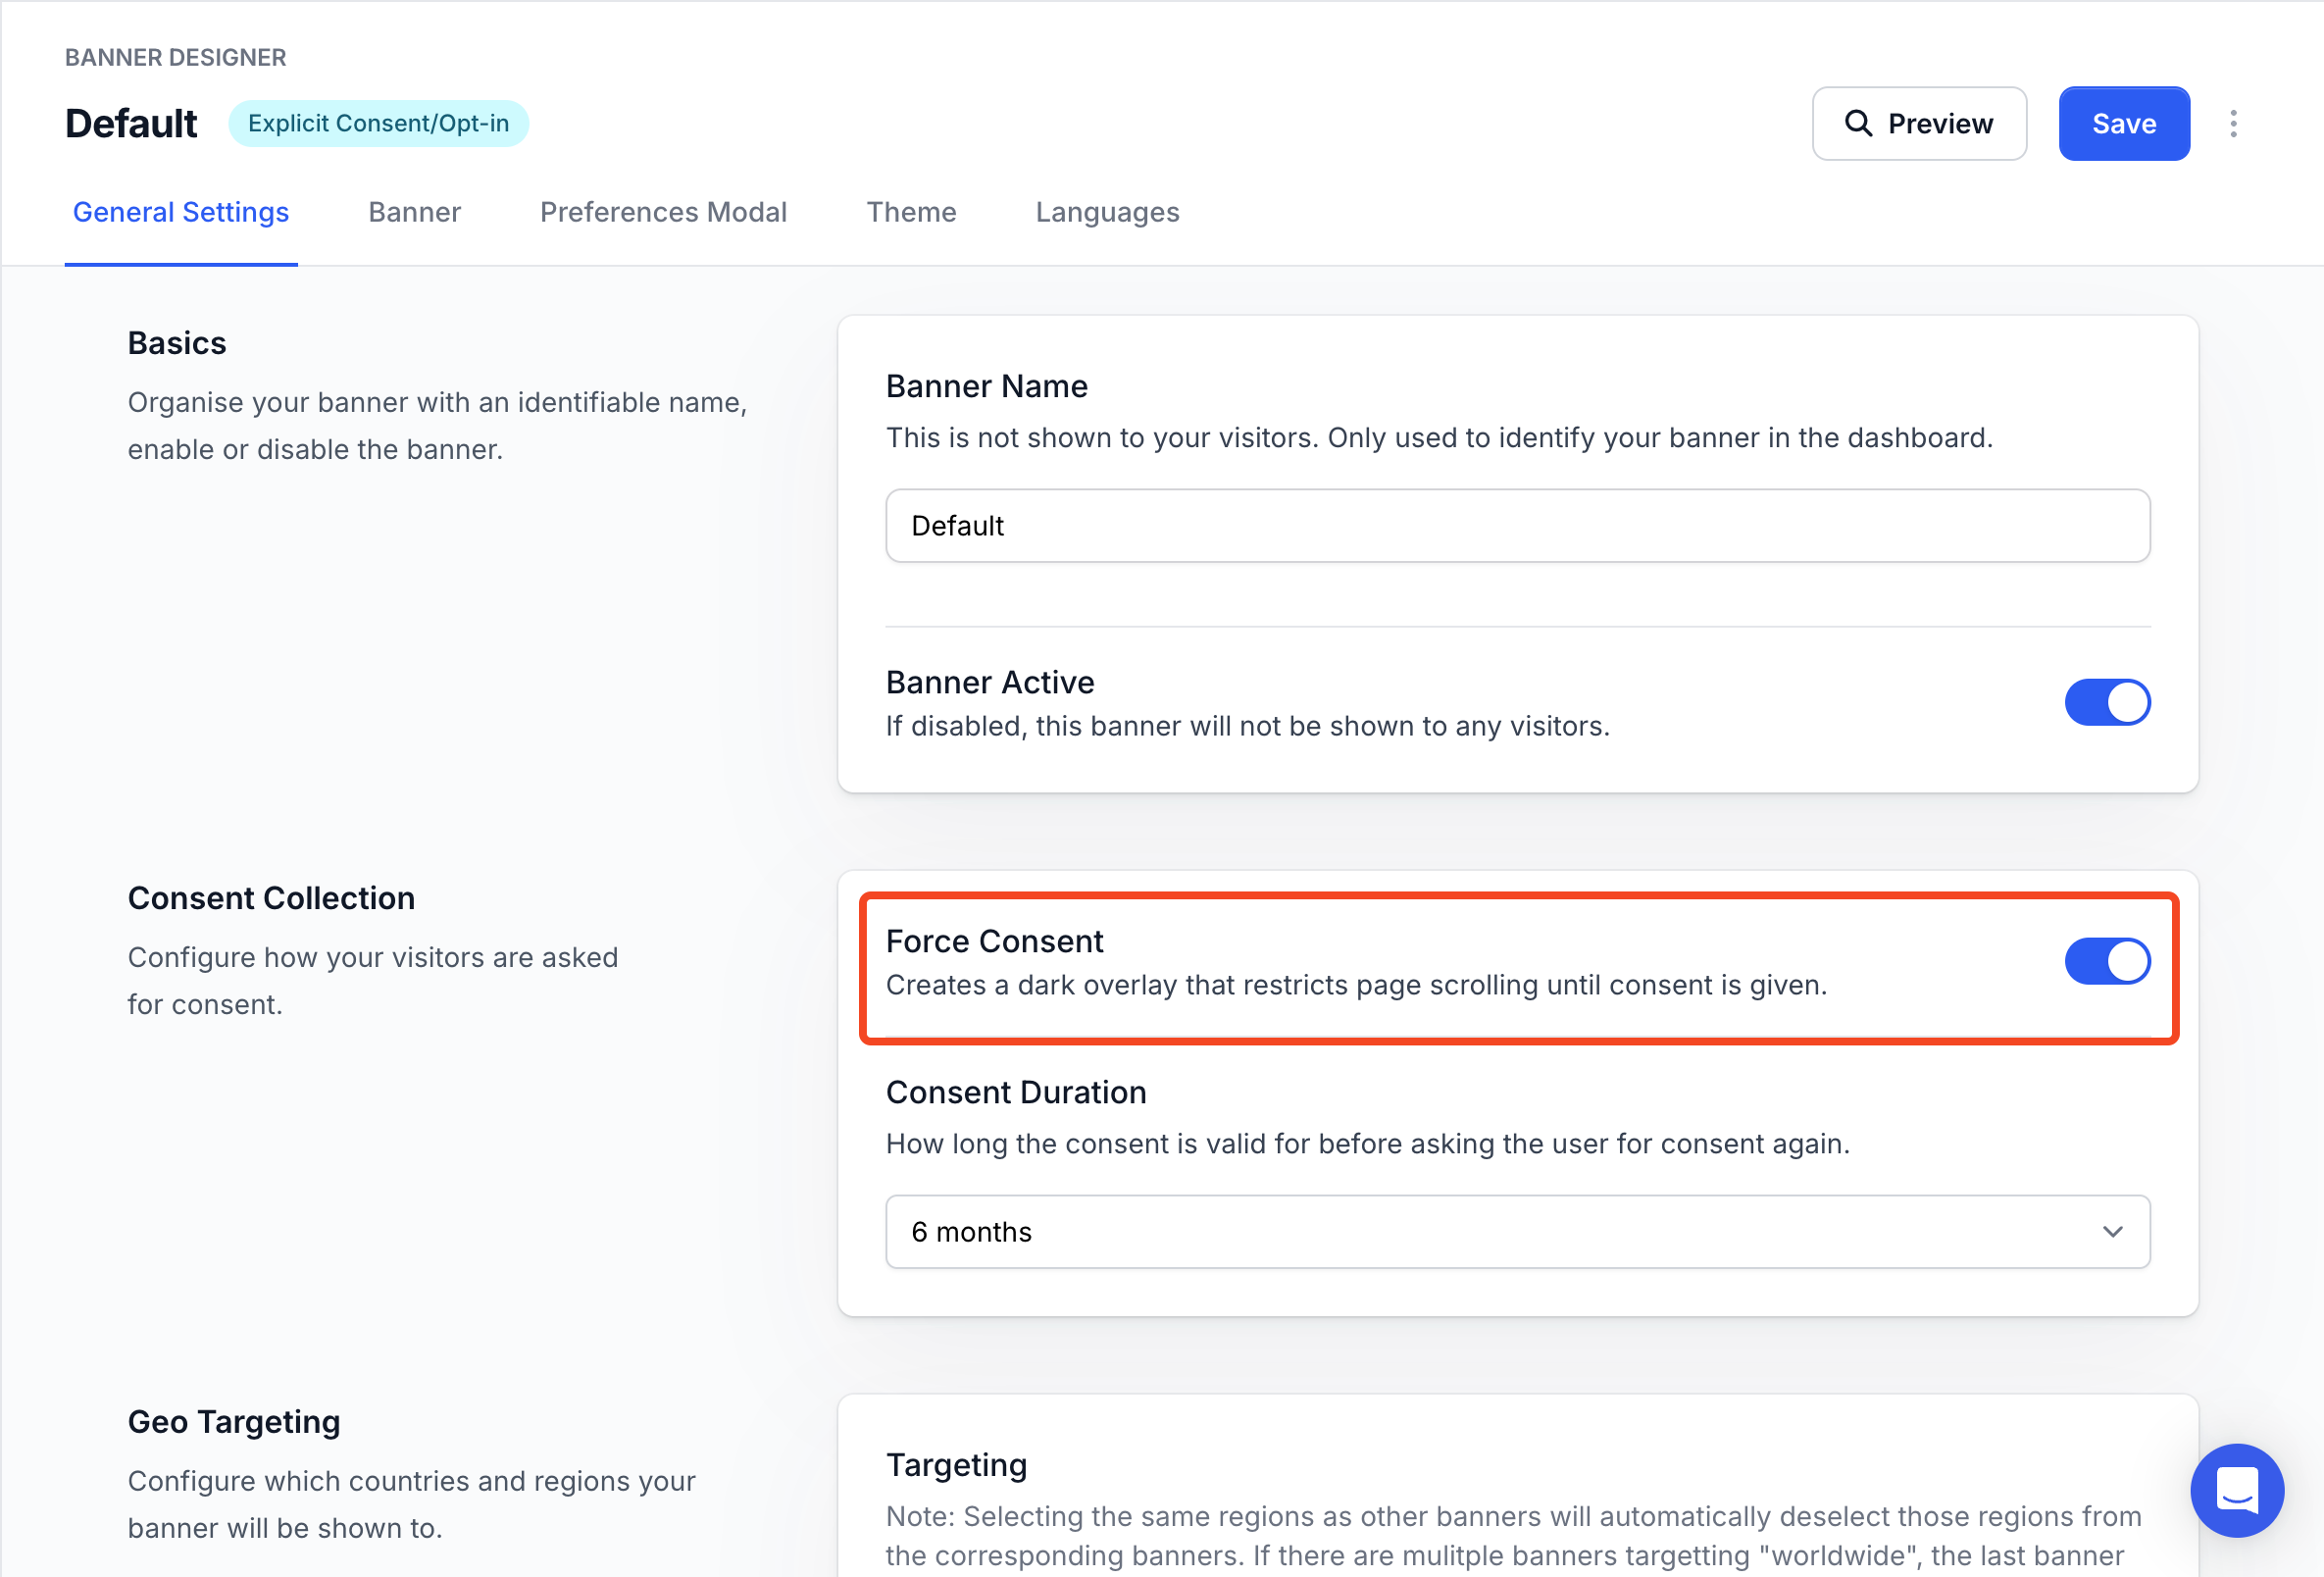
## Force Consent
The force consent option can be toggled to increase consent rates.
When this option is enabled, the user is forced to accept/deny consent before interacting with the website.
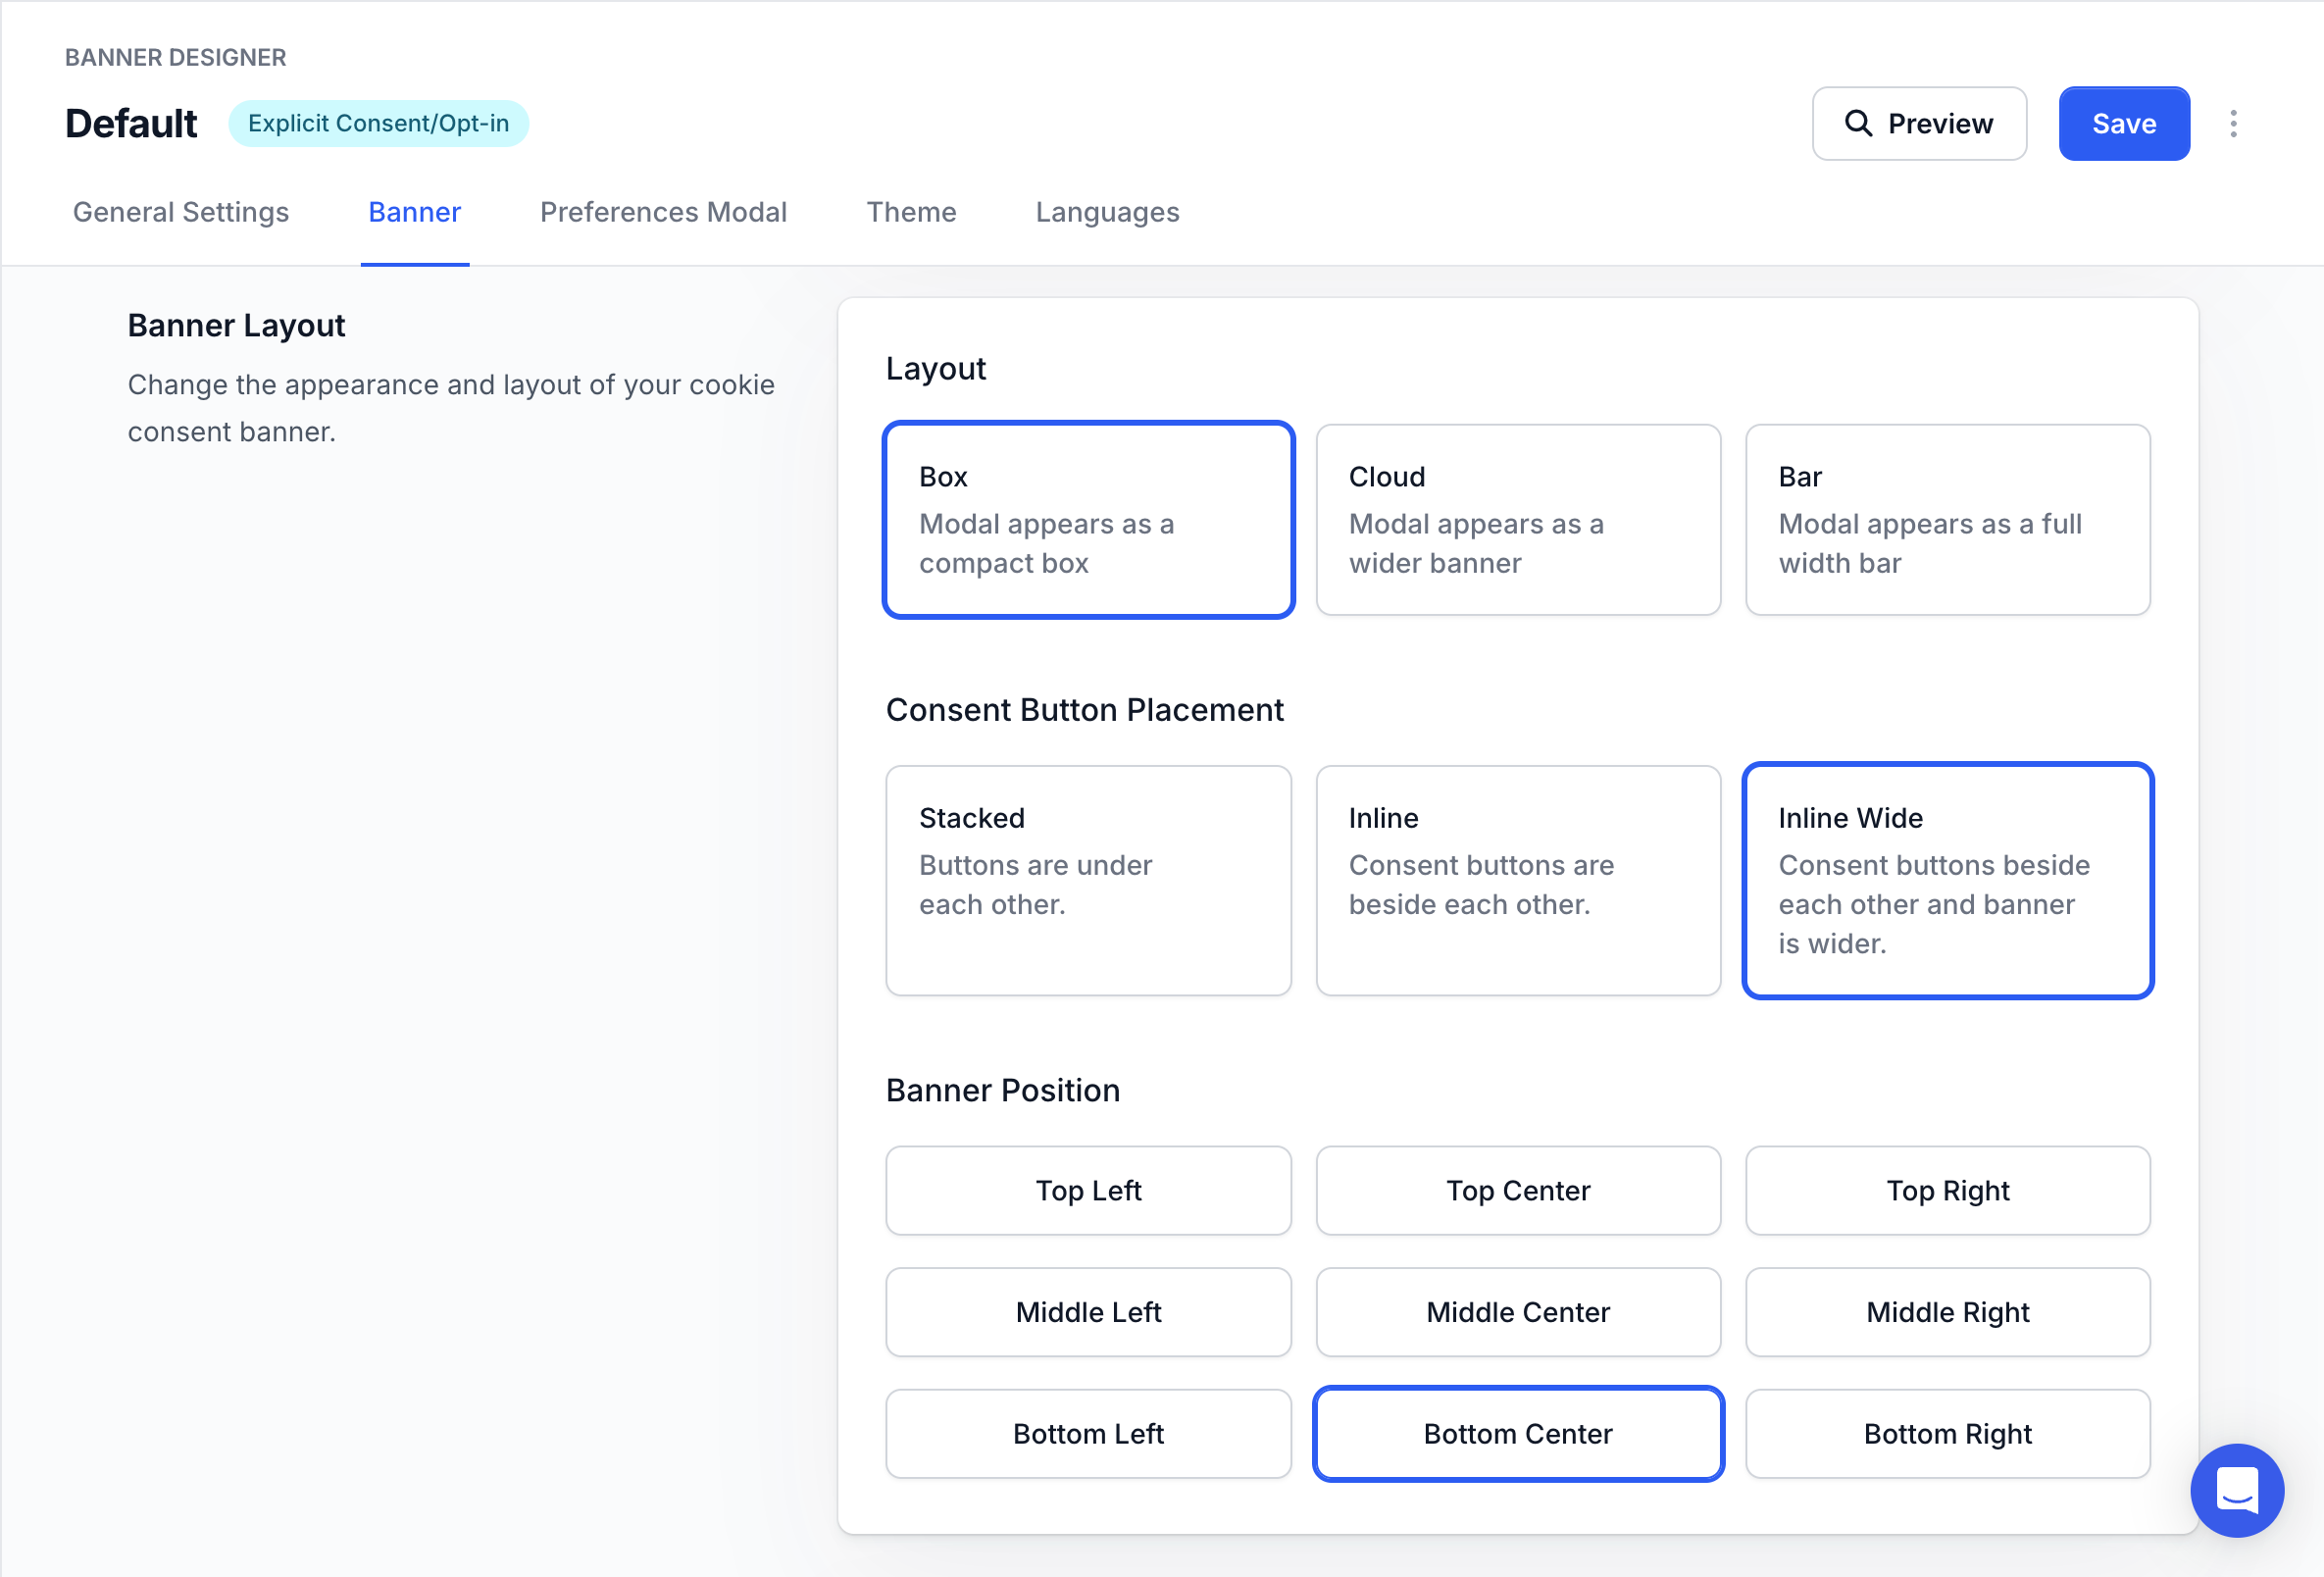
## Layouts
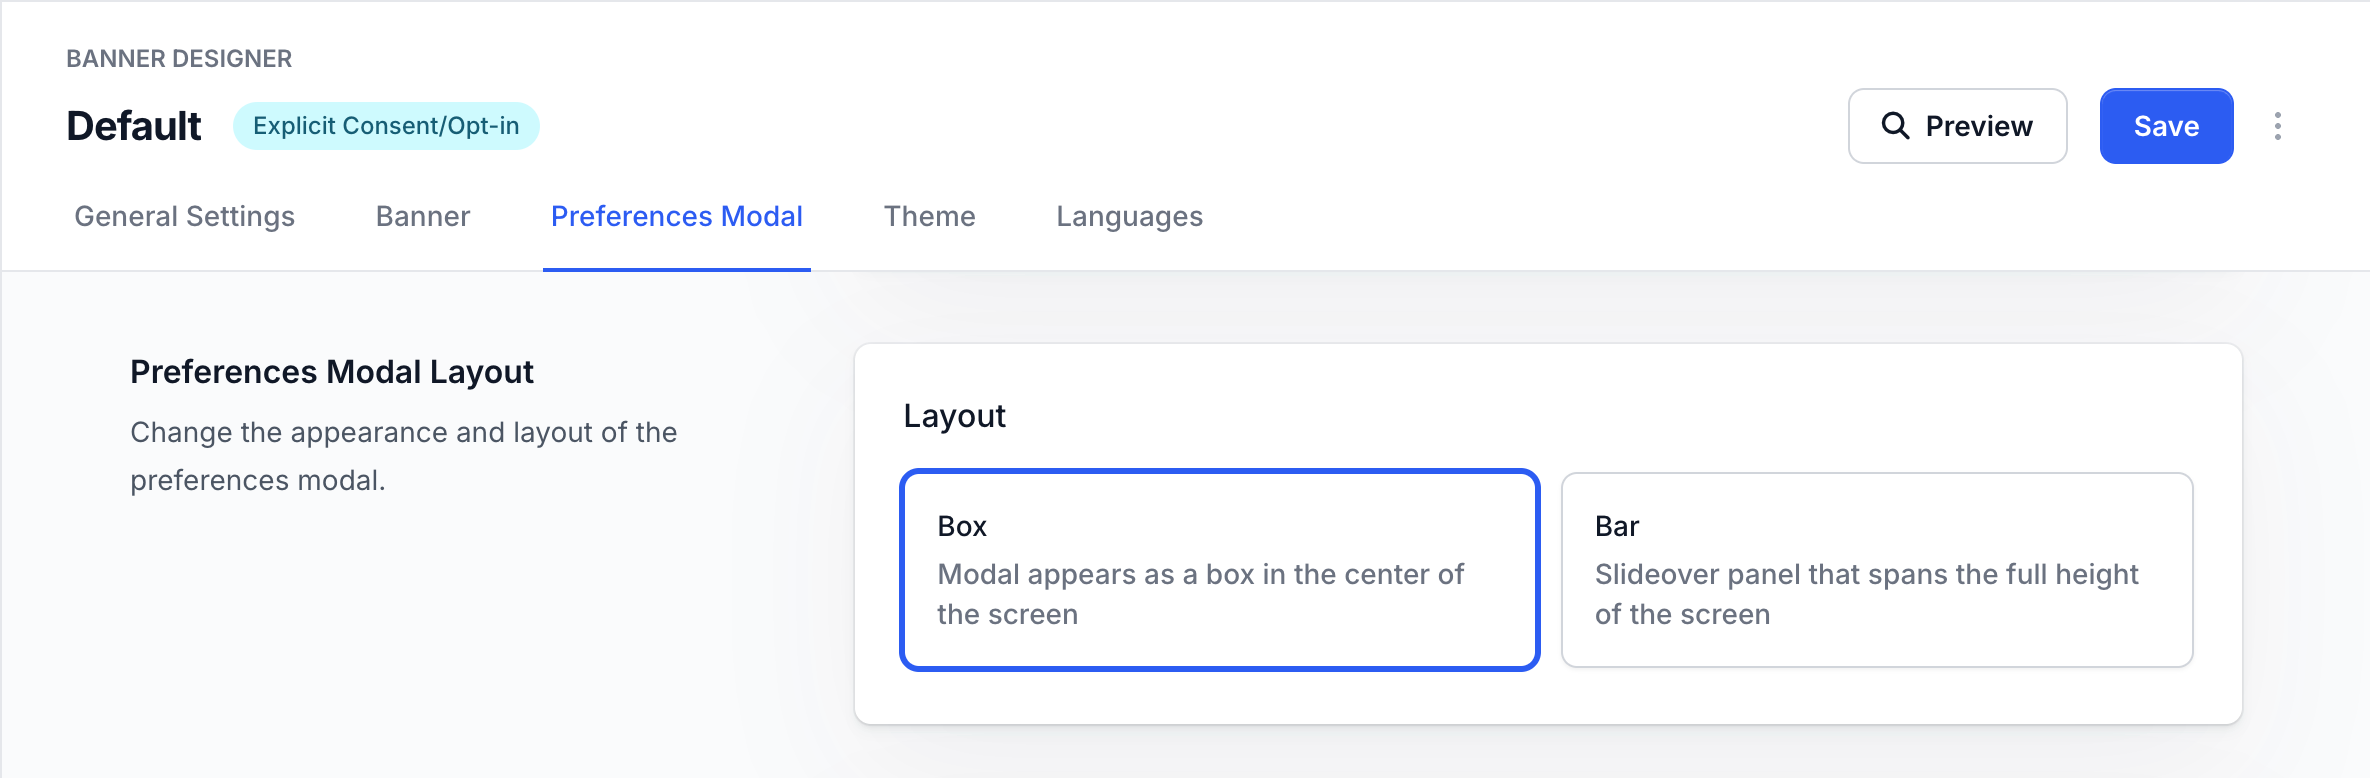
The layout, position and button placement of banners can be customised to fit your website's style.
Similarly, the layout of the preferences modal can also be customised.
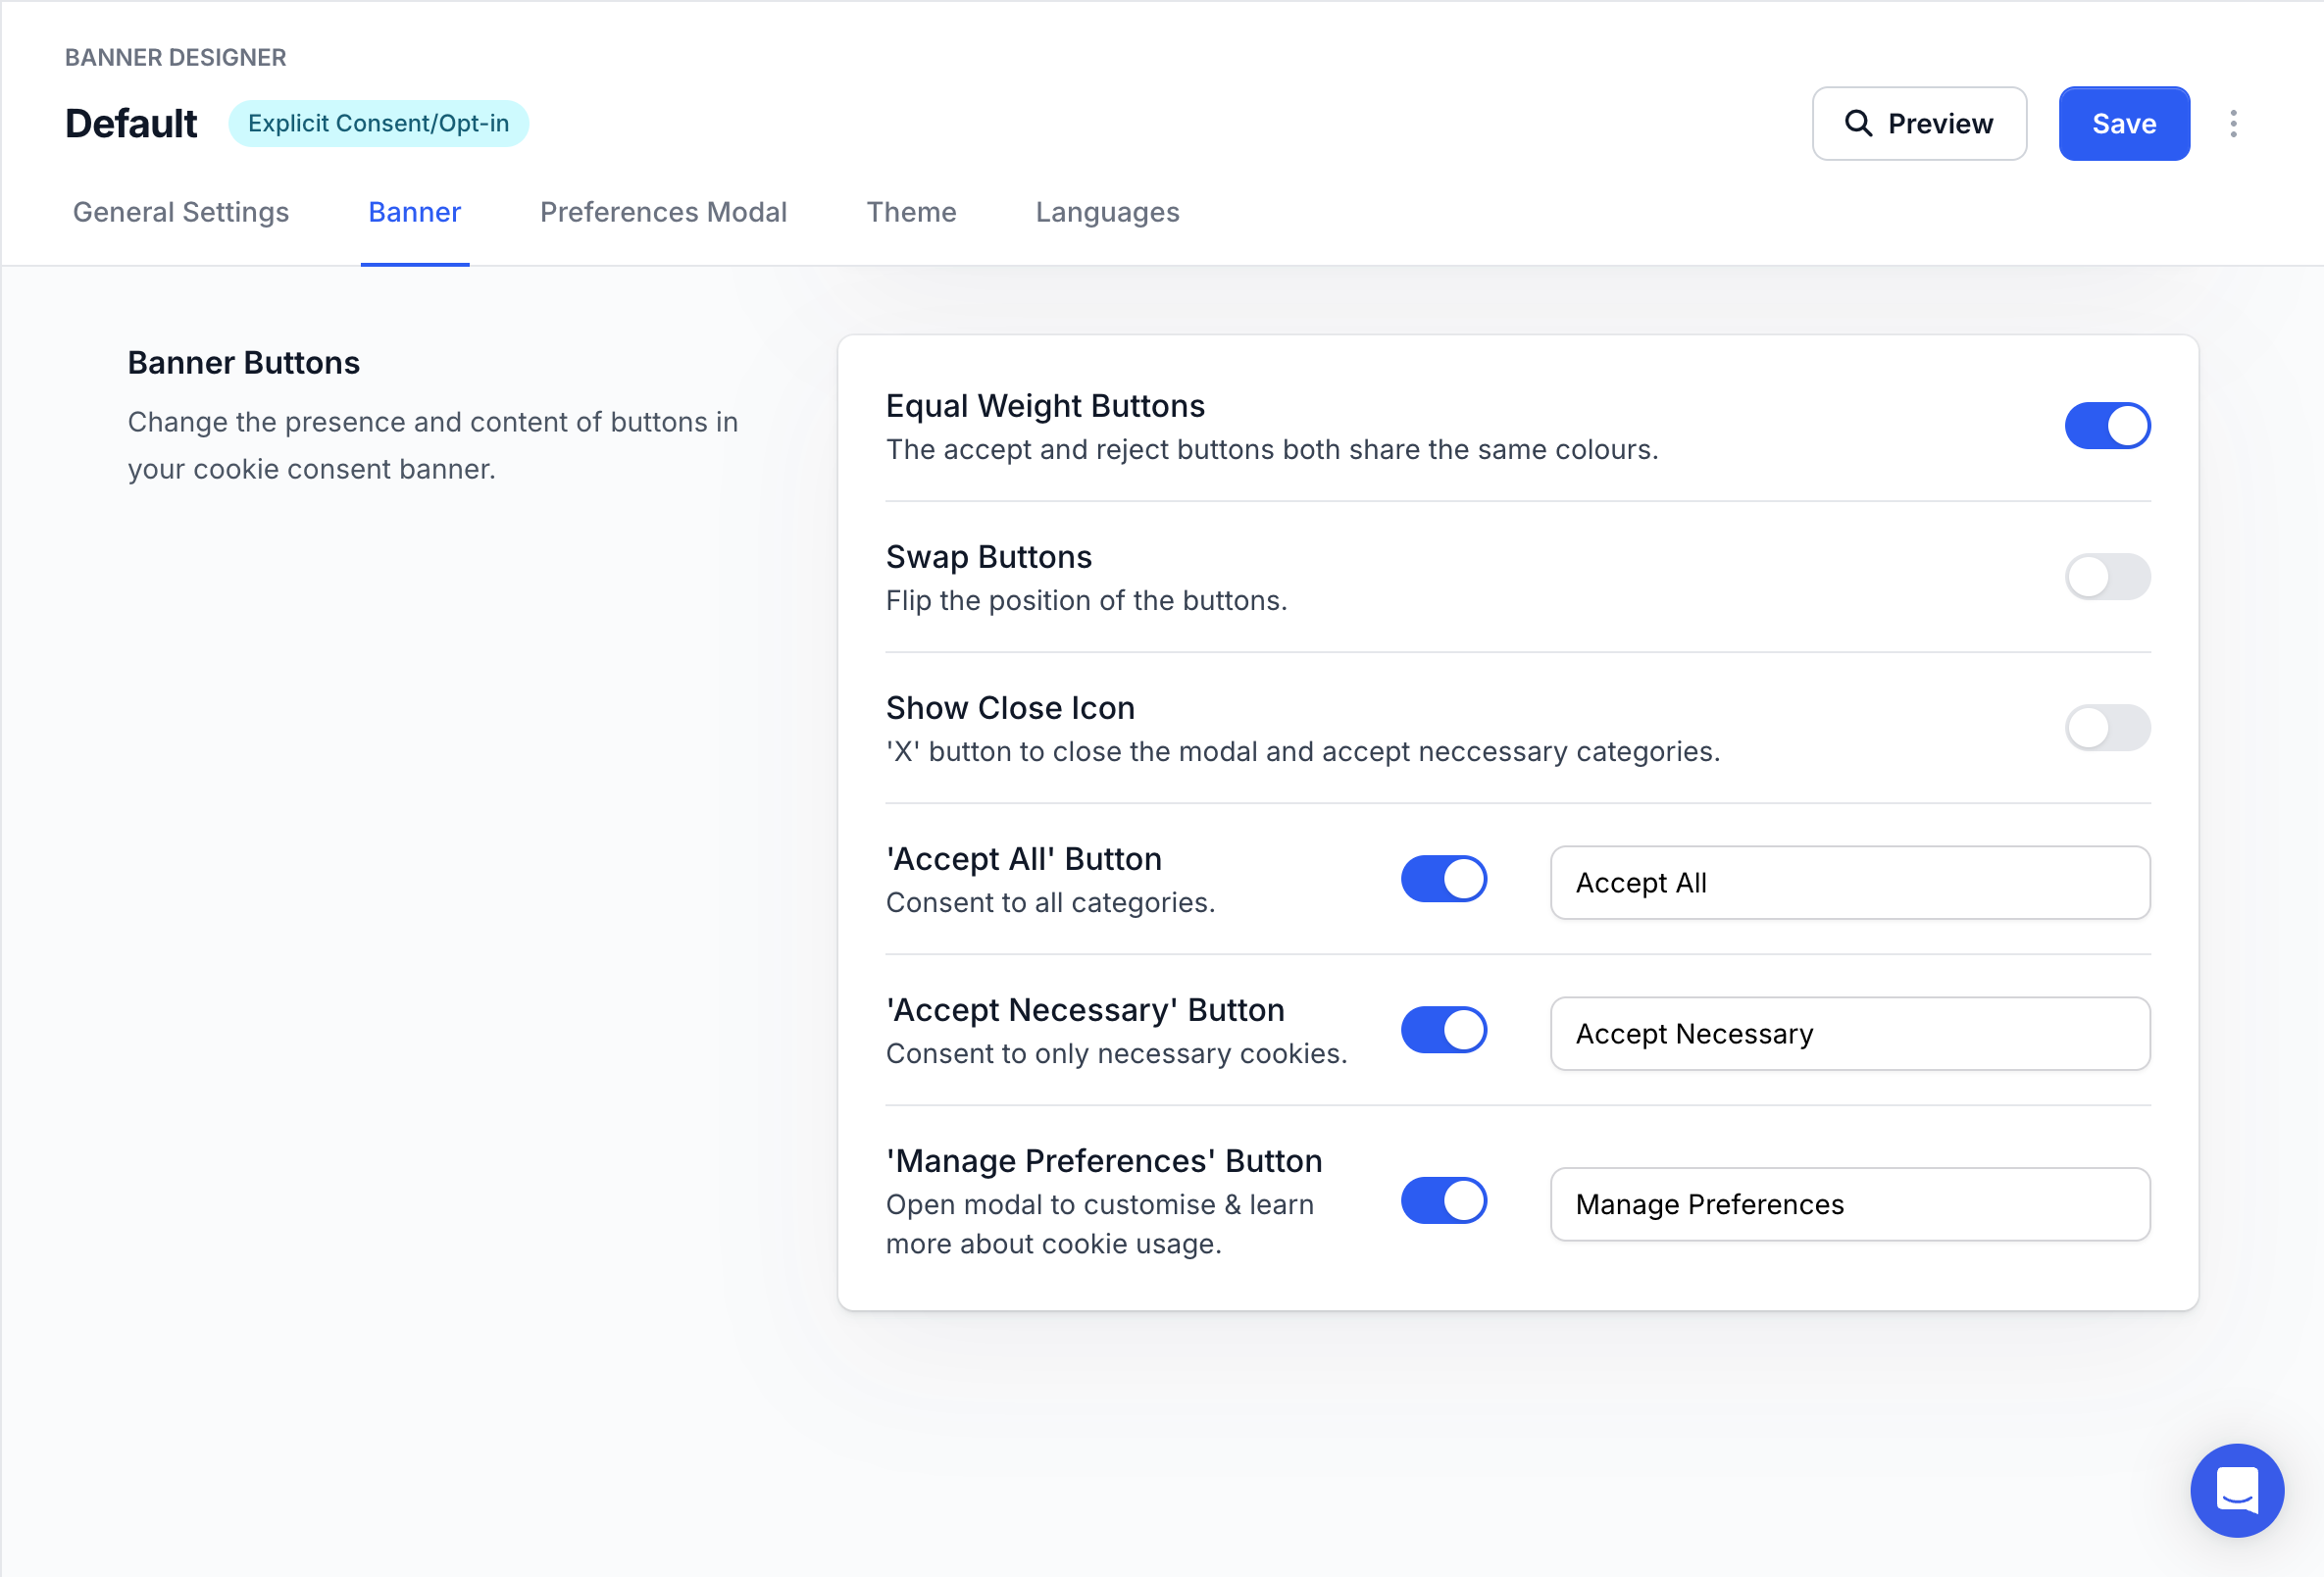
## Banner Buttons
The weights, position and text of banner buttons can be customised.
Some regulations like GDPR require banner buttons to be equally weighted.
Some regulations might require specific text for buttons.
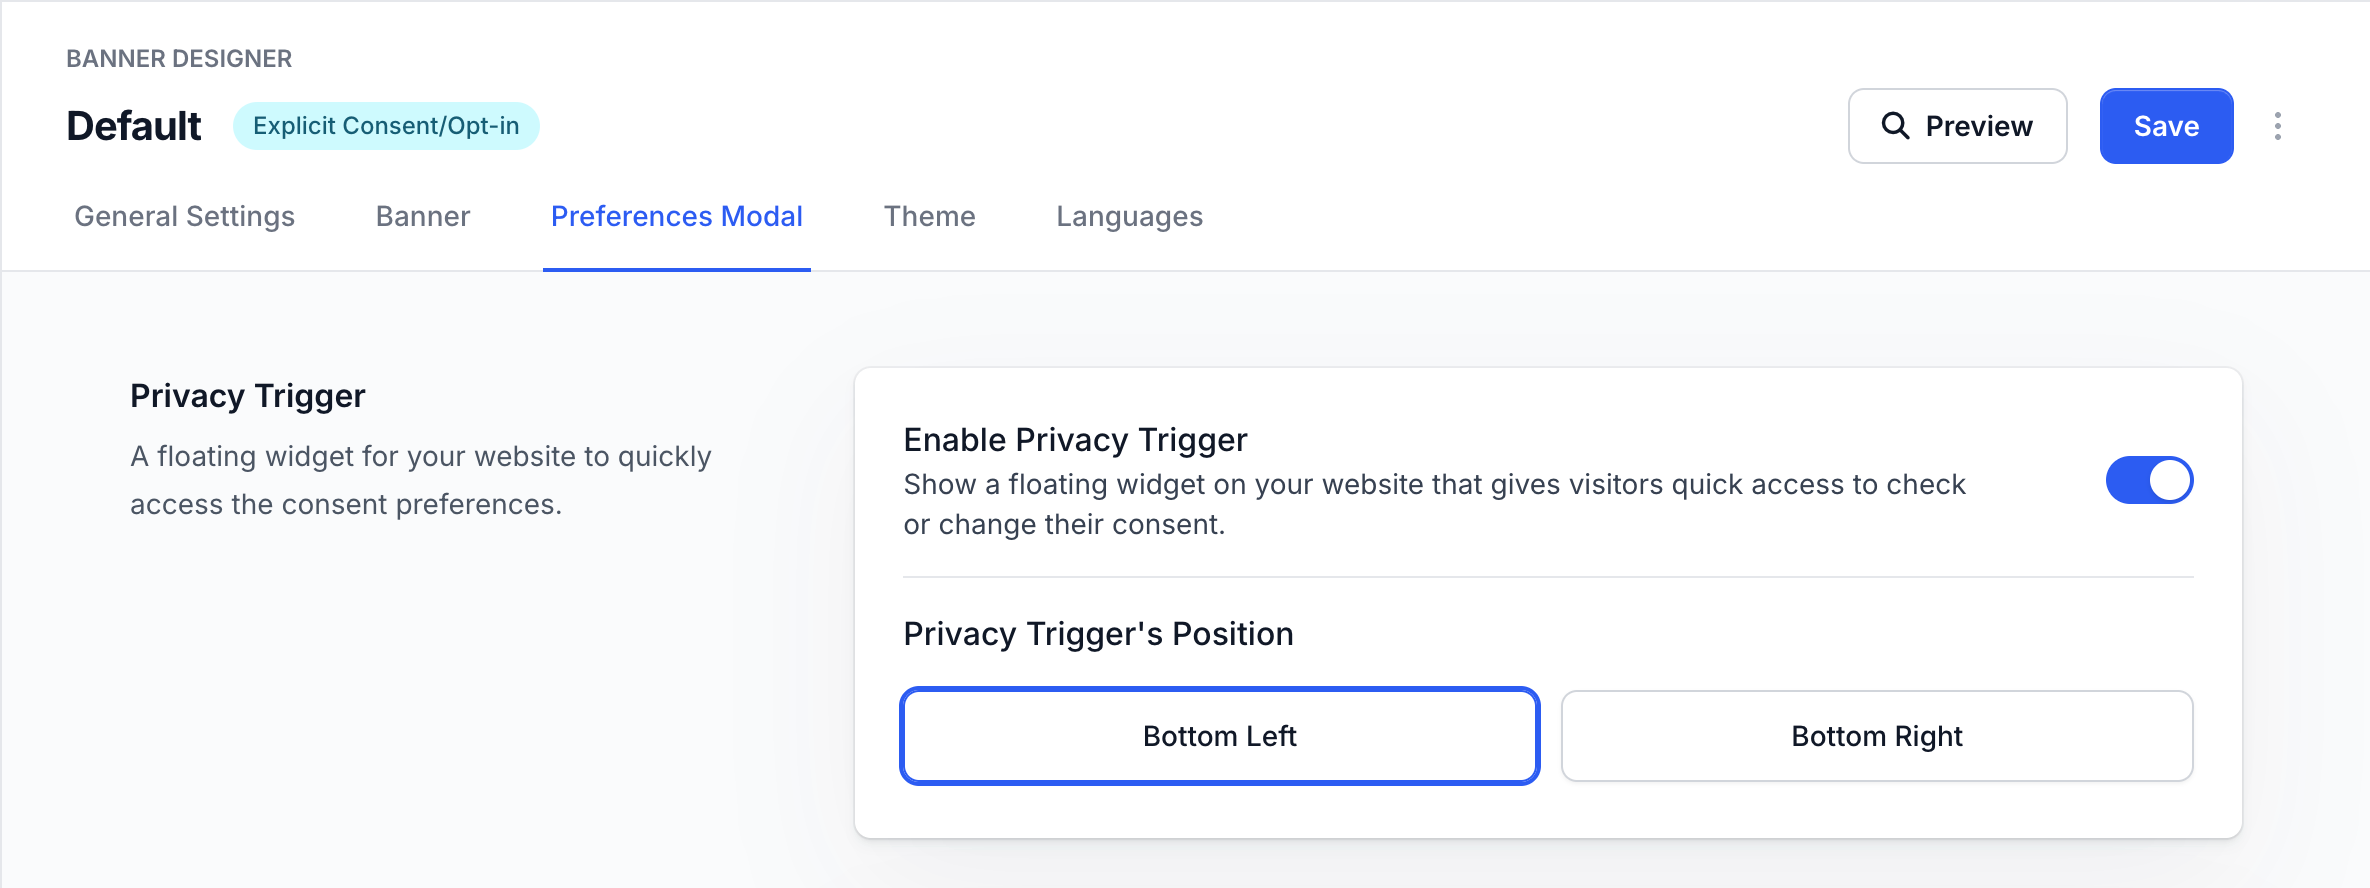
## Privacy Trigger
The privacy trigger is a floating button that allows users to update their consent preferences at any time.
This can be enabled/disabled and its position can be customised.
Most regulations mandate that users must be able to update their consent preferences after giving their initial consent.
You can enable this using our Privacy Trigger or by [adding your own button or link](/docs/advanced/callbacks-events#showpreferences) to open the preferences.
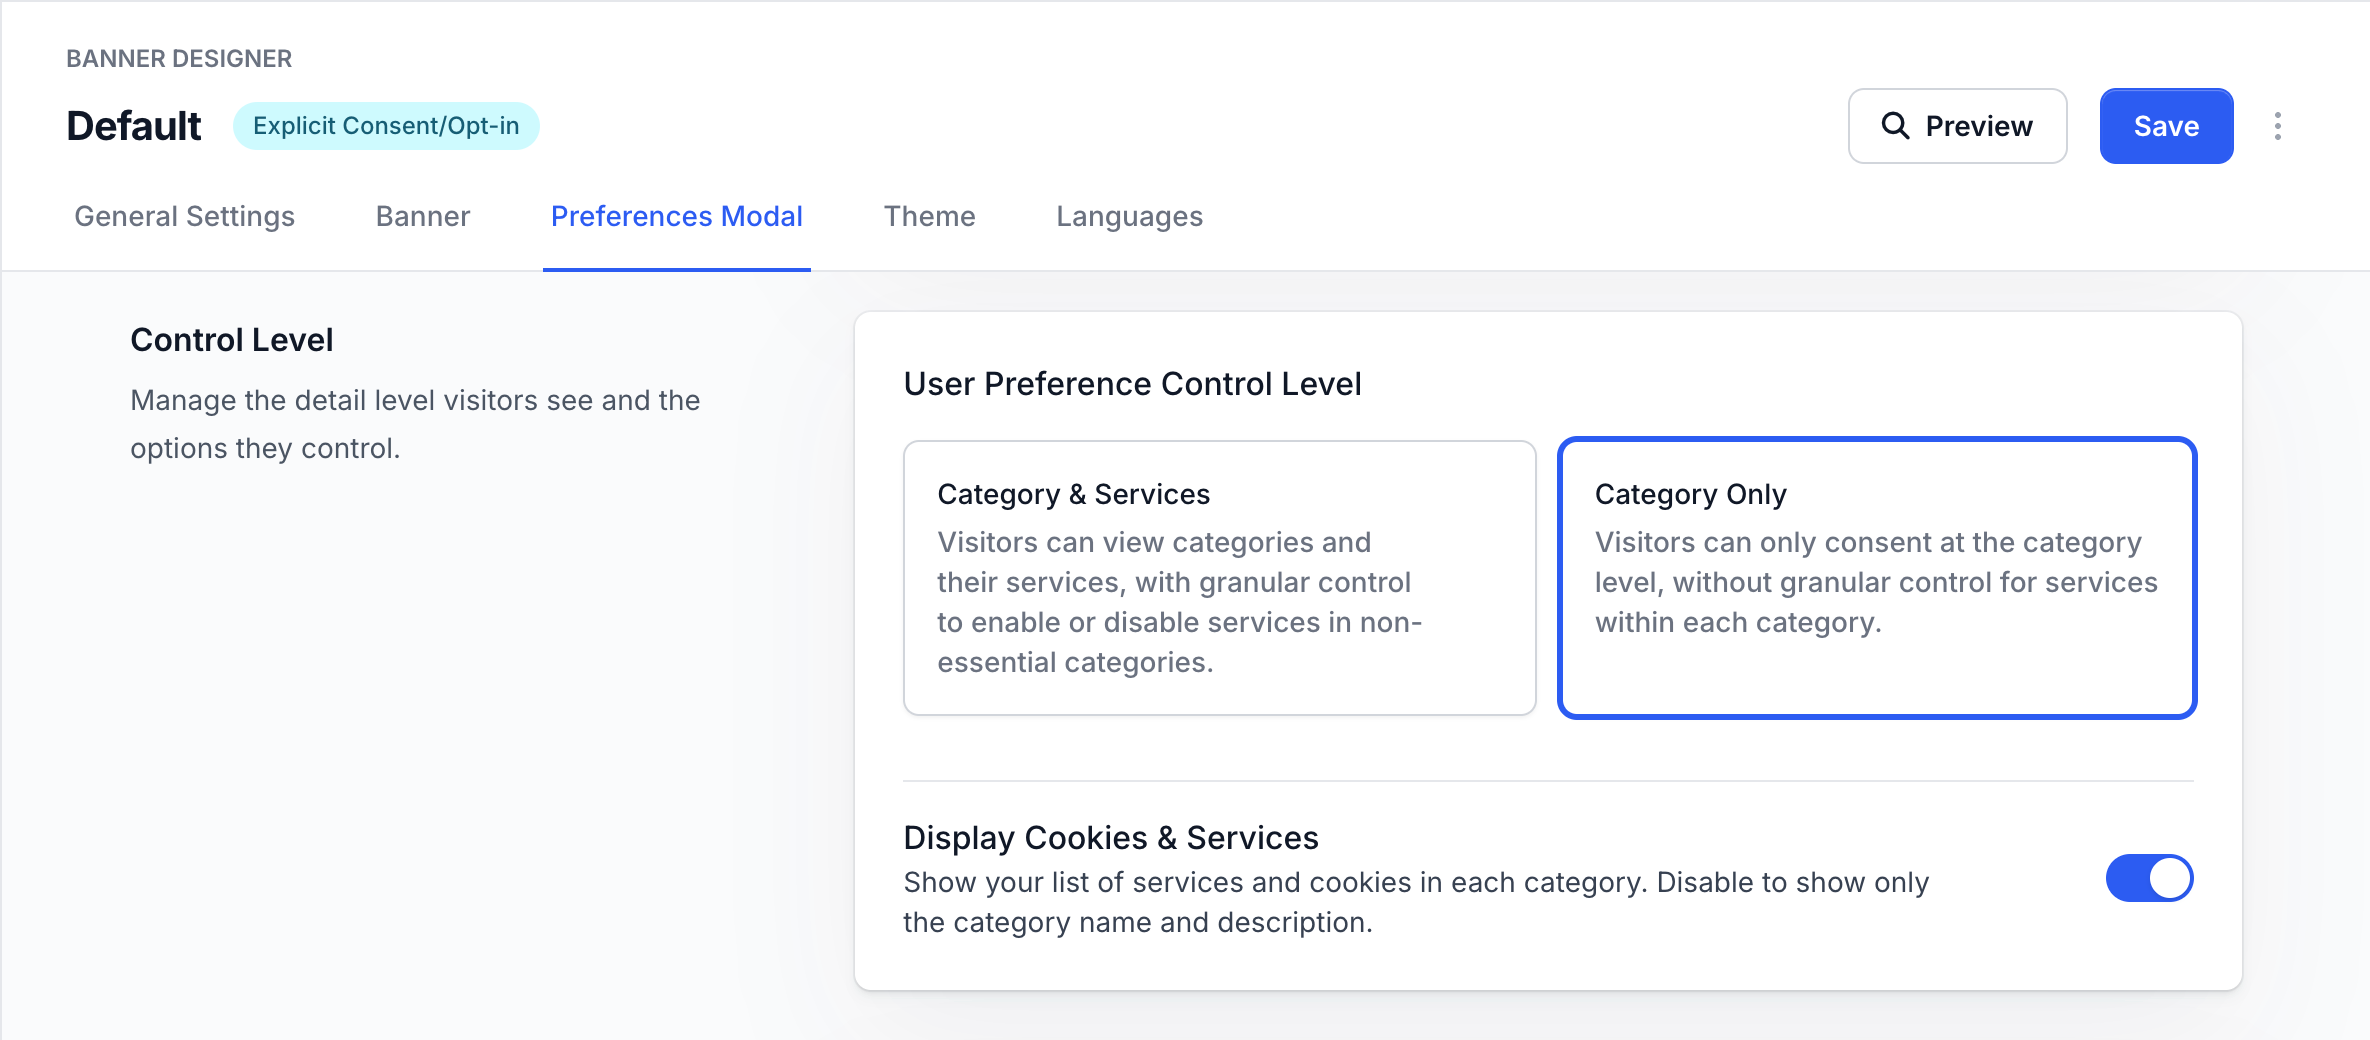
## Preferences Control Level
The preferences modal can be customised to only show categories or to show their services and cookies and allow users to have more granular control.
Some regulations require all storage items and services to be shown.
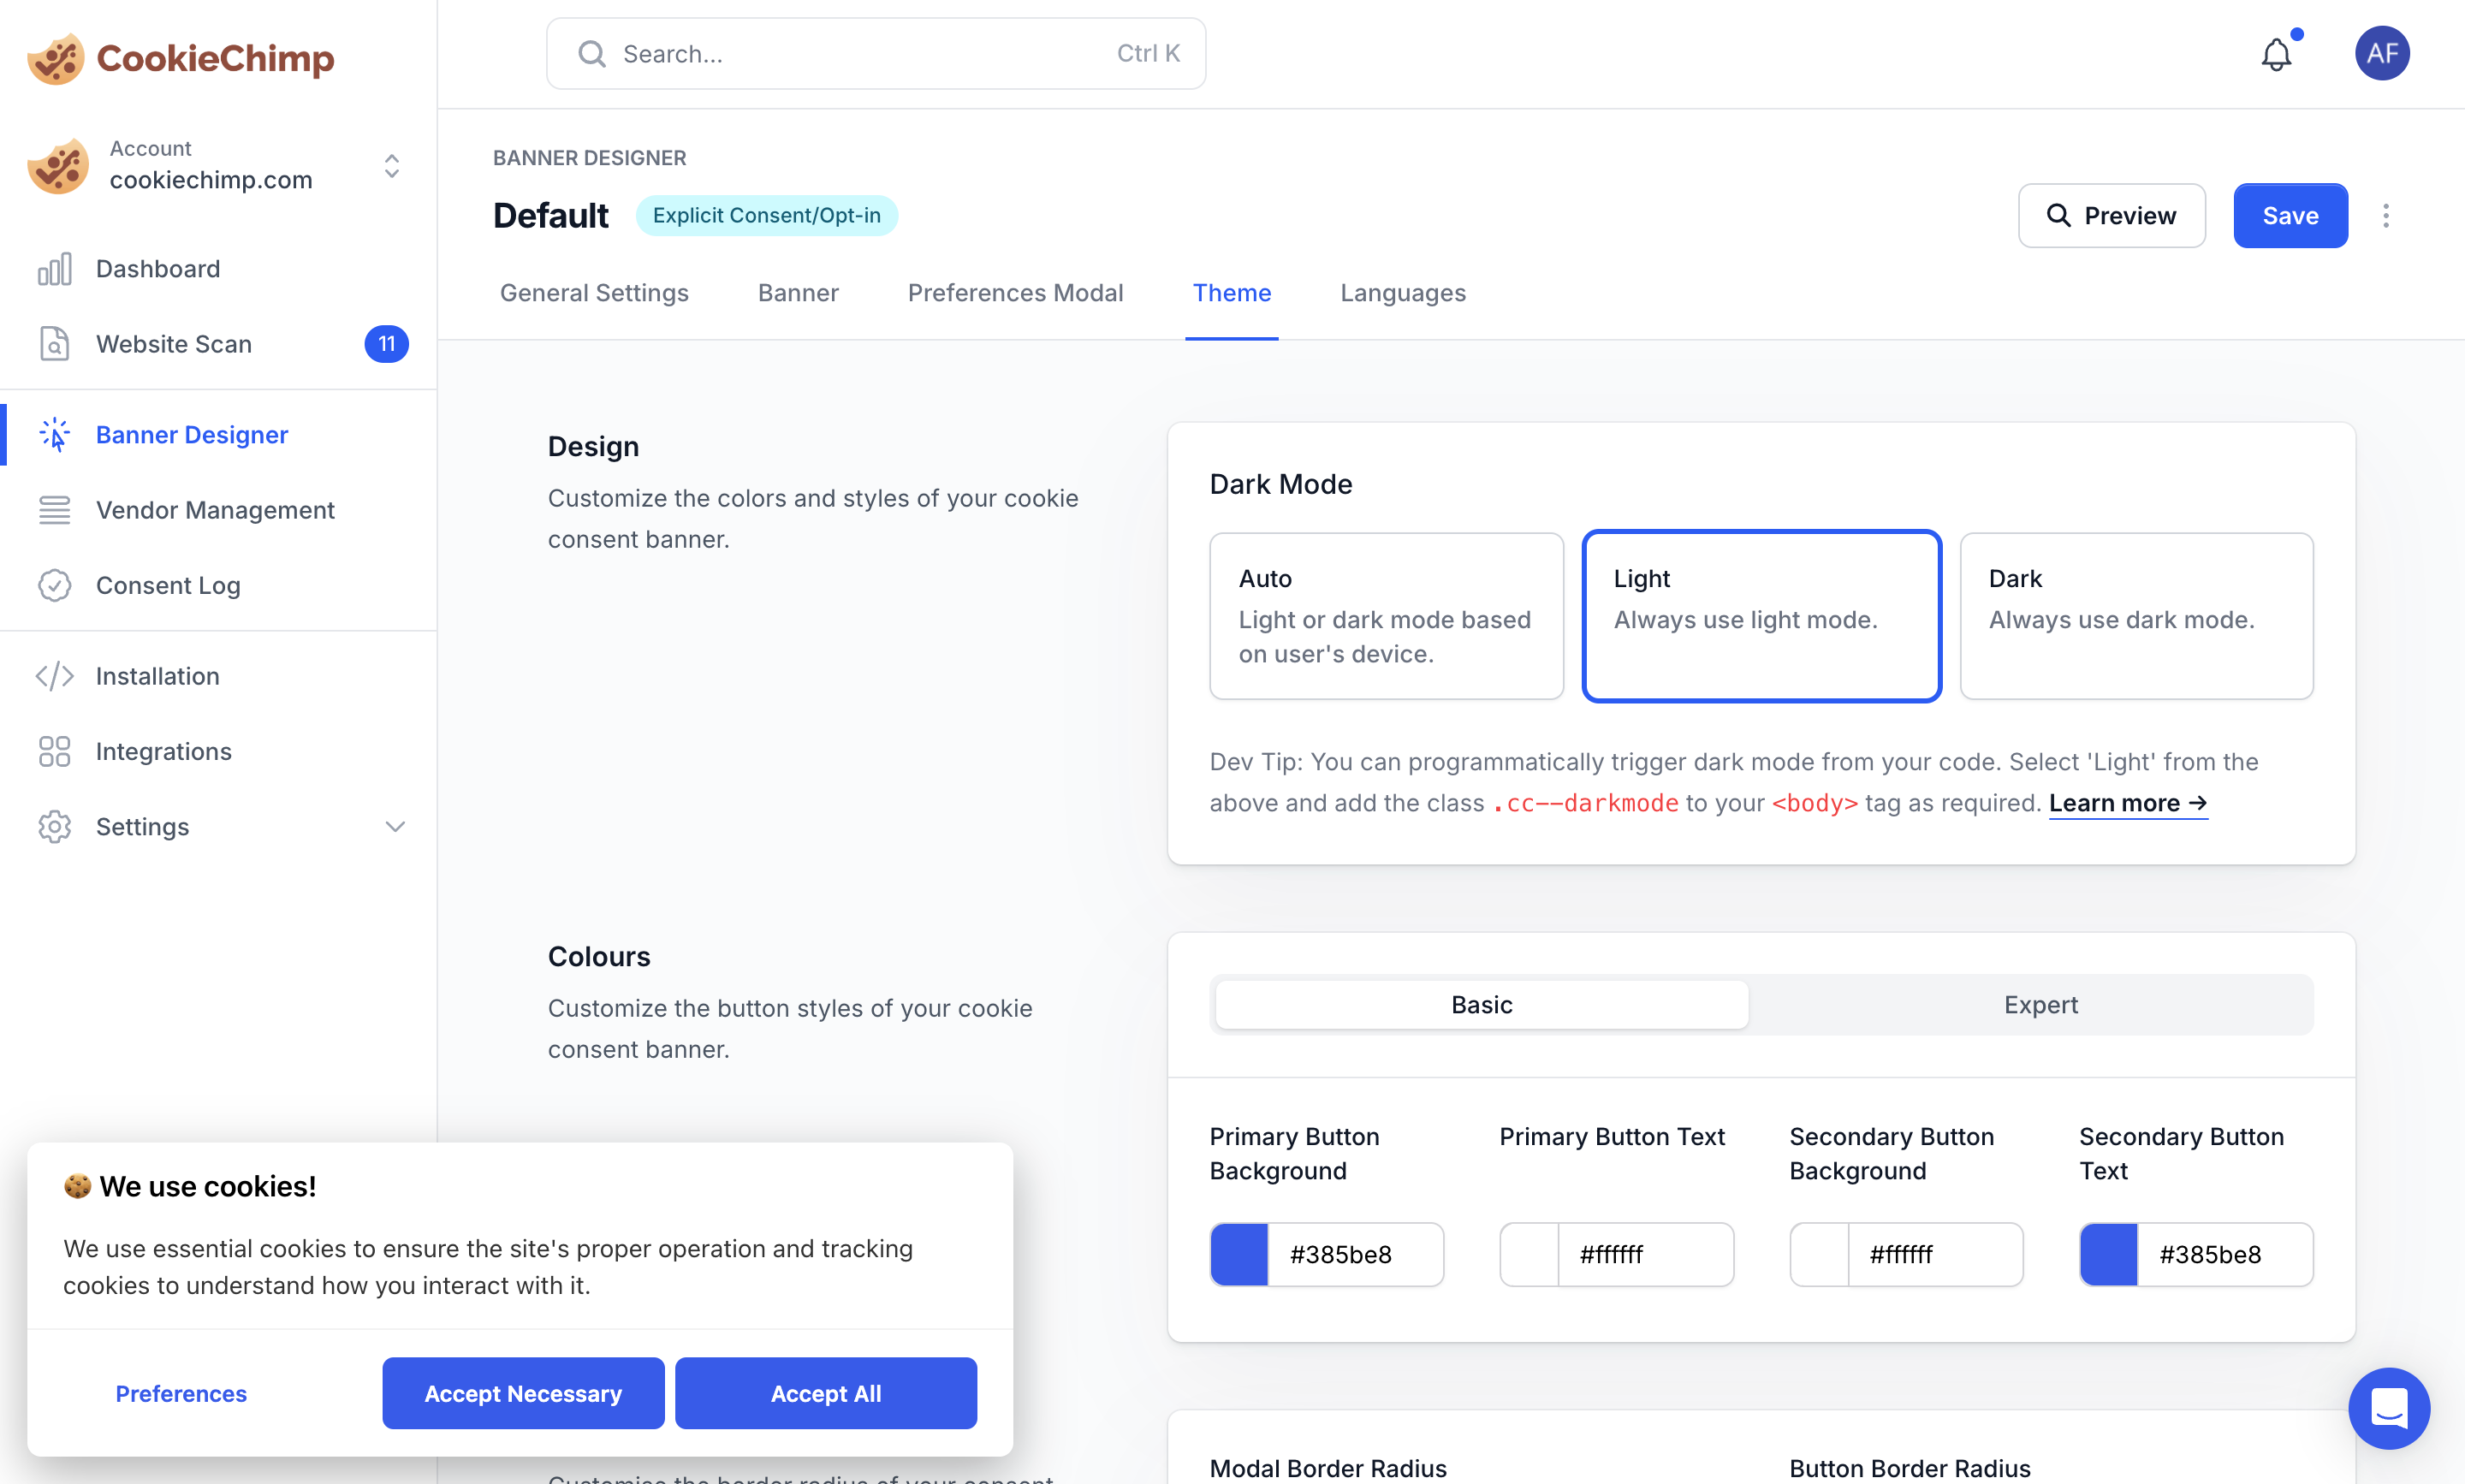
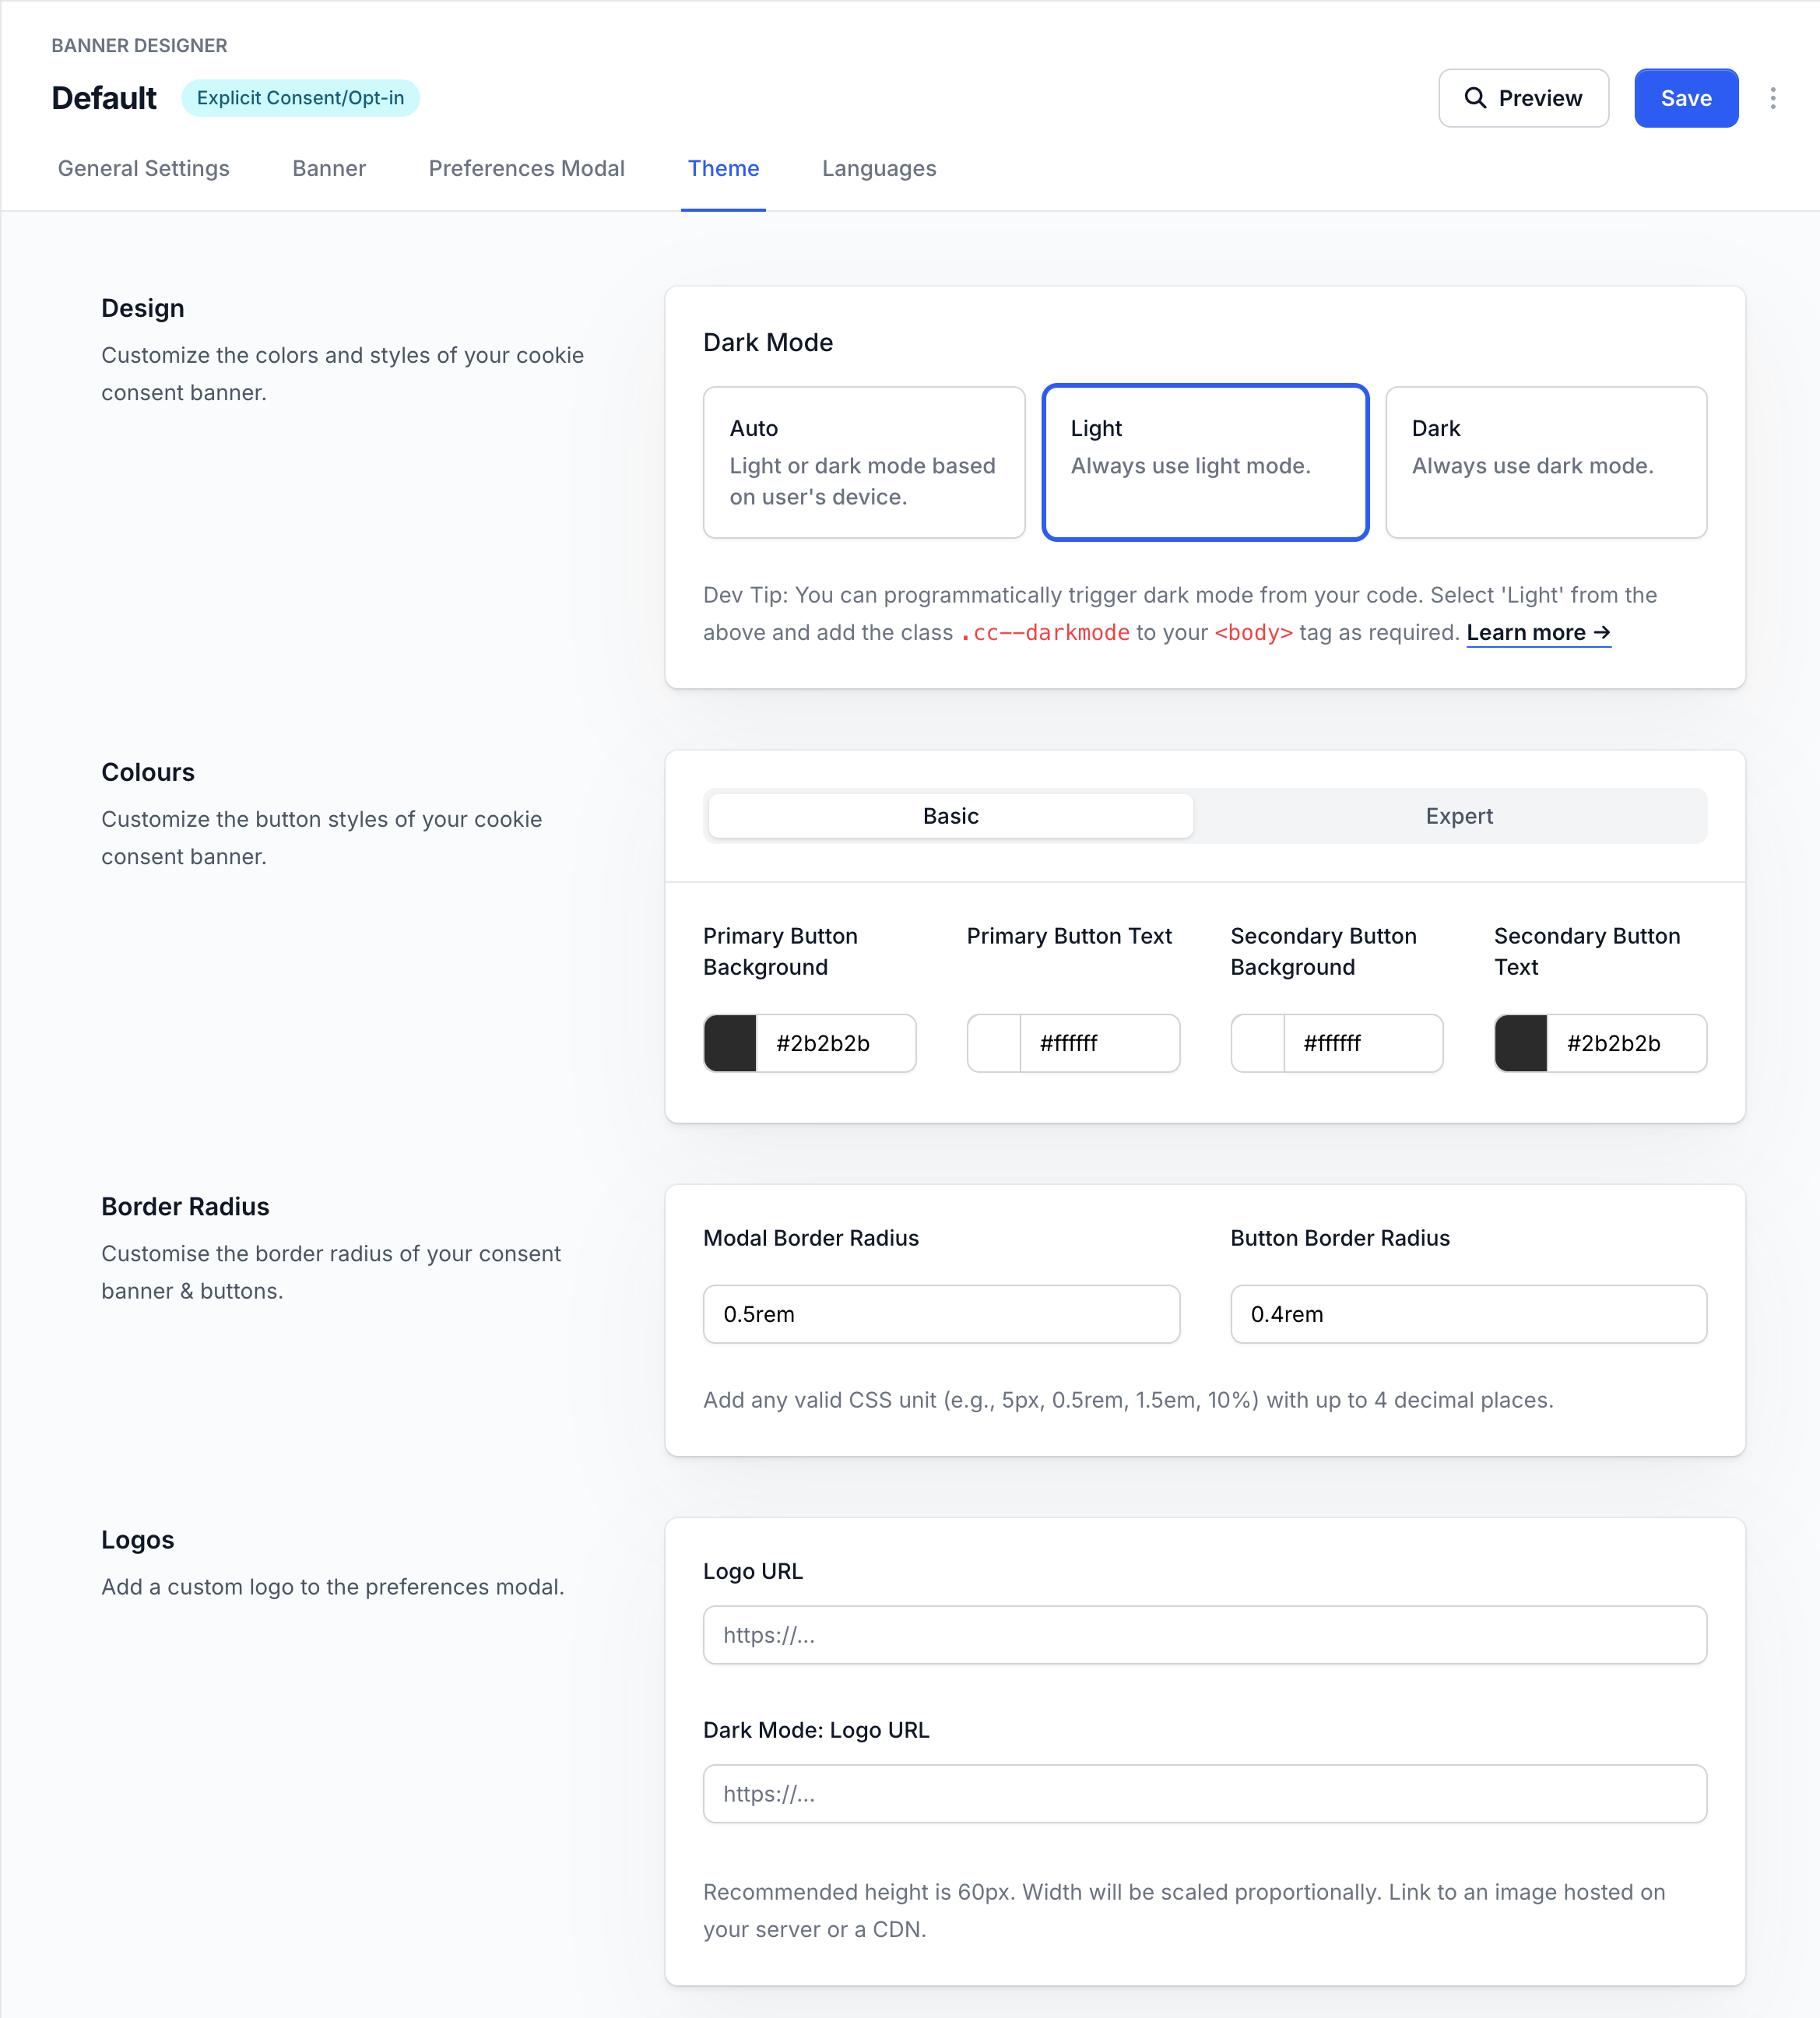
## Theme
The banner's appearance can be customised with various theme options:
* Dark/Light mode - Choose between light, dark, or auto mode that follows the user's system preferences
* Colors - Customise the banner's primary colors, text colors, and button colors to match your brand
* Border radius - Adjust the roundness of corners on the banner, buttons and modal
* Logo - Add your company logo to reinforce brand identity
These theme settings apply to both the consent banner and preferences modal to maintain a consistent look across all consent UI elements.
For more detailed styling options, refer to the [Custom CSS](/docs/advanced/custom-css) documentation page.
## Banner Languages & Translations
For more detailed information about banner languages and translations, refer to the [Multilingual Banners](/docs/features/multilingual-banners) documentation page.
# Block 3rd Party Iframes
Source: https://docs.cookiechimp.com/docs/features/block-iframes
Disable 3rd party iframes and display a notification regarding their use. Load iframes after user consent is obtained.
To comply with privacy regulations, you can prevent 3rd party iframes from loading before gaining user consent. Enable this feature in the CookieChimp dashboard, then update your website's embeds.
## Basic Usage
```html
```
## Customised Embedding Example
```html
```
### Configuration Options
* `data-service`: \[String, Required] Service name (e.g., YouTube, Vimeo, Google Maps).
* `data-id`: \[String, Required] Unique resource ID (e.g., video ID).
* `data-title`: \[String] Notice title.
* `data-params`: \[String] Iframe query parameters.
* `data-thumbnail`: \[String] Path to custom thumbnail.
* `data-ratio`: \[String] Custom aspect ratio (e.g., "16:9").
* `data-autoscale`: Responsive iframe that fills parent width and scales proportionally.
* `data-widget`: Use for custom widgets with explicit width and height.
## Supported Services
* YouTube
* Vimeo
* Google Maps
Looking for a service that's not listed? [Let us know](mailto:support@cookiechimp.com).
# Manage User Consents
Source: https://docs.cookiechimp.com/docs/features/consent-records
View consent history of users on your website.
### Data Privacy & Storage
* CookieChimp generates a random UUID for each visitor.
* No Personal Identifiable Information (PII) is stored in our database.
### IP Address Handling
* IP addresses are processed only to determine visitor's country & region.
* IPs are masked before storage.
* Only country & region information is retained in logs.
### Finding User Records
You can search for specific consent records using the visitor's UUID, which can be found in the banner:
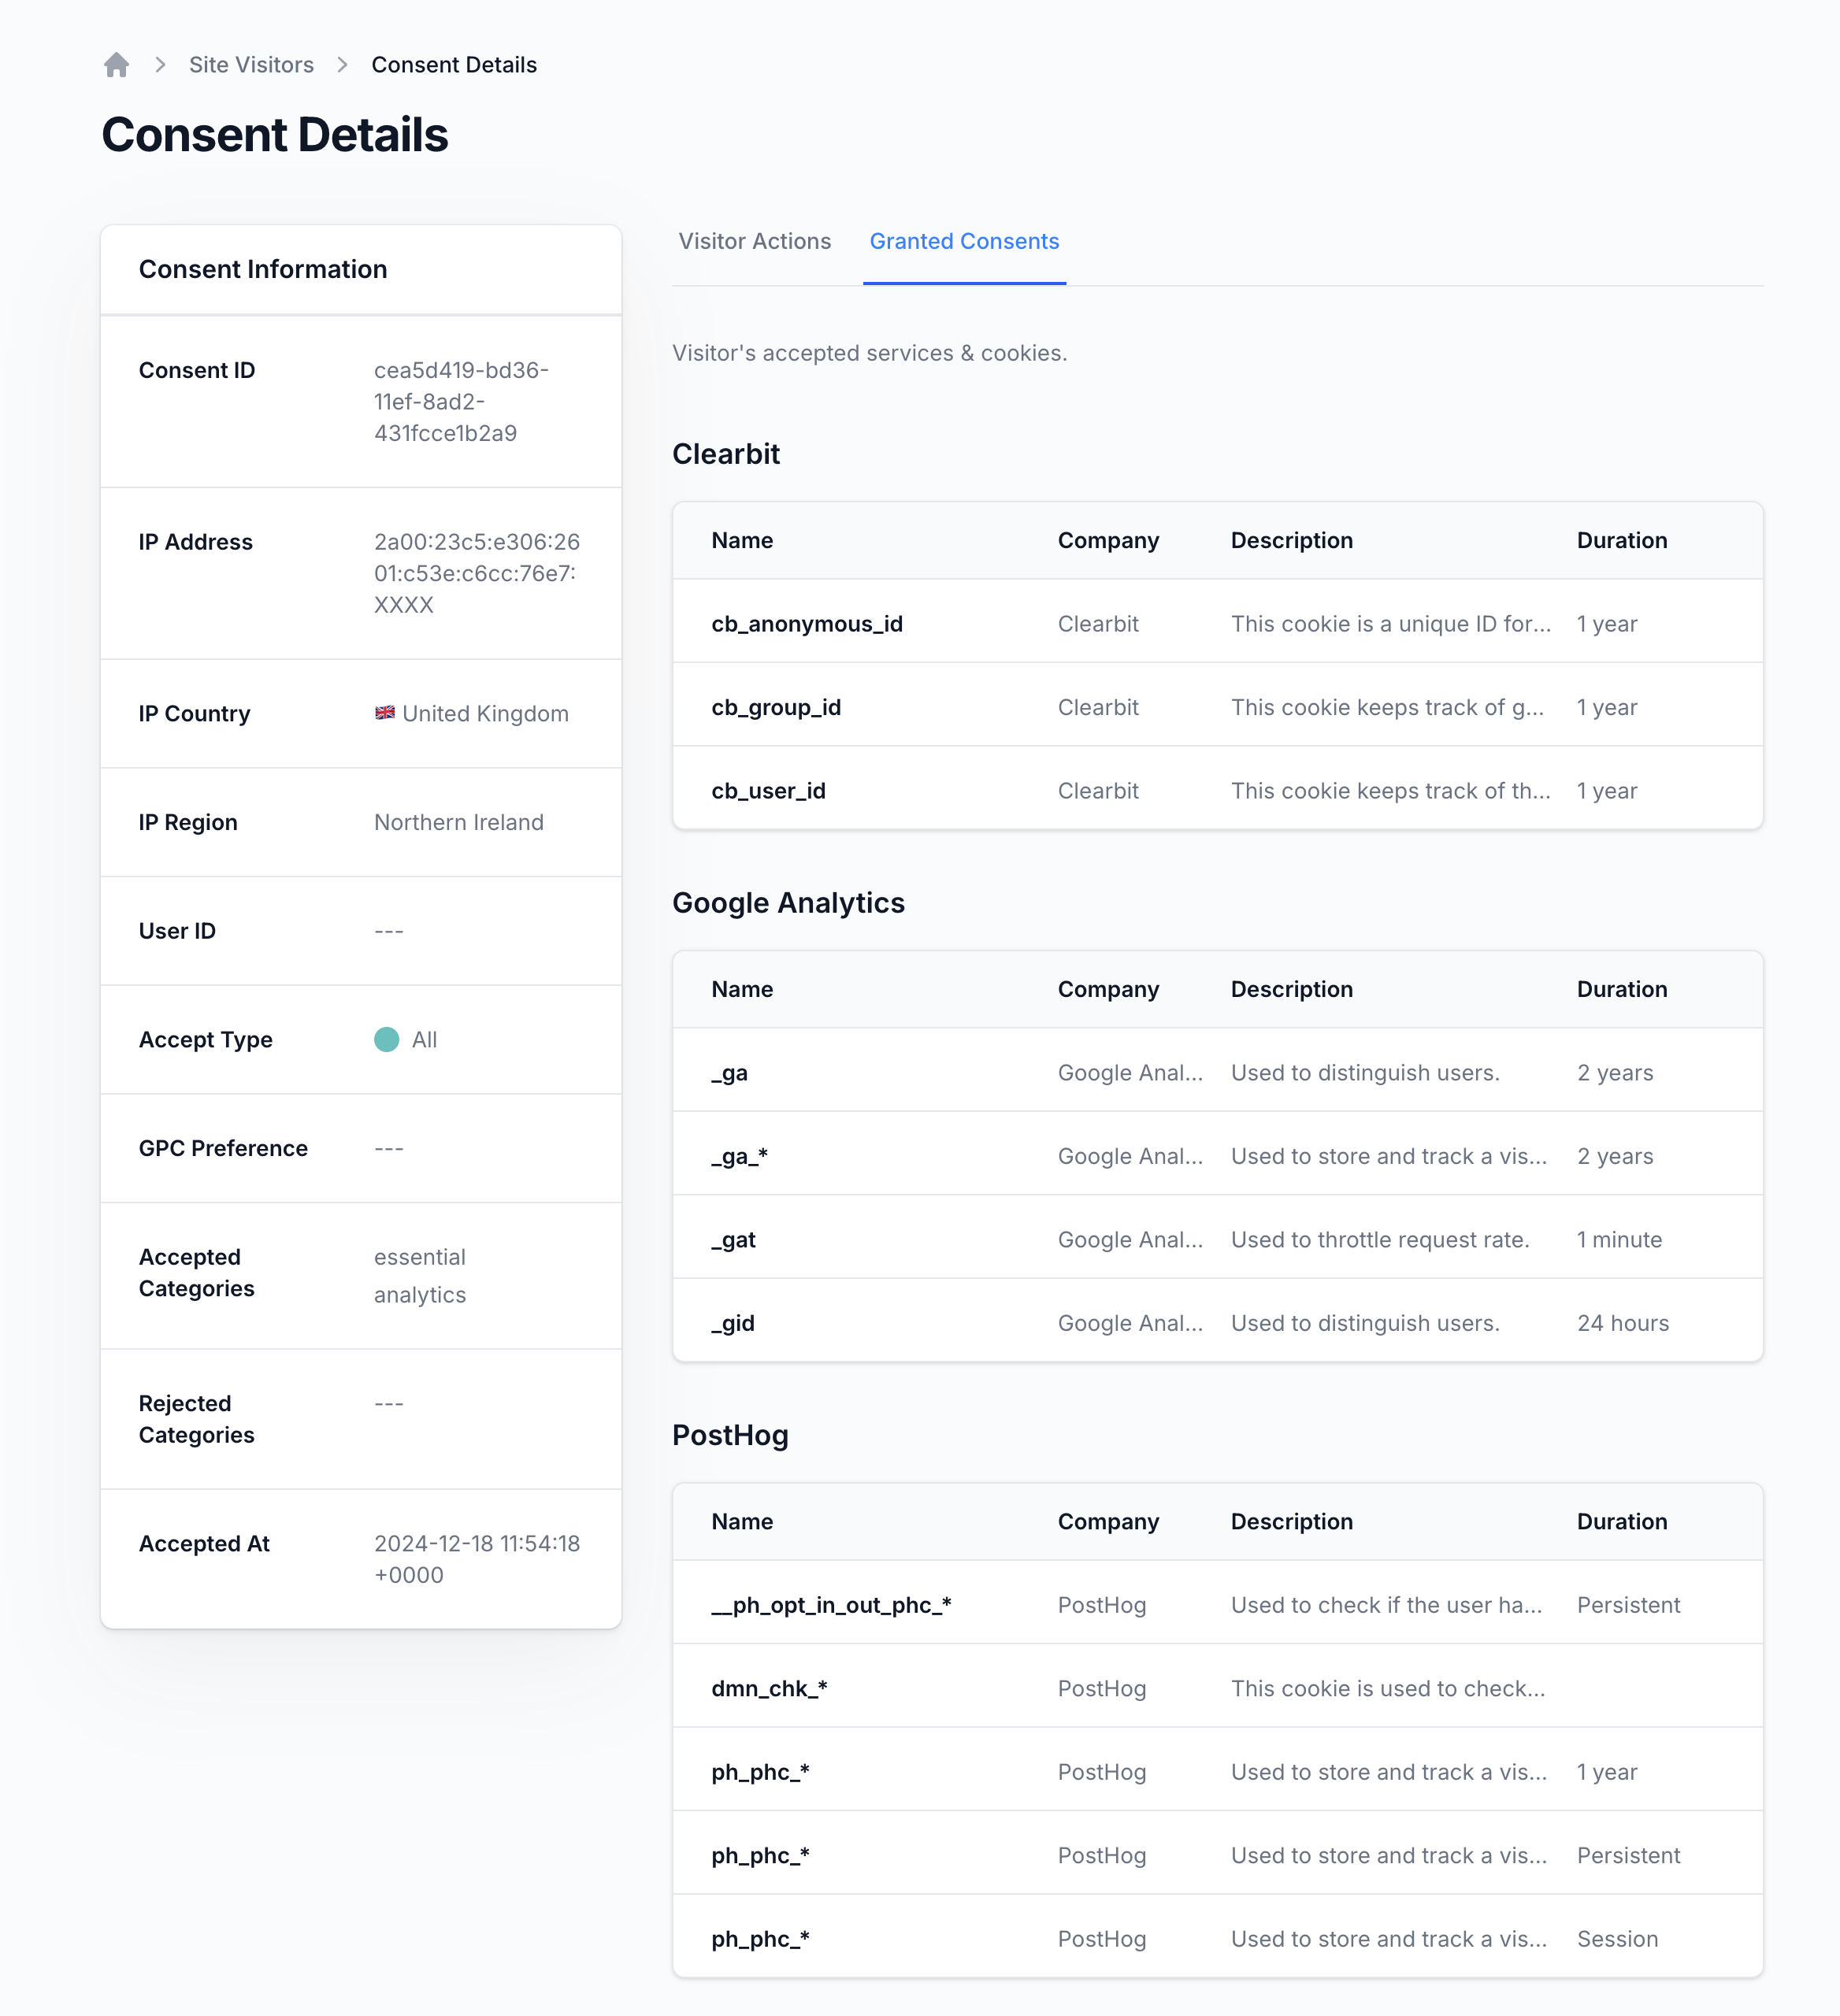
### Consent Details
You can click on consent records to see more details.
# Identify Users
Source: https://docs.cookiechimp.com/docs/features/identify-users
Set User's ID to match cookie consent records with your database.
Identify consent records stored on CookieChimp with your application's user IDs. This allows you to search for consent records and cookies set on each session.
Add the following code to your HTML page, replacing `your_user_ID_123` with your user's ID. Add this as high up in the `` as possible. This code needs to have executed before CookieChimp loads.
```html
```
**Don't use any Personal Identifiable Information (PII) as the user ID.** It's
best to use a unique ID that you can match with your database. If you use an
email address, IP address or any other personal information, CookieChimp will
discard this information and no user ID will be set.
# Multilingual Banners
Source: https://docs.cookiechimp.com/docs/features/multilingual-banners
Translate your consent banner into different languages.
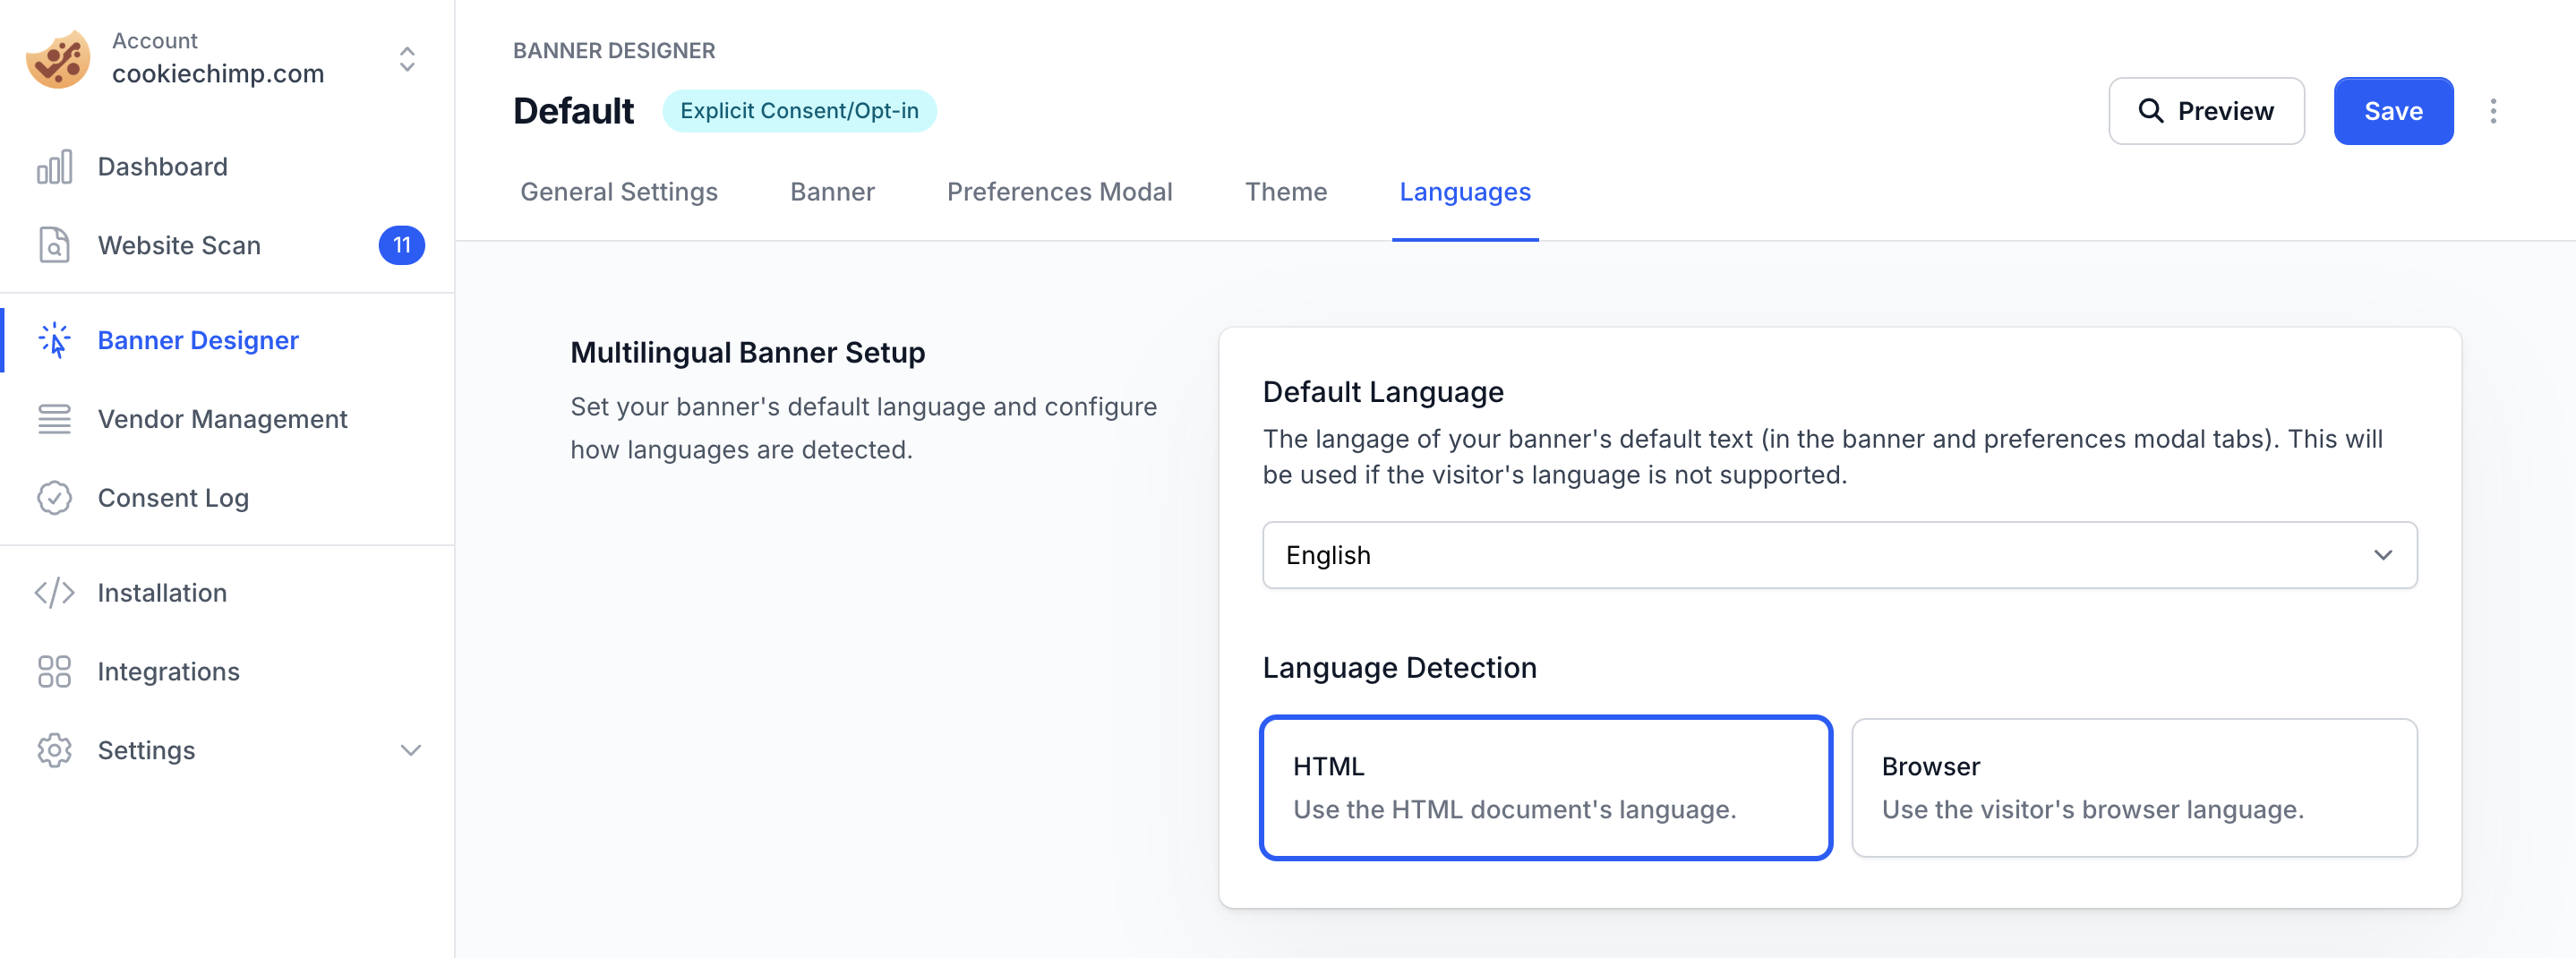
## Language Detection
We can detect language based on:
1. The HTML document language - controlled by the [lang attribute](https://www.tpgi.com/using-the-html-lang-attribute/) in the `html` element.
2. The user's browser language - set by the user's browser.
The default language is used if the visitor's language is not supported or there is no translation available for the visitor's language.
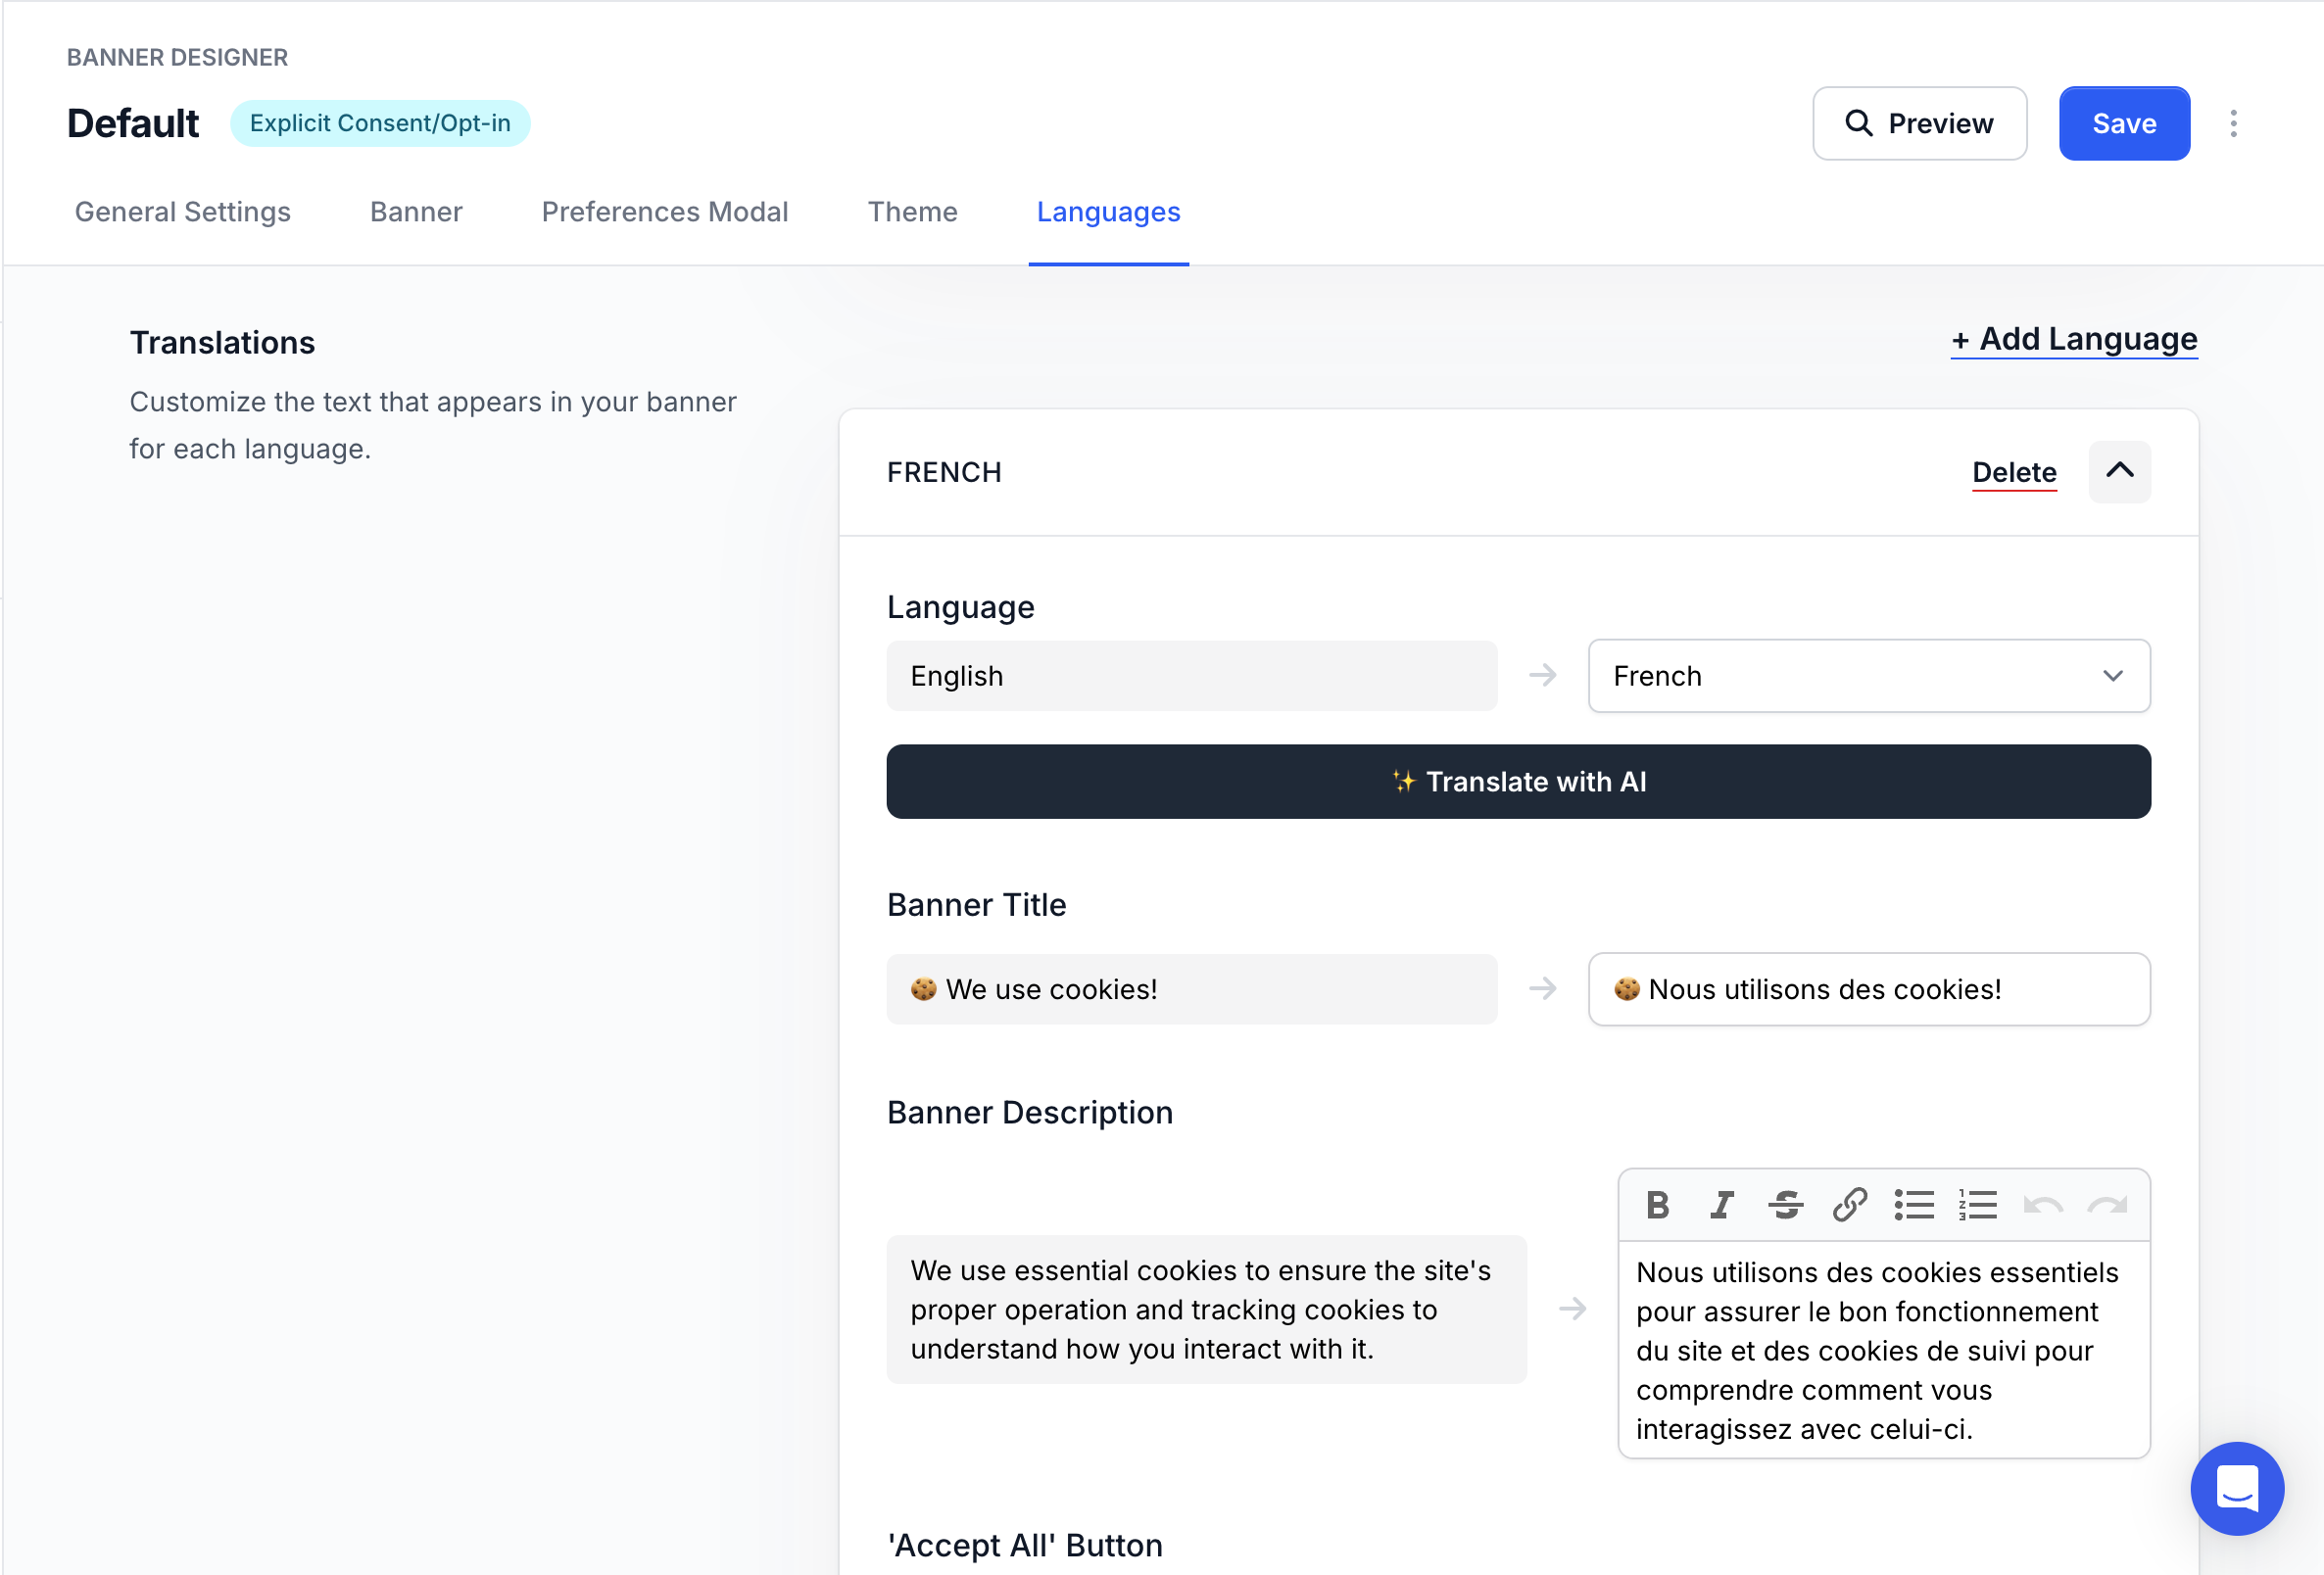
## Translations
Consent banners can be translated into multiple languages.
We offer AI auto translate for paid accounts to quickly translate into another language.
Always check and verify AI translations before saving.
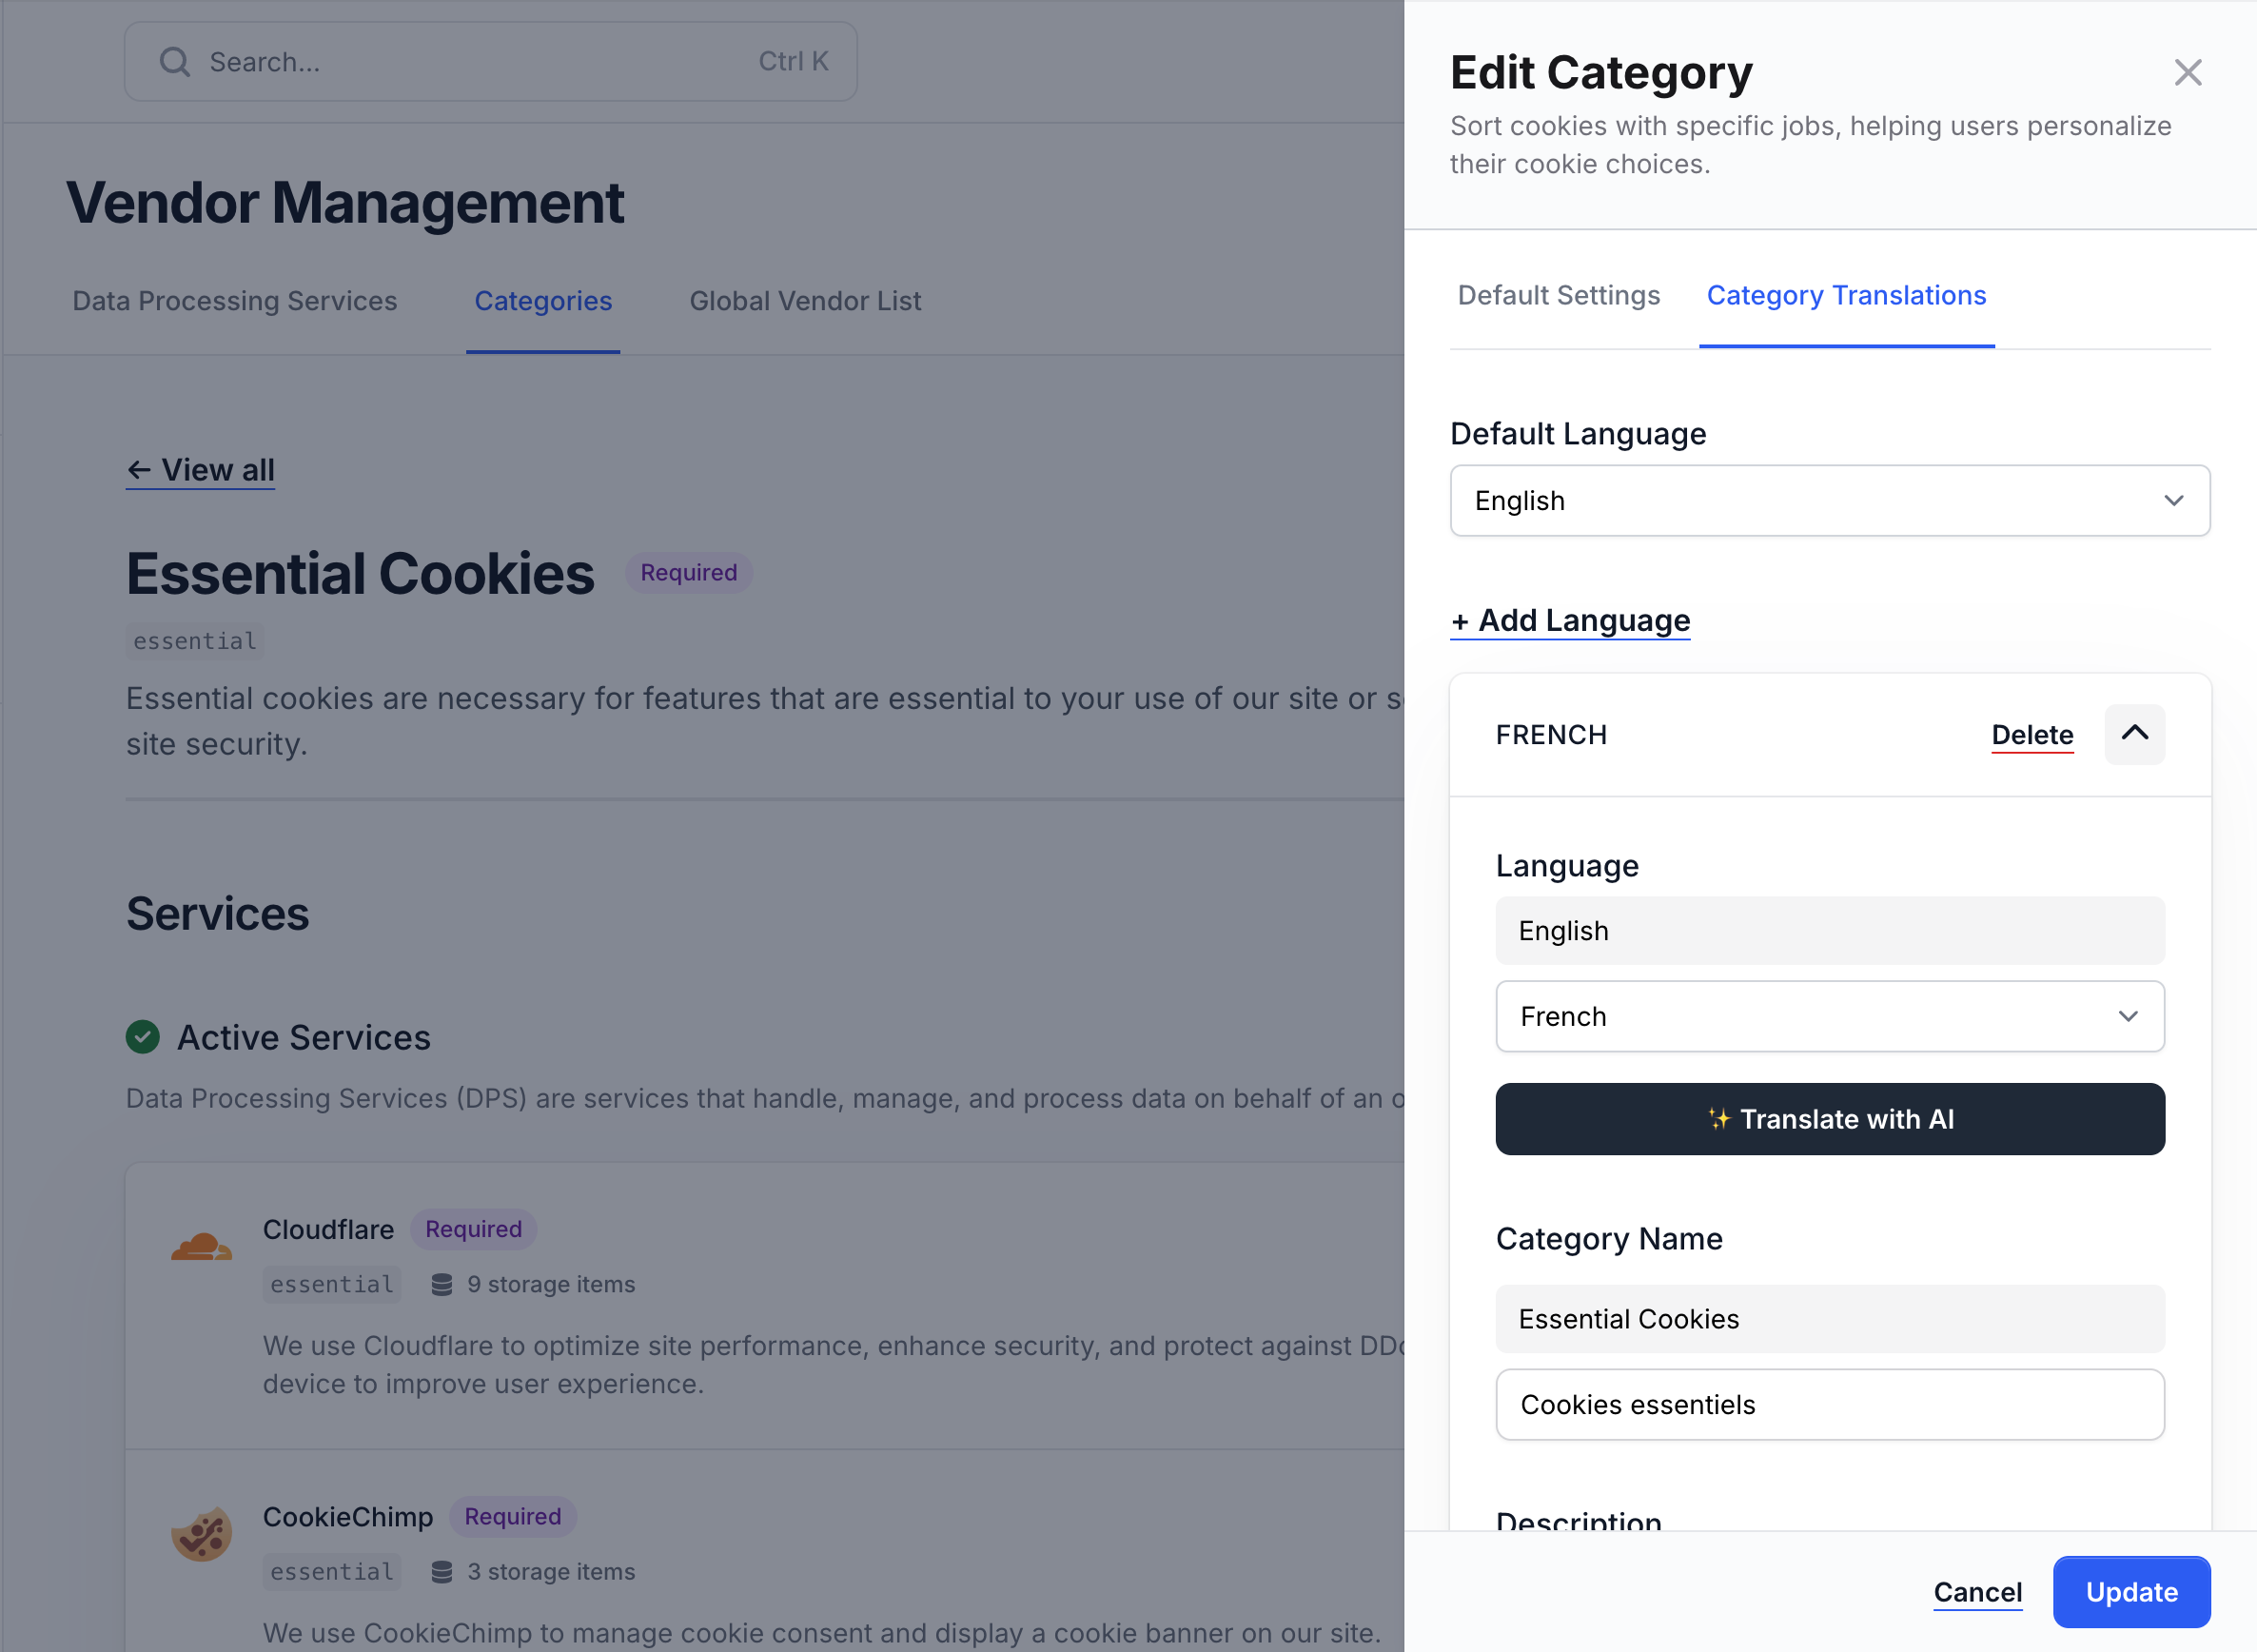
Similarly categories, services and storage items can be individually translated.
# Cookie Policy Vendor List
Source: https://docs.cookiechimp.com/docs/features/vendor-list-embed
Embed up-to-date vendor information for your cookie or privacy policy pages.
Copy and paste the following script into the `` section of your website, replacing `{account_id}` with your CookieChimp account ID.
```html
```
Add the following div where you want to embed the vendor list.
```html
```
# Vendor Management
Source: https://docs.cookiechimp.com/docs/features/vendor-management
Organize and manage storage items used your website.
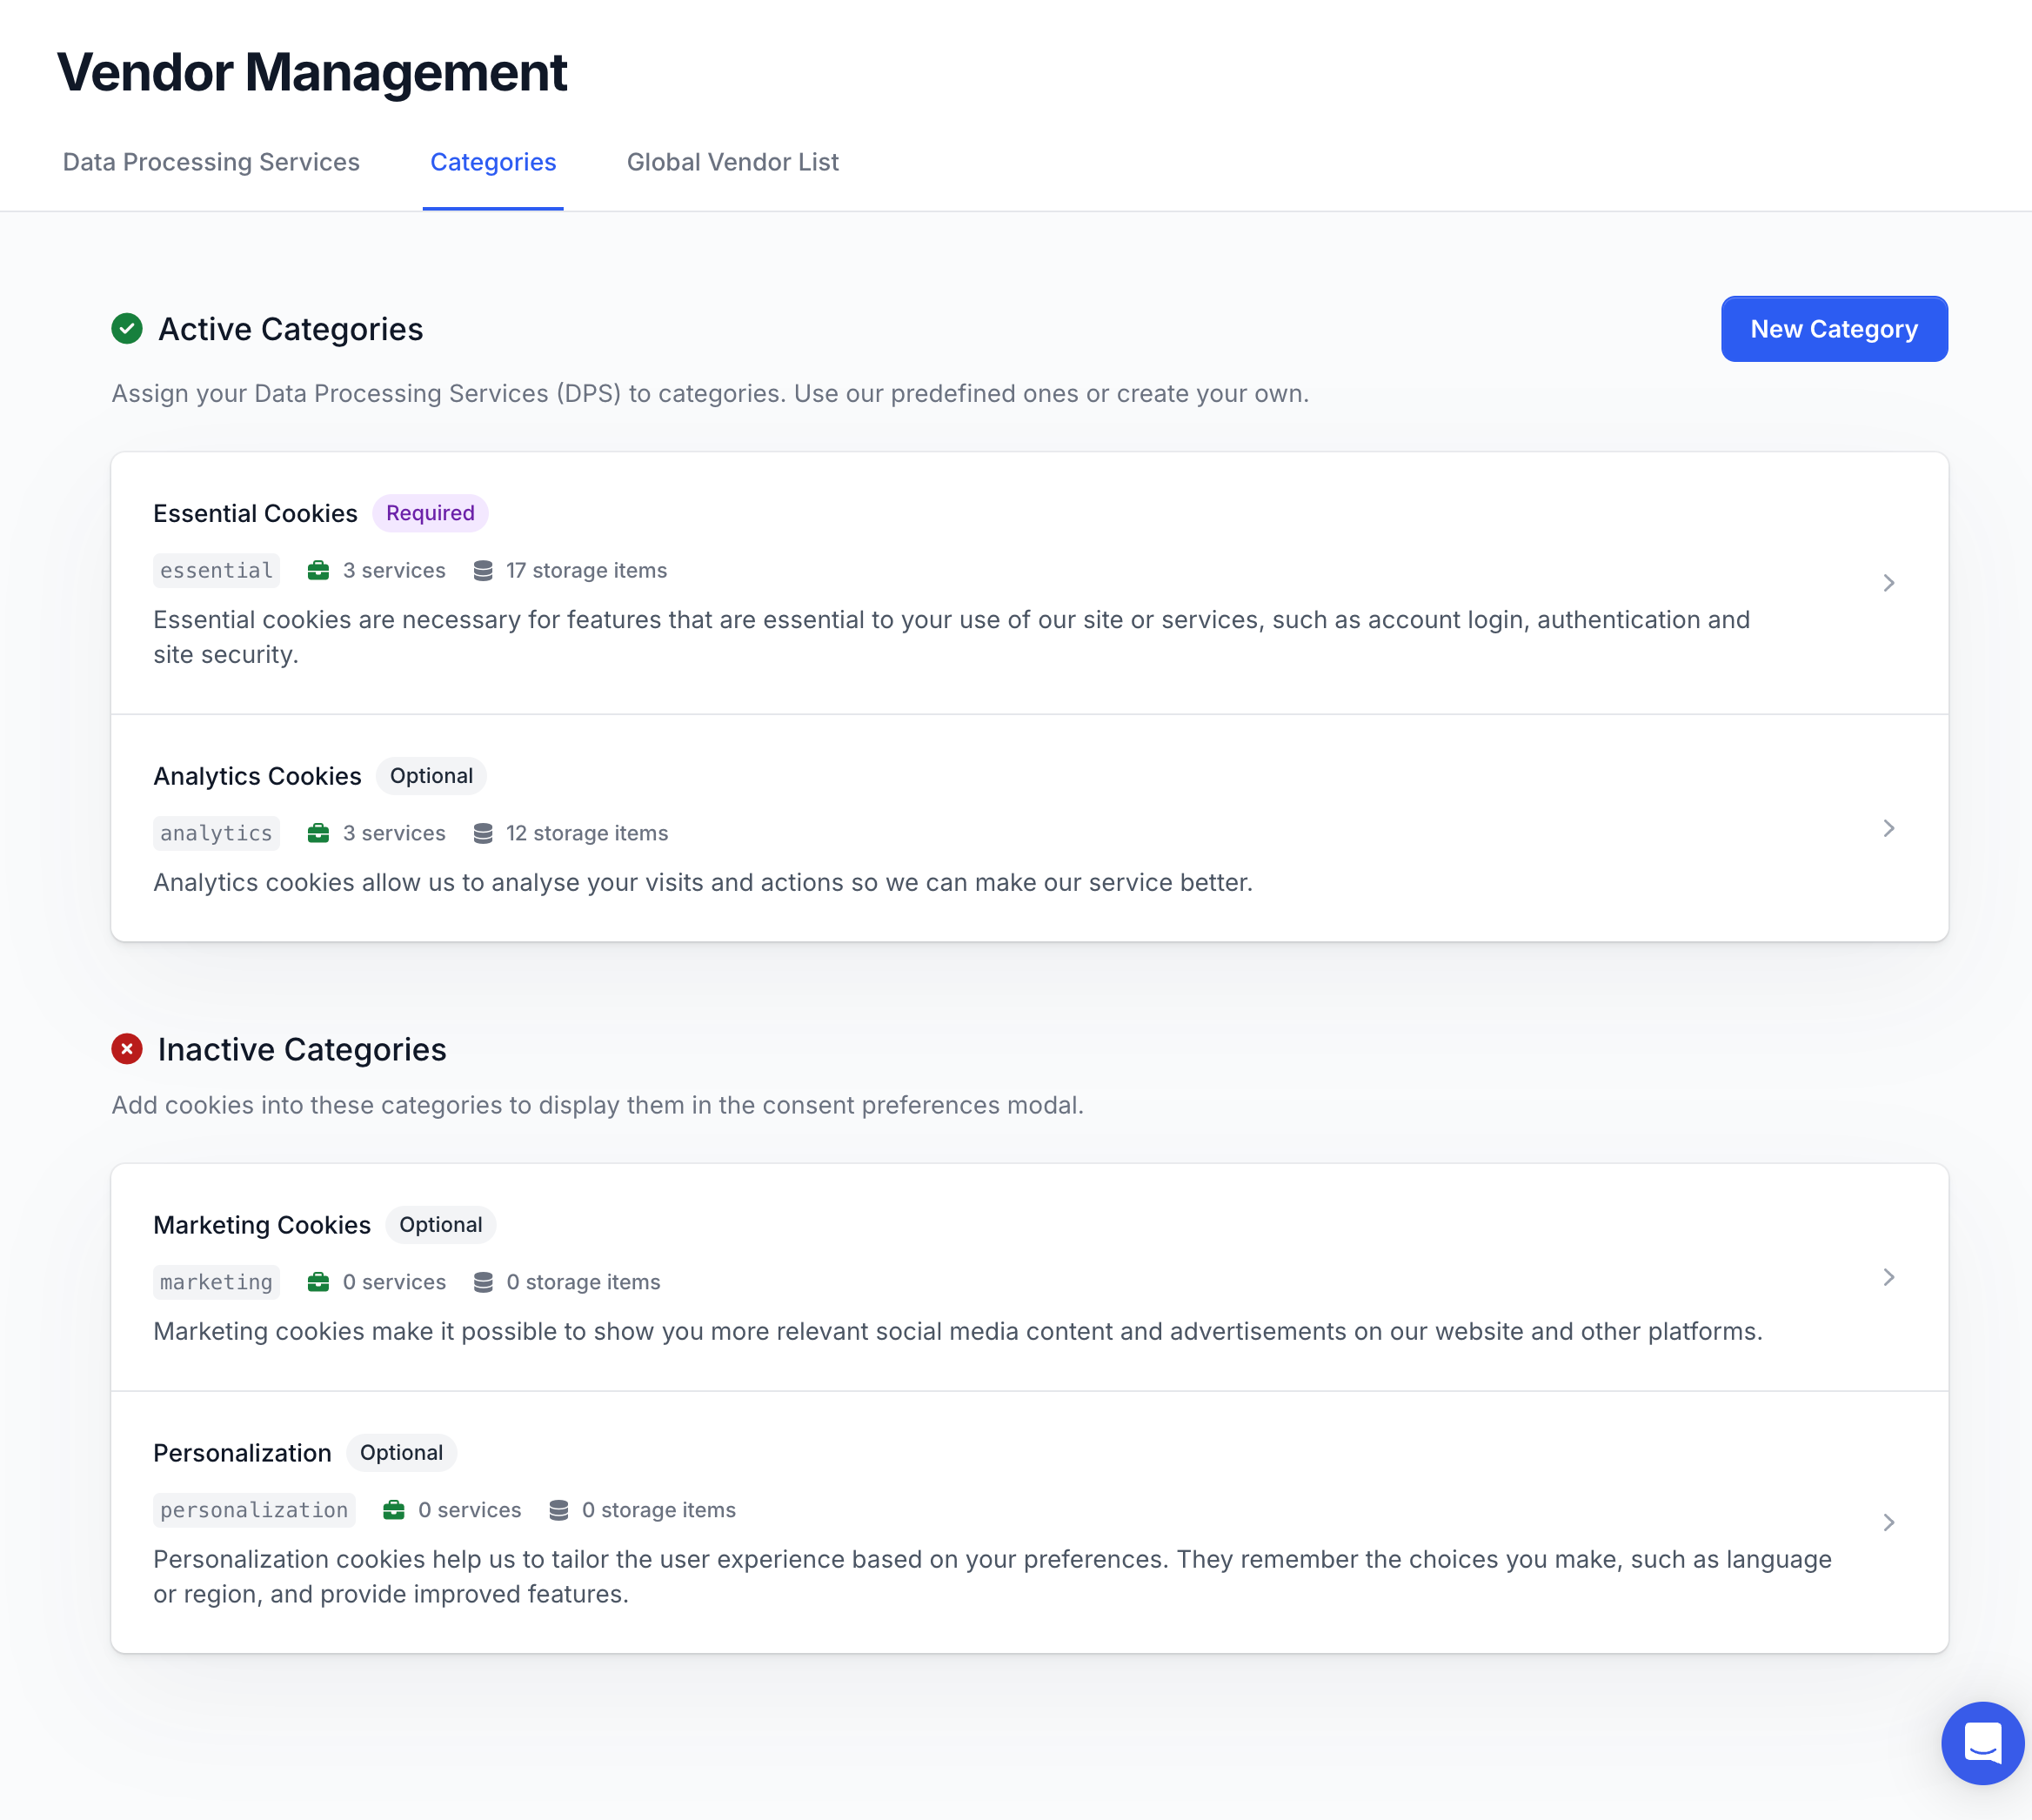
## Categories
Categories are used to organize vendors into groups.
You can create as many categories as you need and edit the default ones.
The default categories are:
* Essential
* Analytics
* Marketing
* Personalization
A category becomes active when it contains an active service or storage items. Only active categories are shown to visitors in the banner.
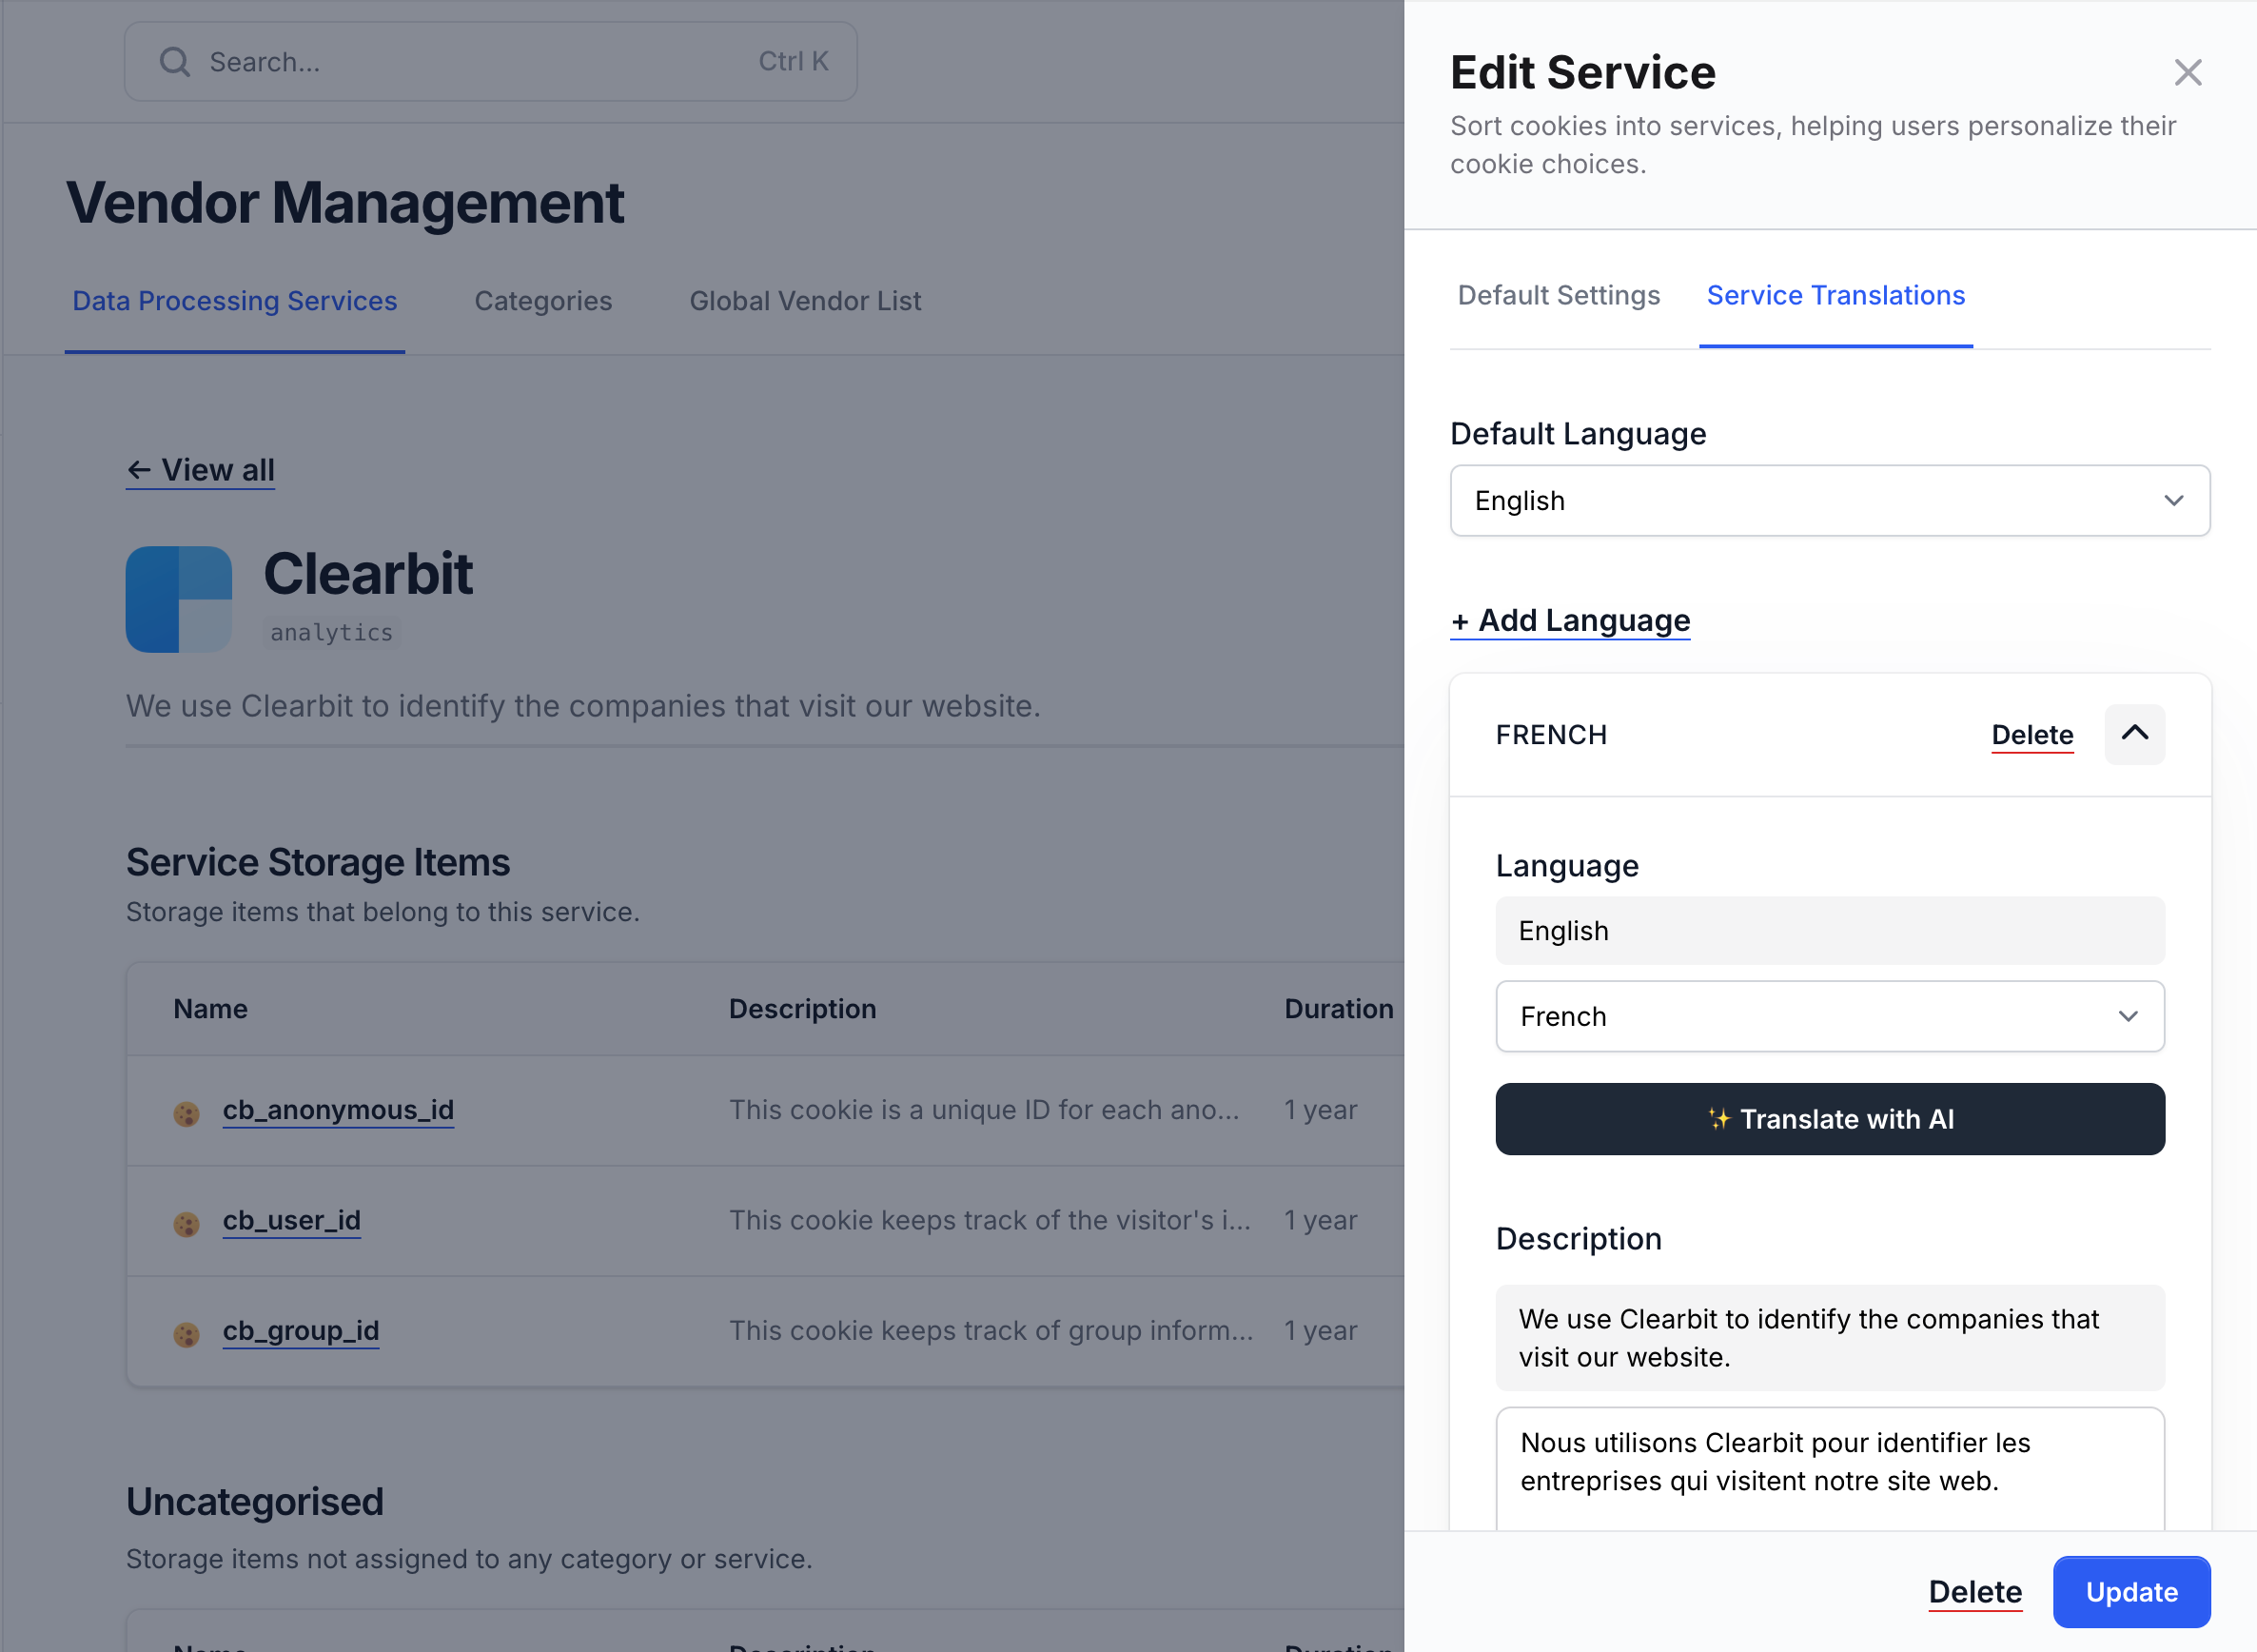
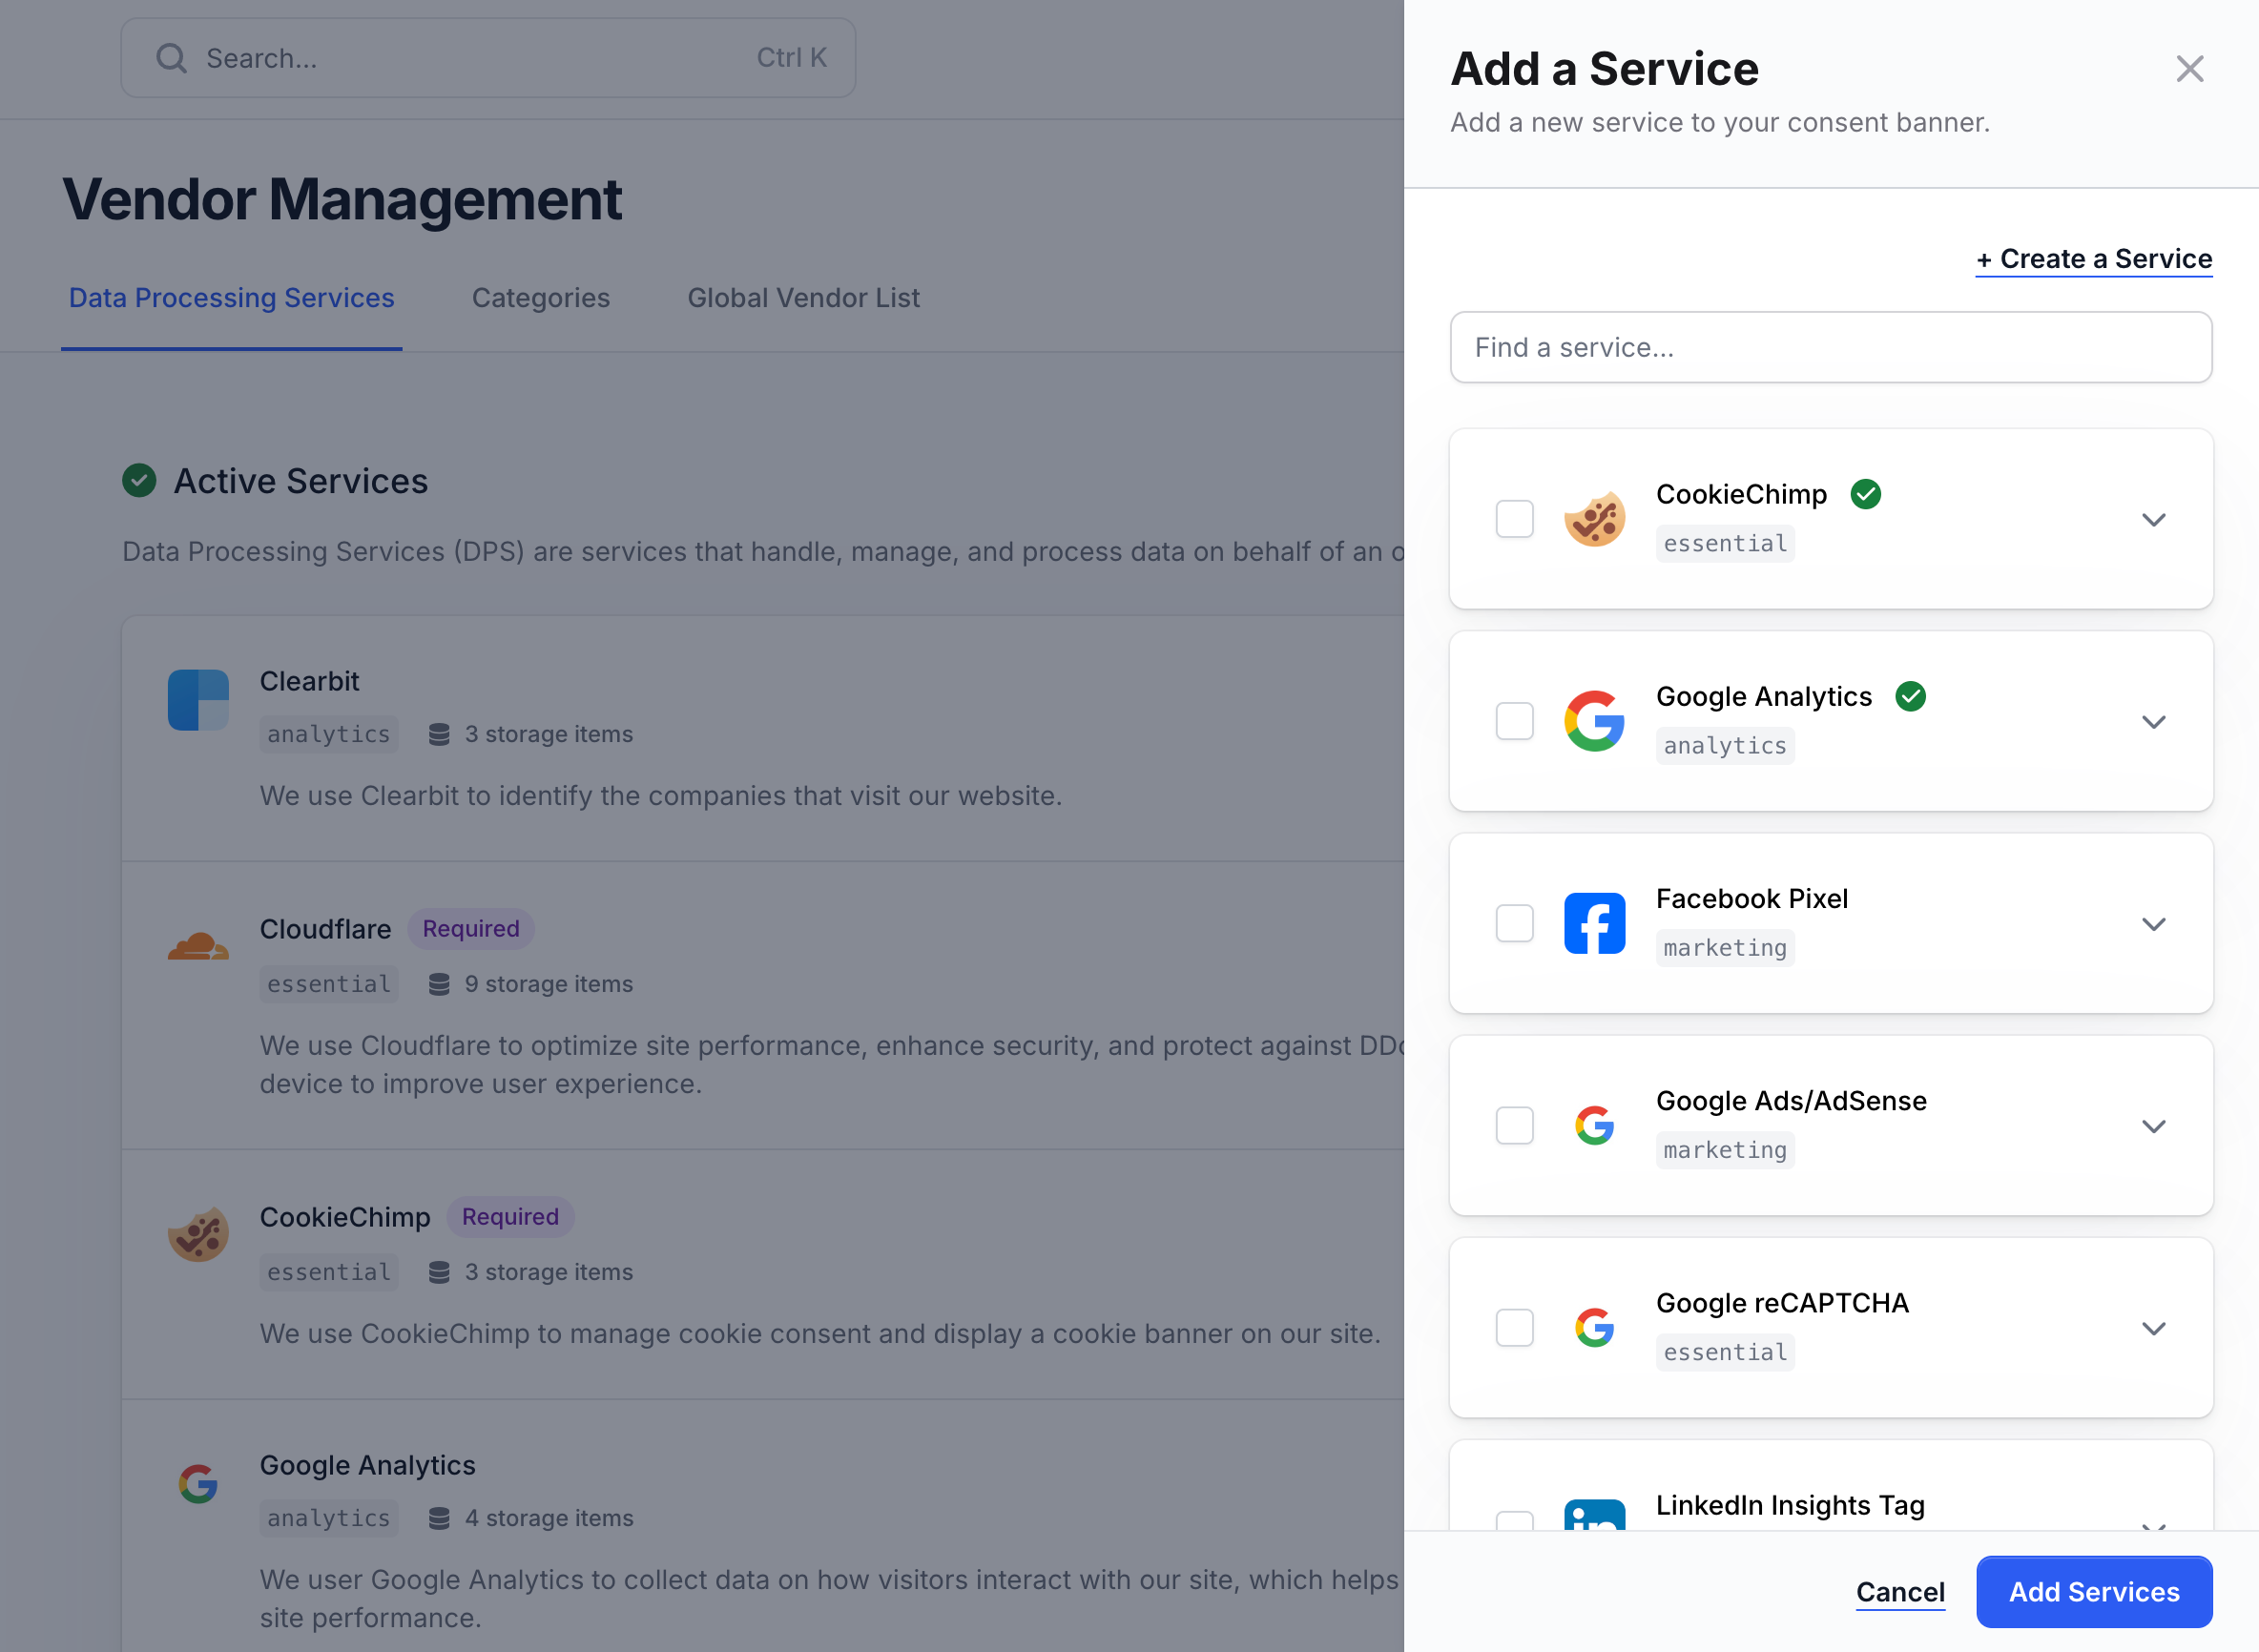
## Vendors
Storage items set by a vendor/service can be grouped together.
Services must be associated with a category and each service will have a toggle inside its category section to allow users to opt-in or opt-out of the service.
You can then use the services attribute to [block scripts until consent](/docs/block-scripts-cookies).
CookieChimp offers a vendor library of popular services that contain storage items set by the service.
Simply select the ones used in your site and add.
If you are using a service that is not in our vendor library, you can create a service manually.
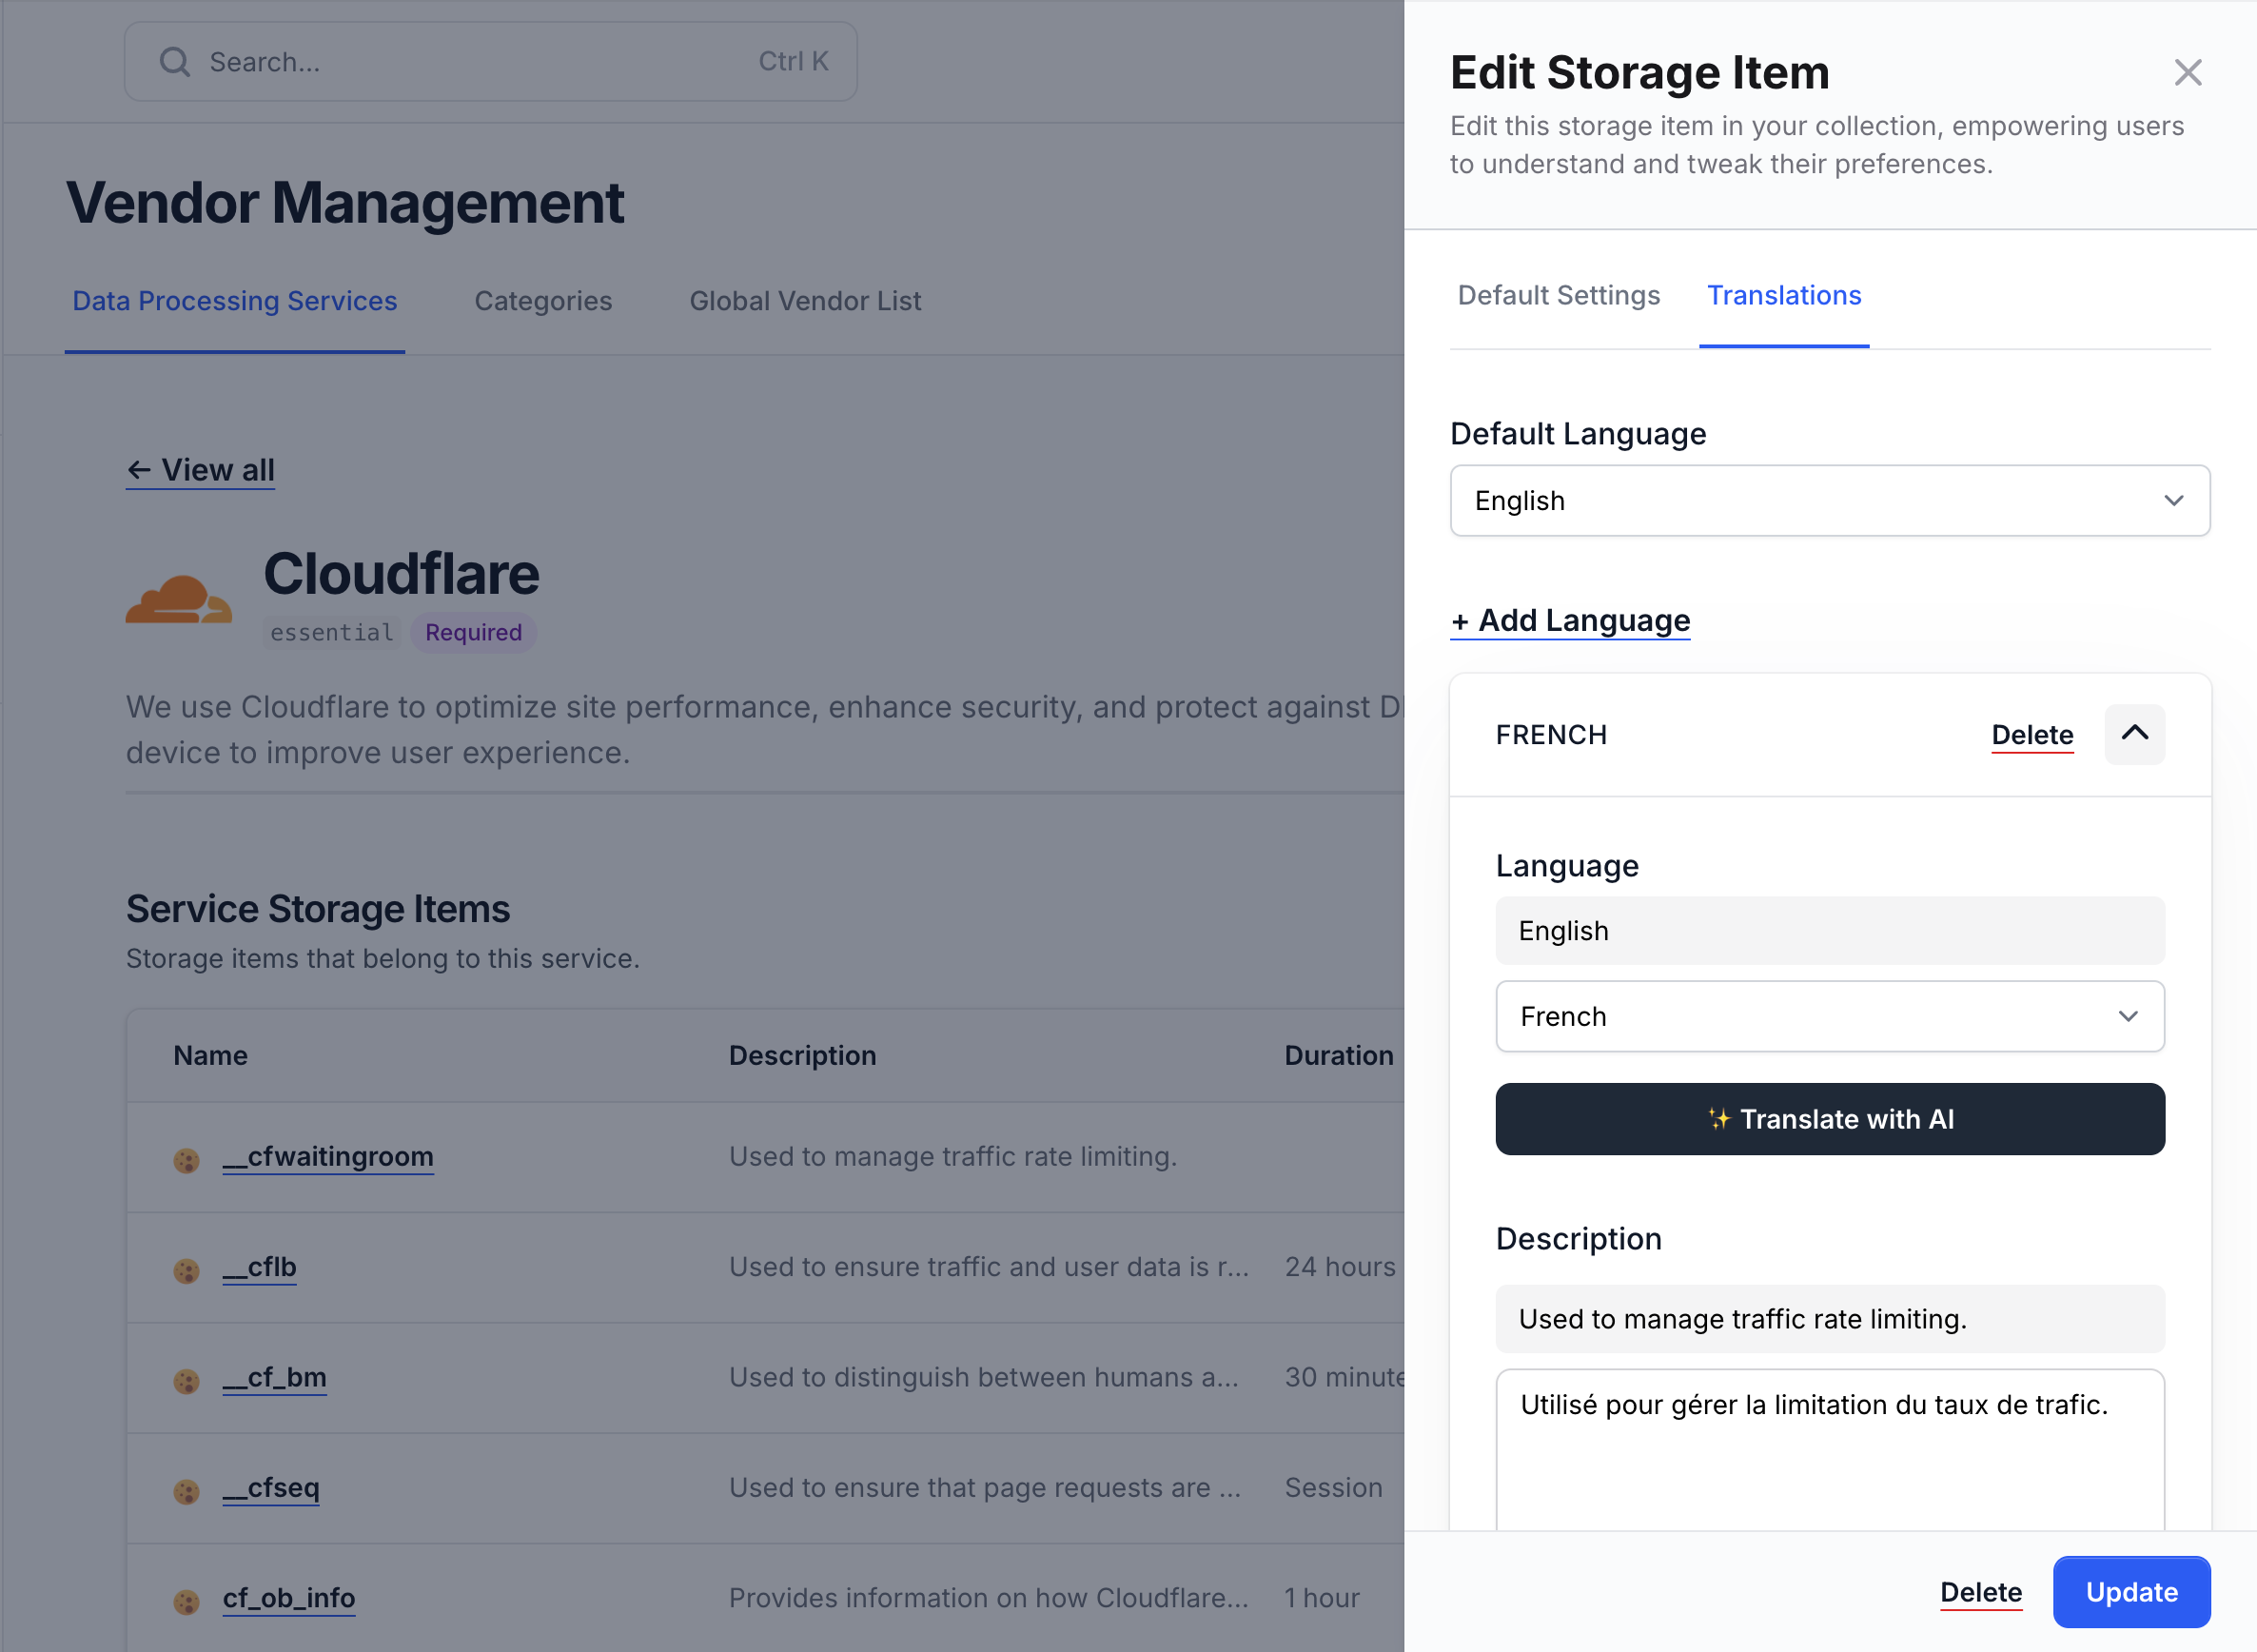
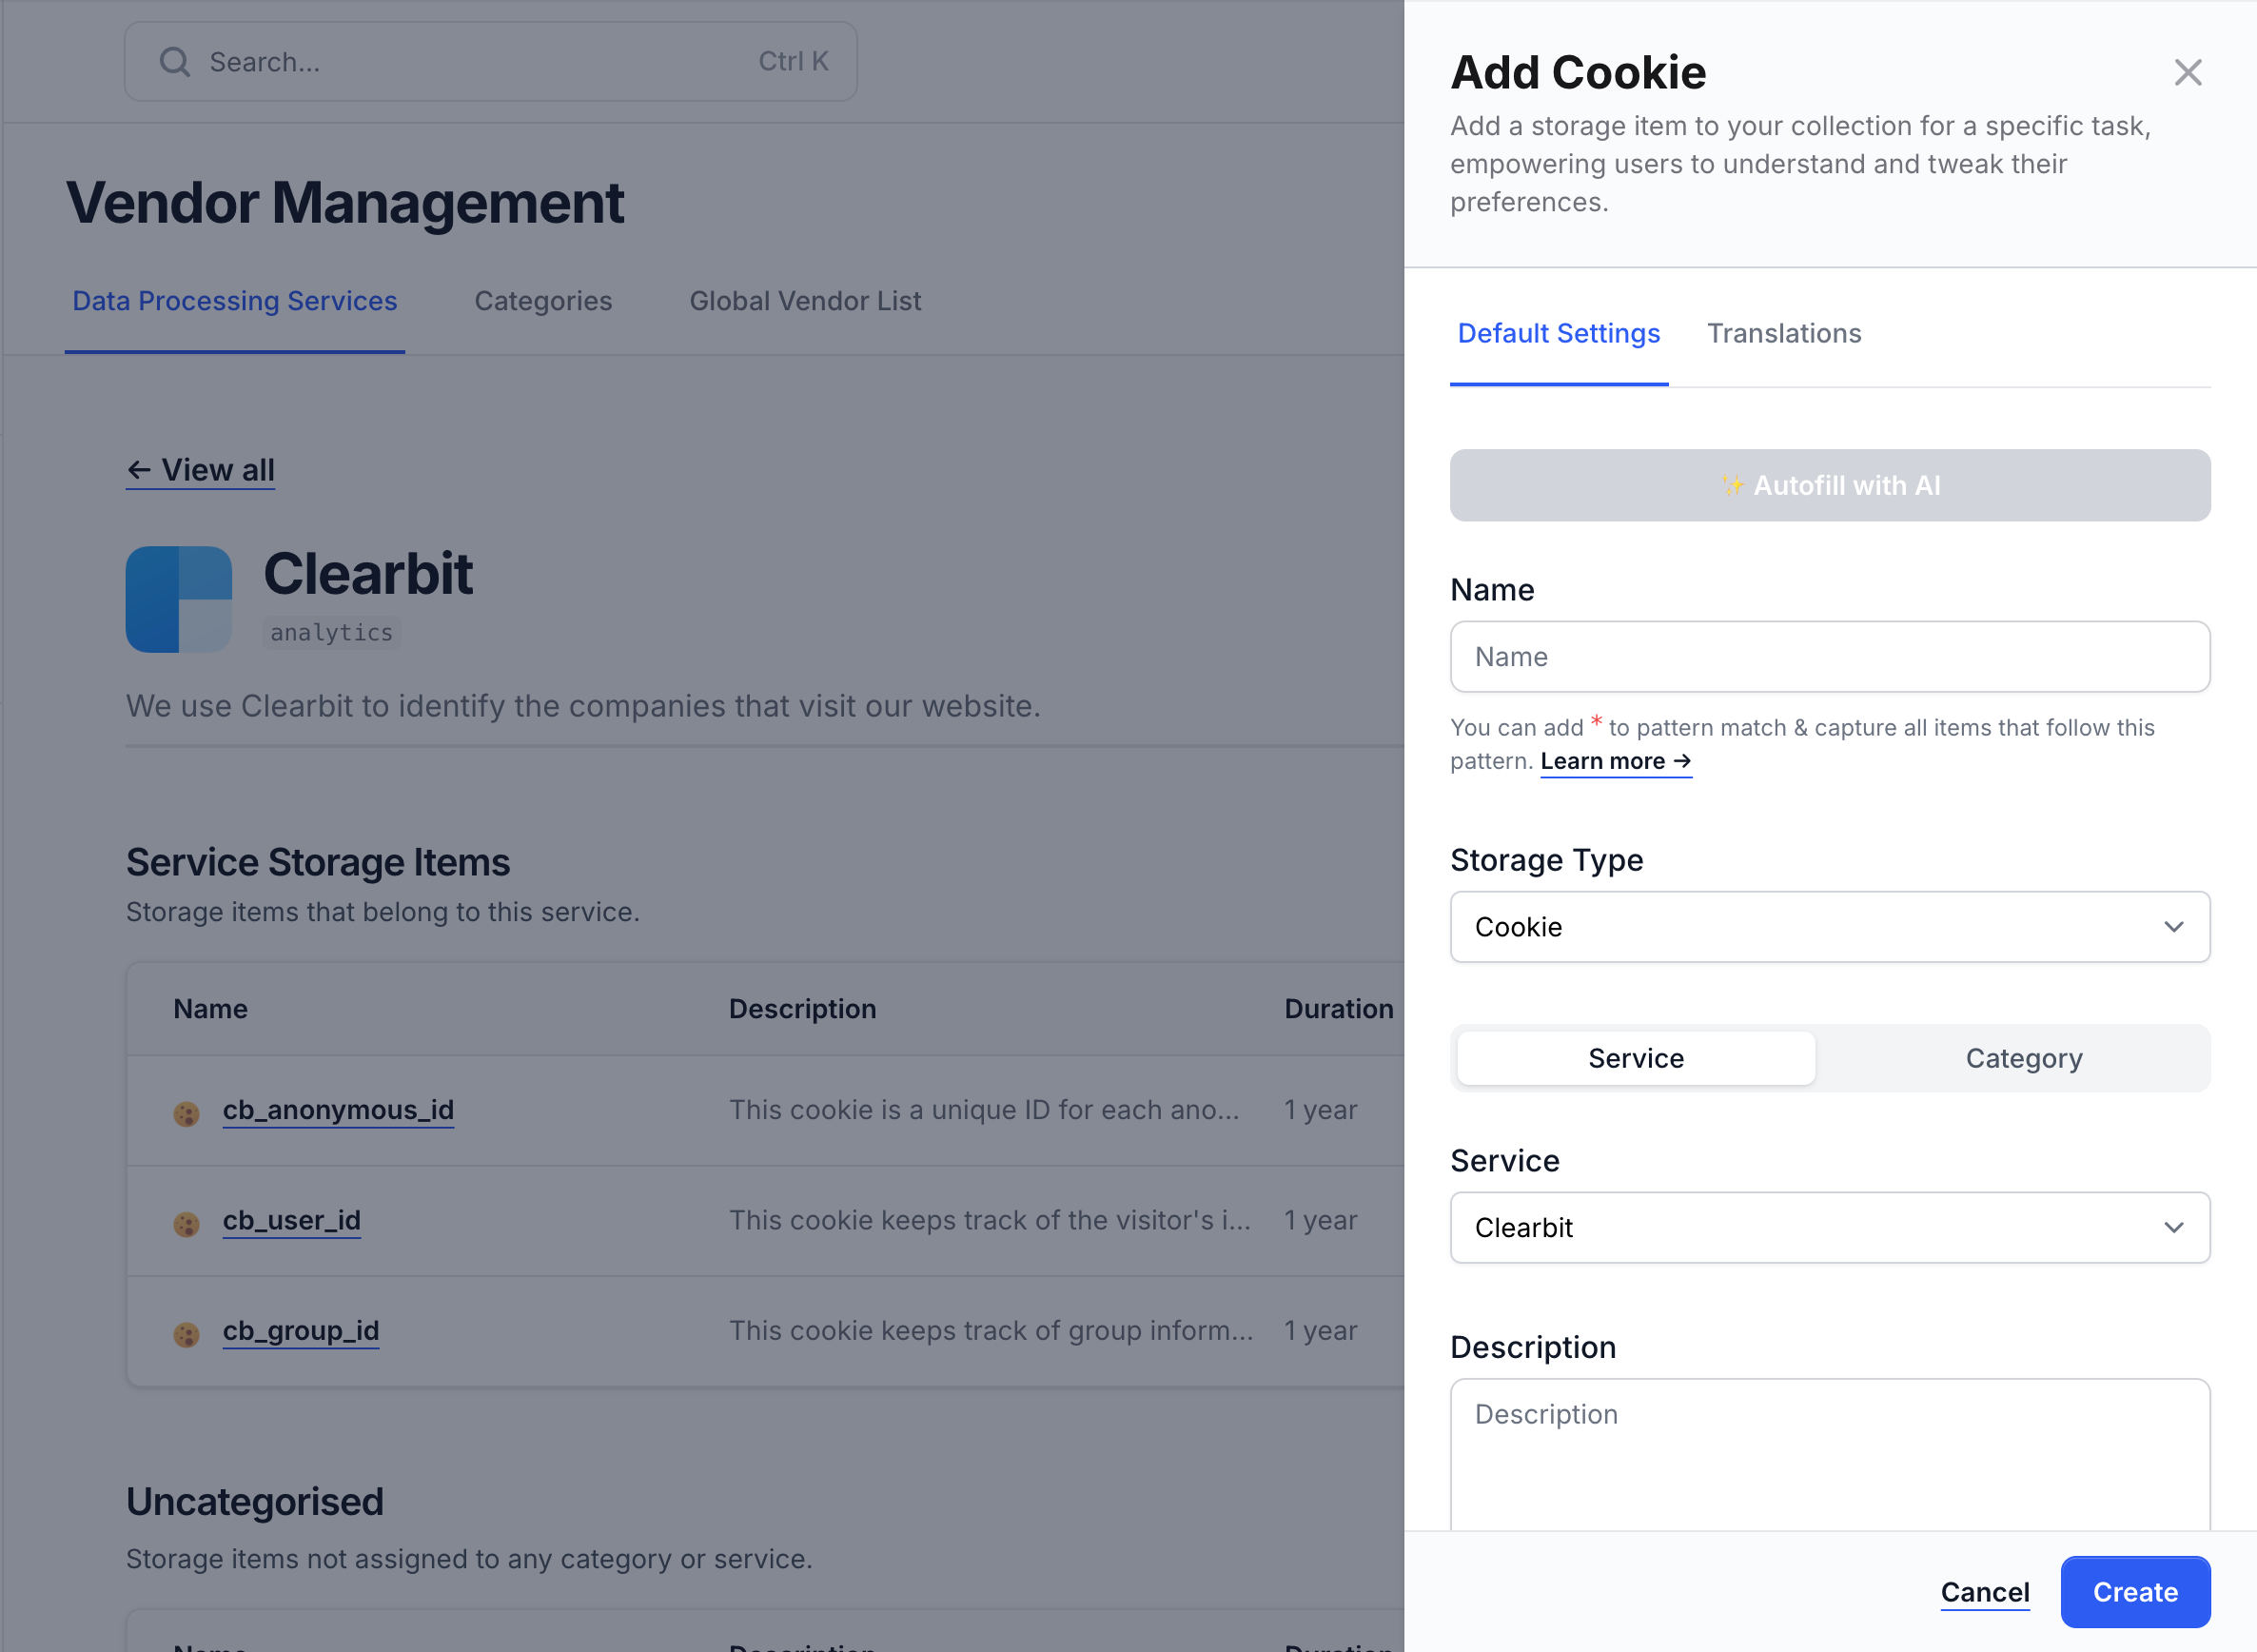
## Storage Items
Storage items can be of three types:
* Cookie
* Local Storage
* Session Storage
Storage items can be grouped together into a service or be added to a category directly.
# Vendor Scanning
Source: https://docs.cookiechimp.com/docs/features/vendor-scanning
Understand how CookieChimp scans your website for vendors.
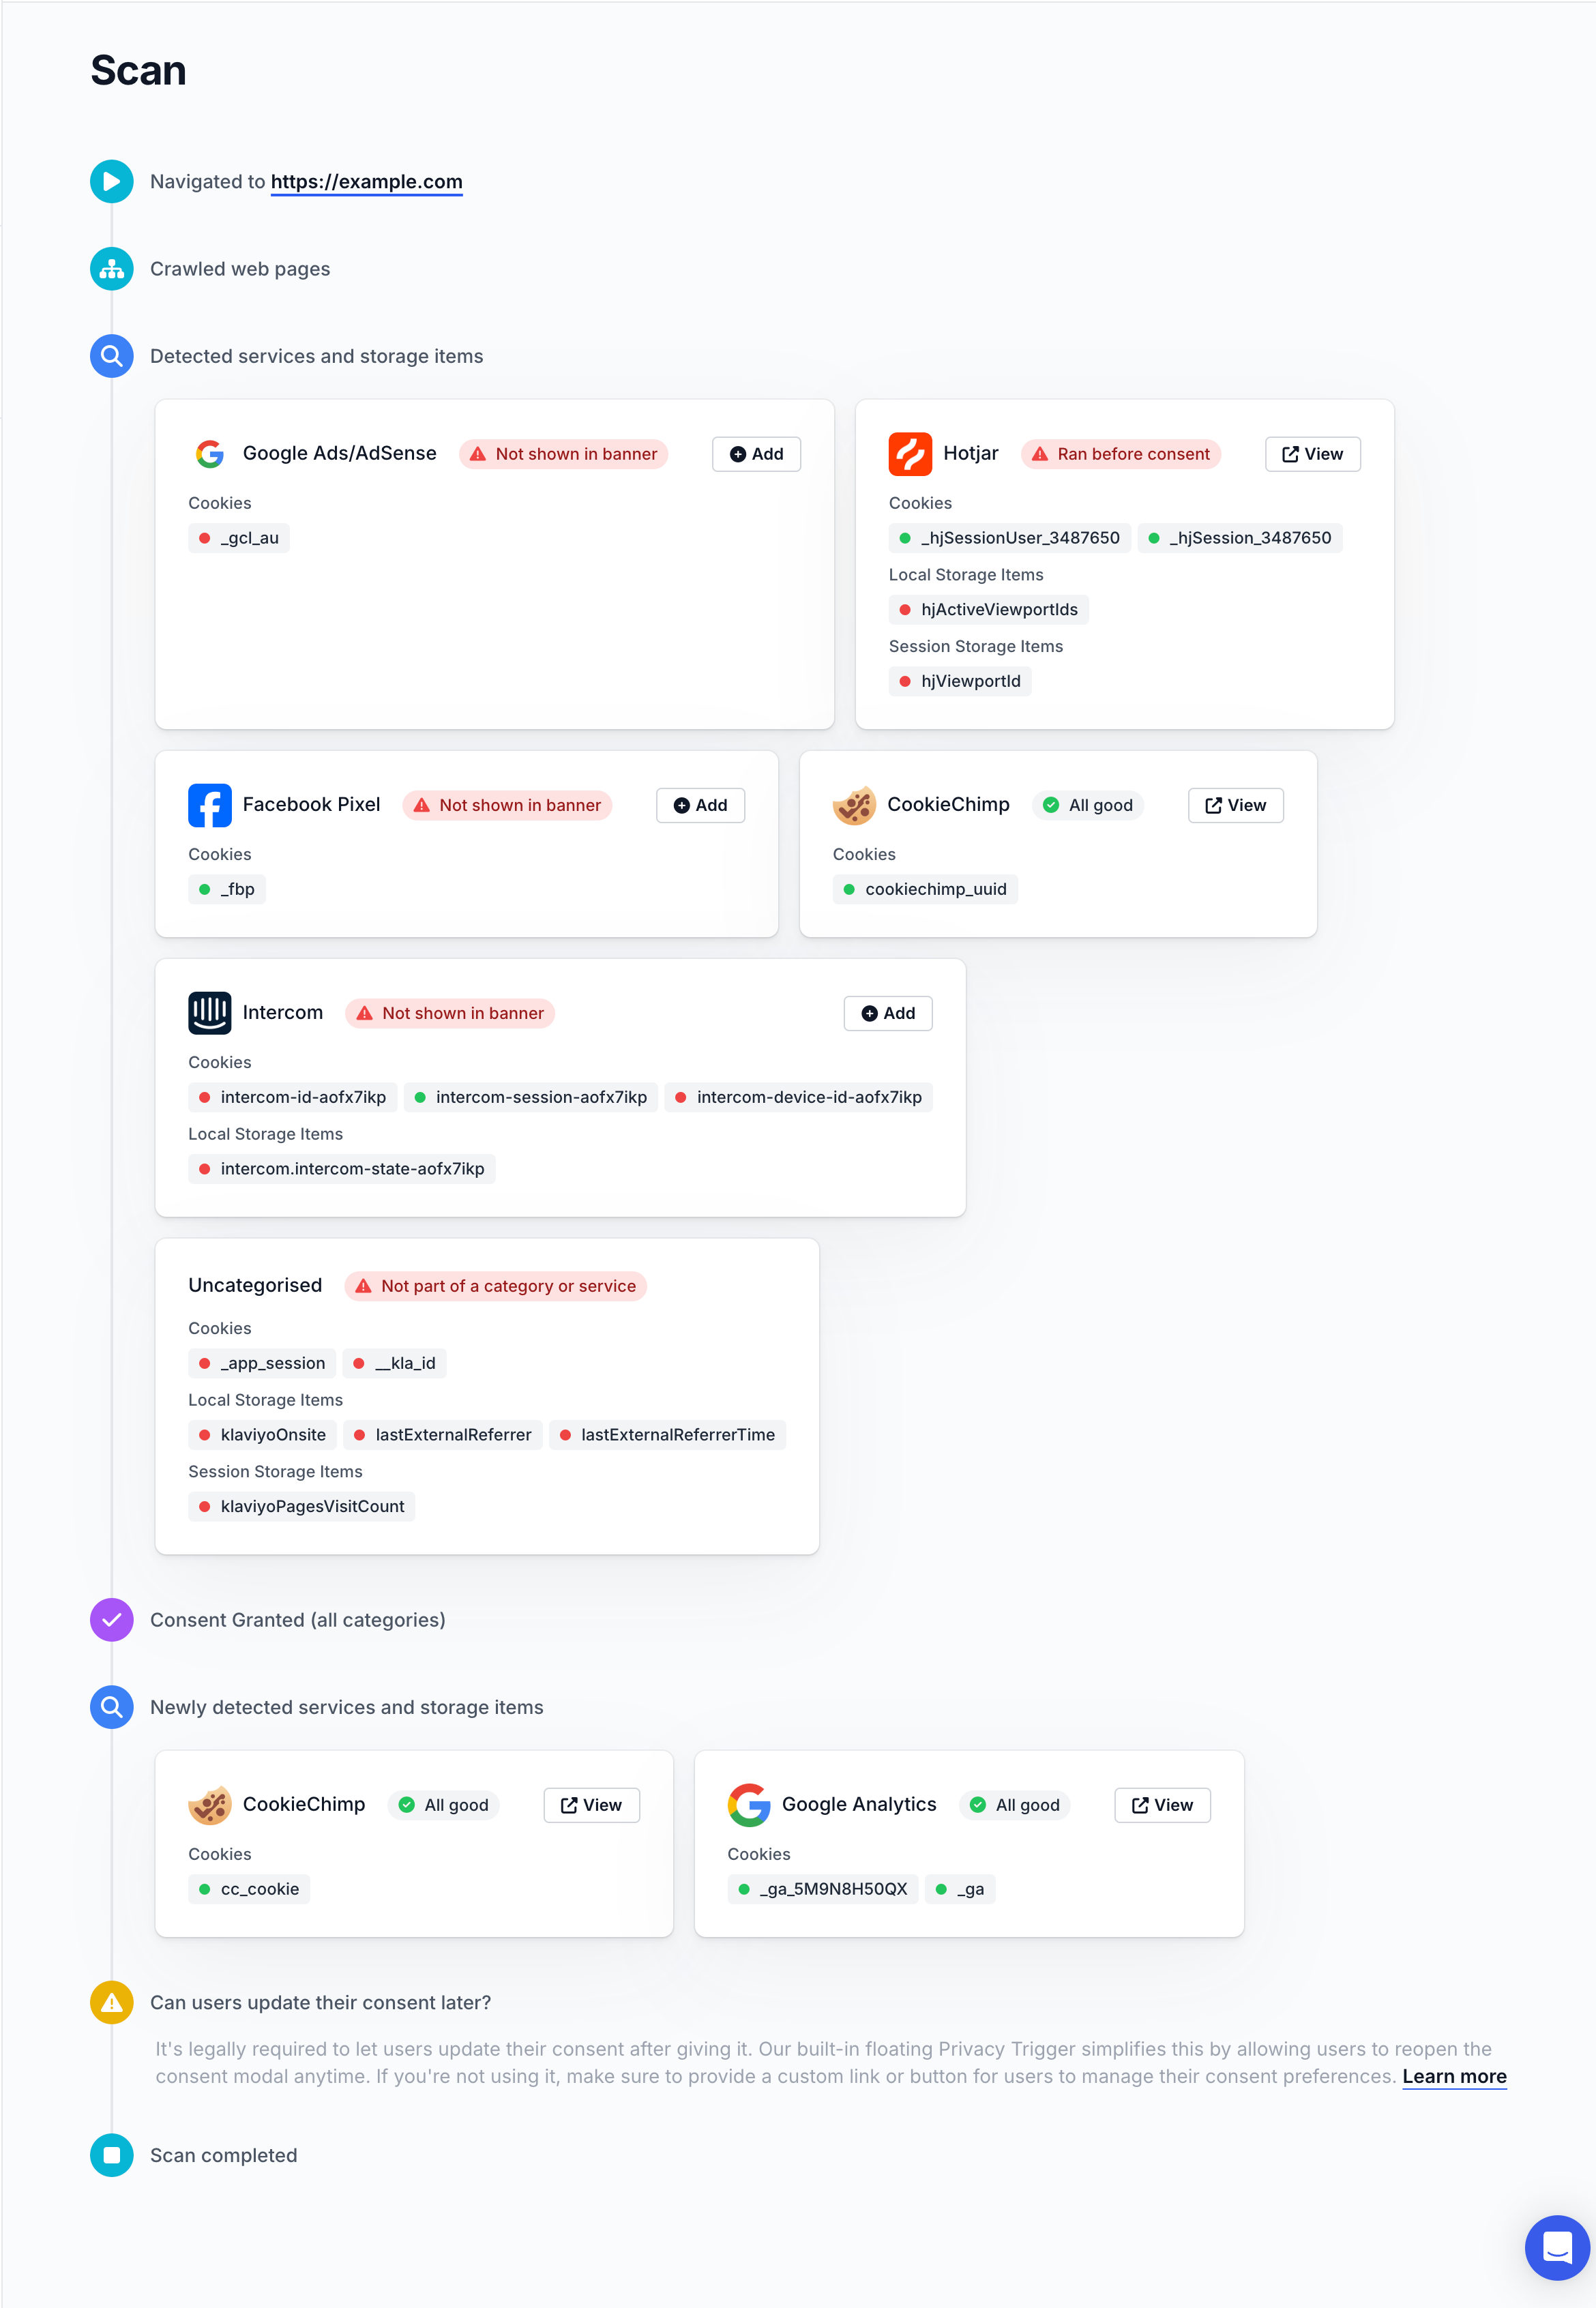
We scan your website to find the vendors and storage items used on your site.
We detect services and storage items set before and after consent was granted.
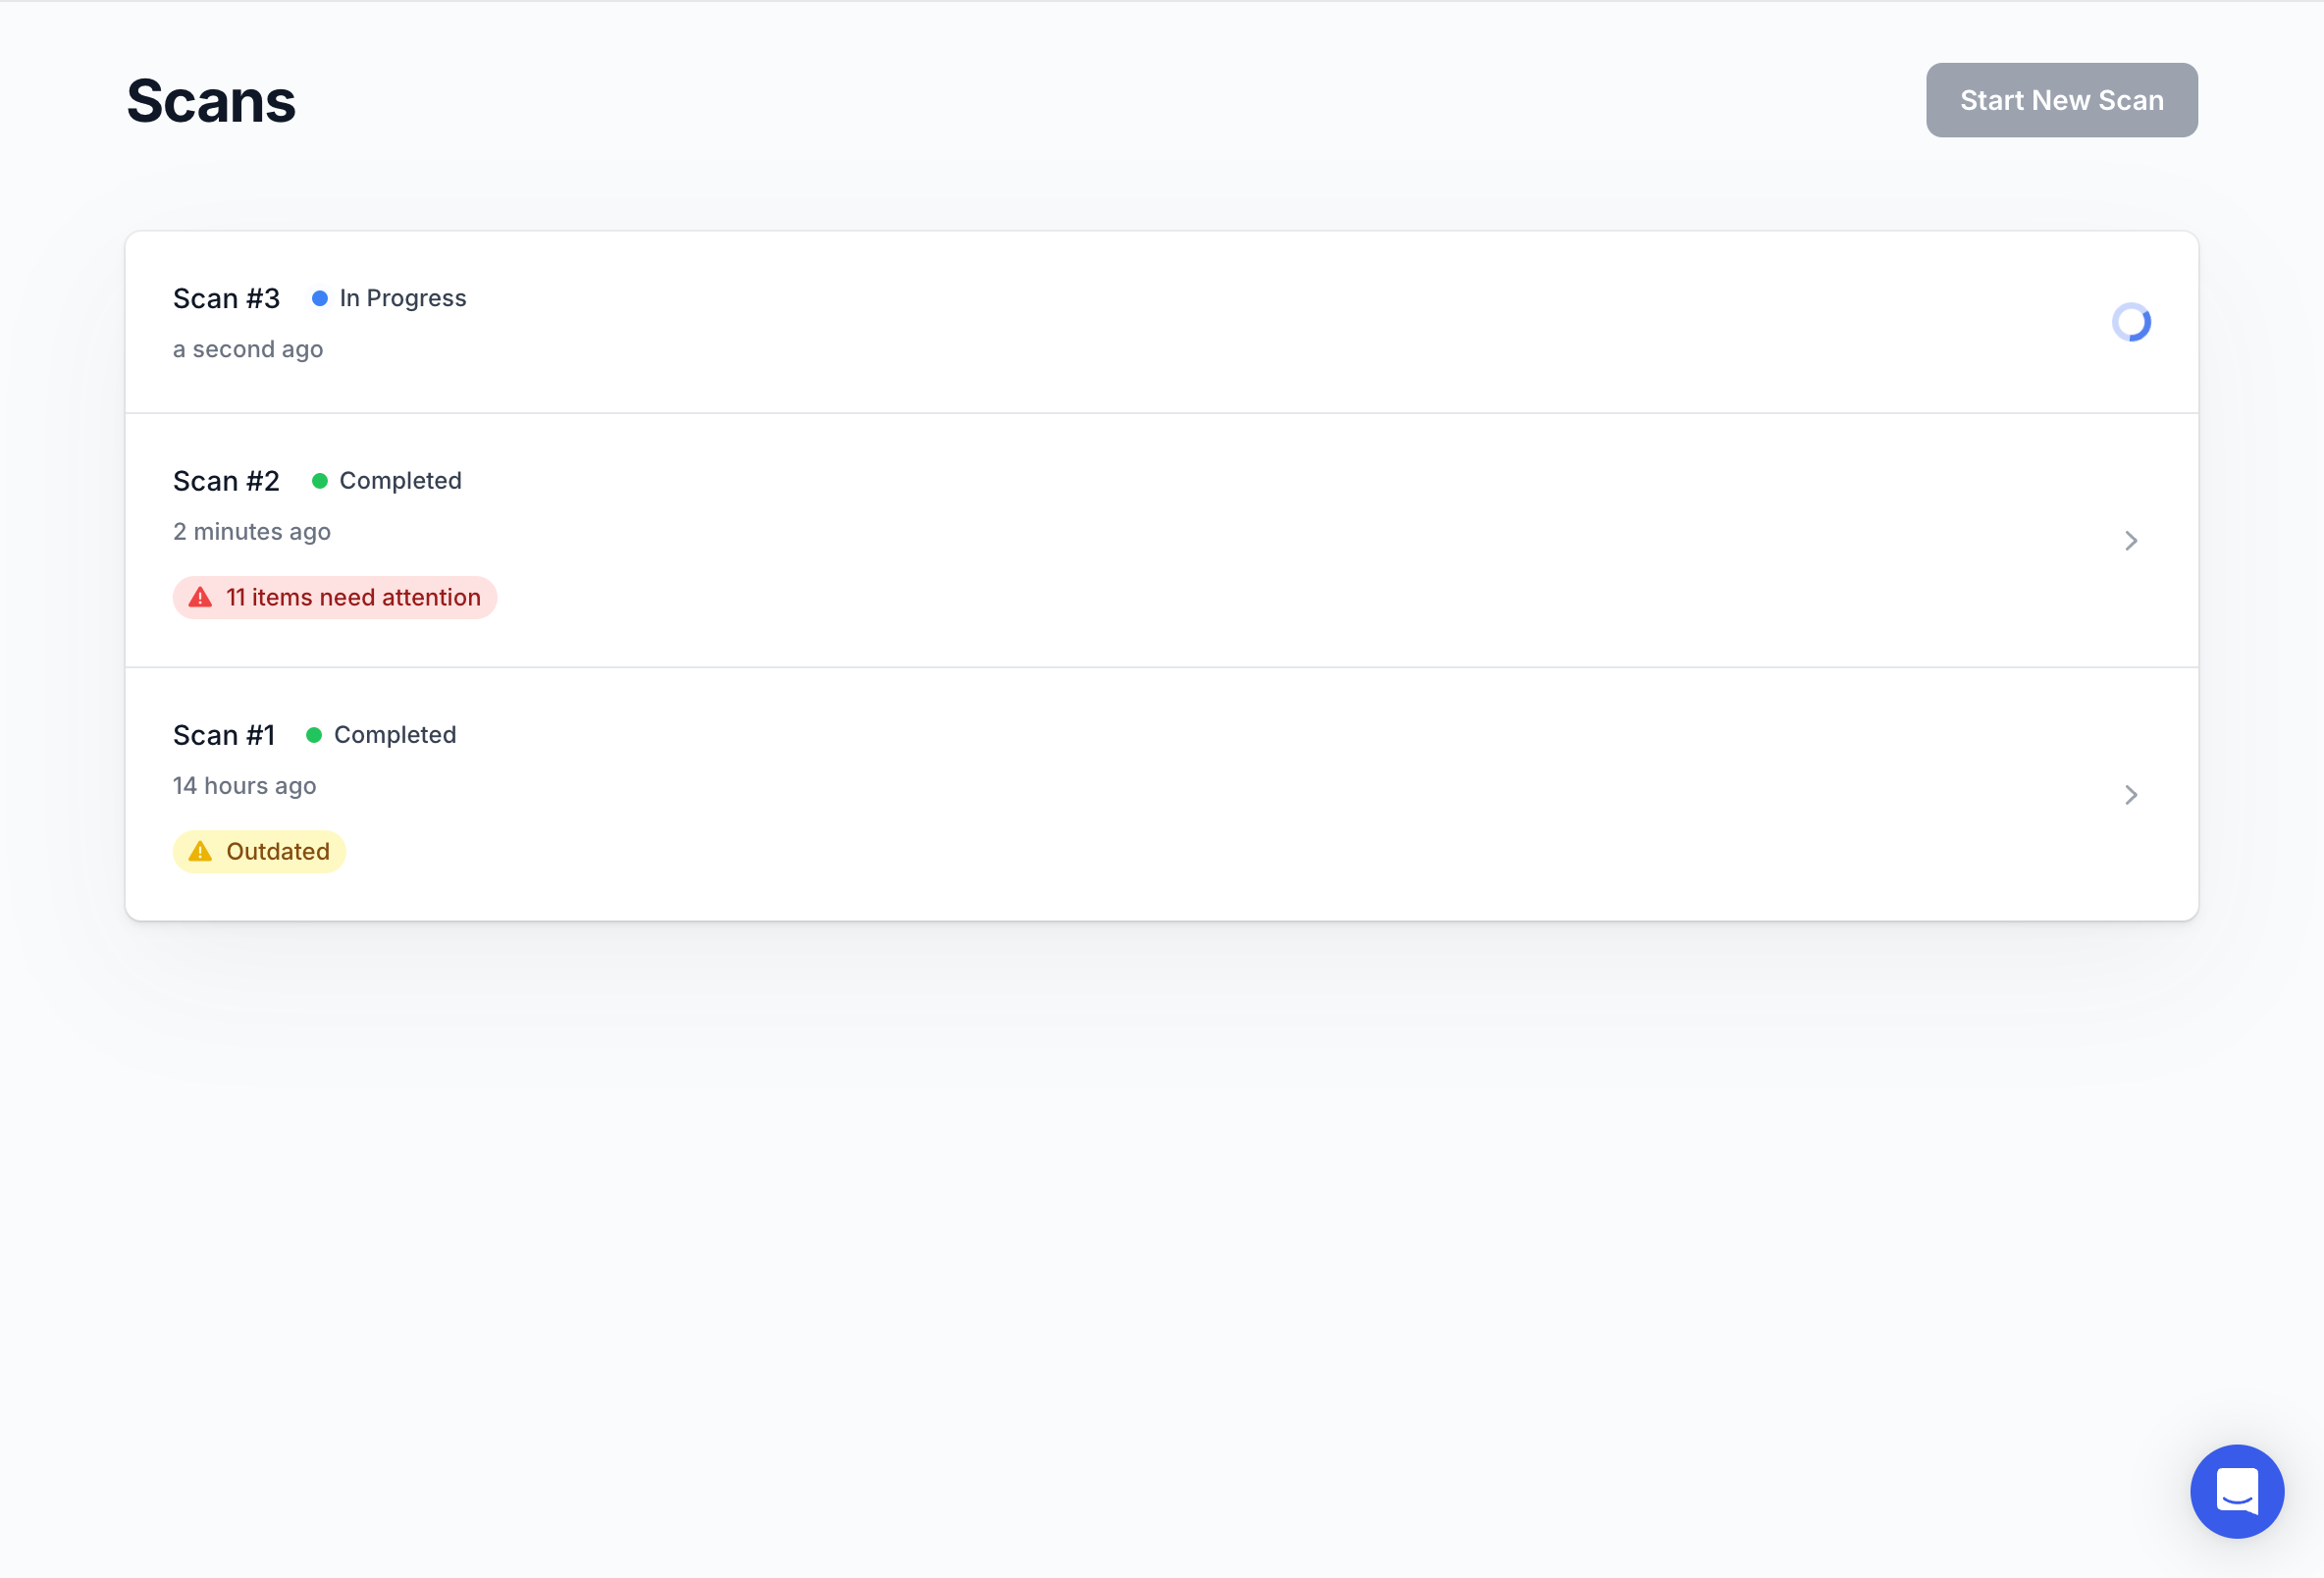
We will flag each service with one of the following status:
* `Ran before consent` - A service that is not part of a required category ran before consent is granted.
* `Not shown in banner` - We detected storage items from a service that is not shown in your banner.
* `Not part of a category or service` - We detected storage items that are not in your banner and we cannot match to a vendor/service.
* `All good` - Everything is set up correctly.
We also check if users can update their preferences after their initial consent.
## Manual Scanning
Scans can be created from the Website Scan page.
Accounts on free plans are limited to 1 scan per day.
Accounts on paid plans have access to 5 scans per day.
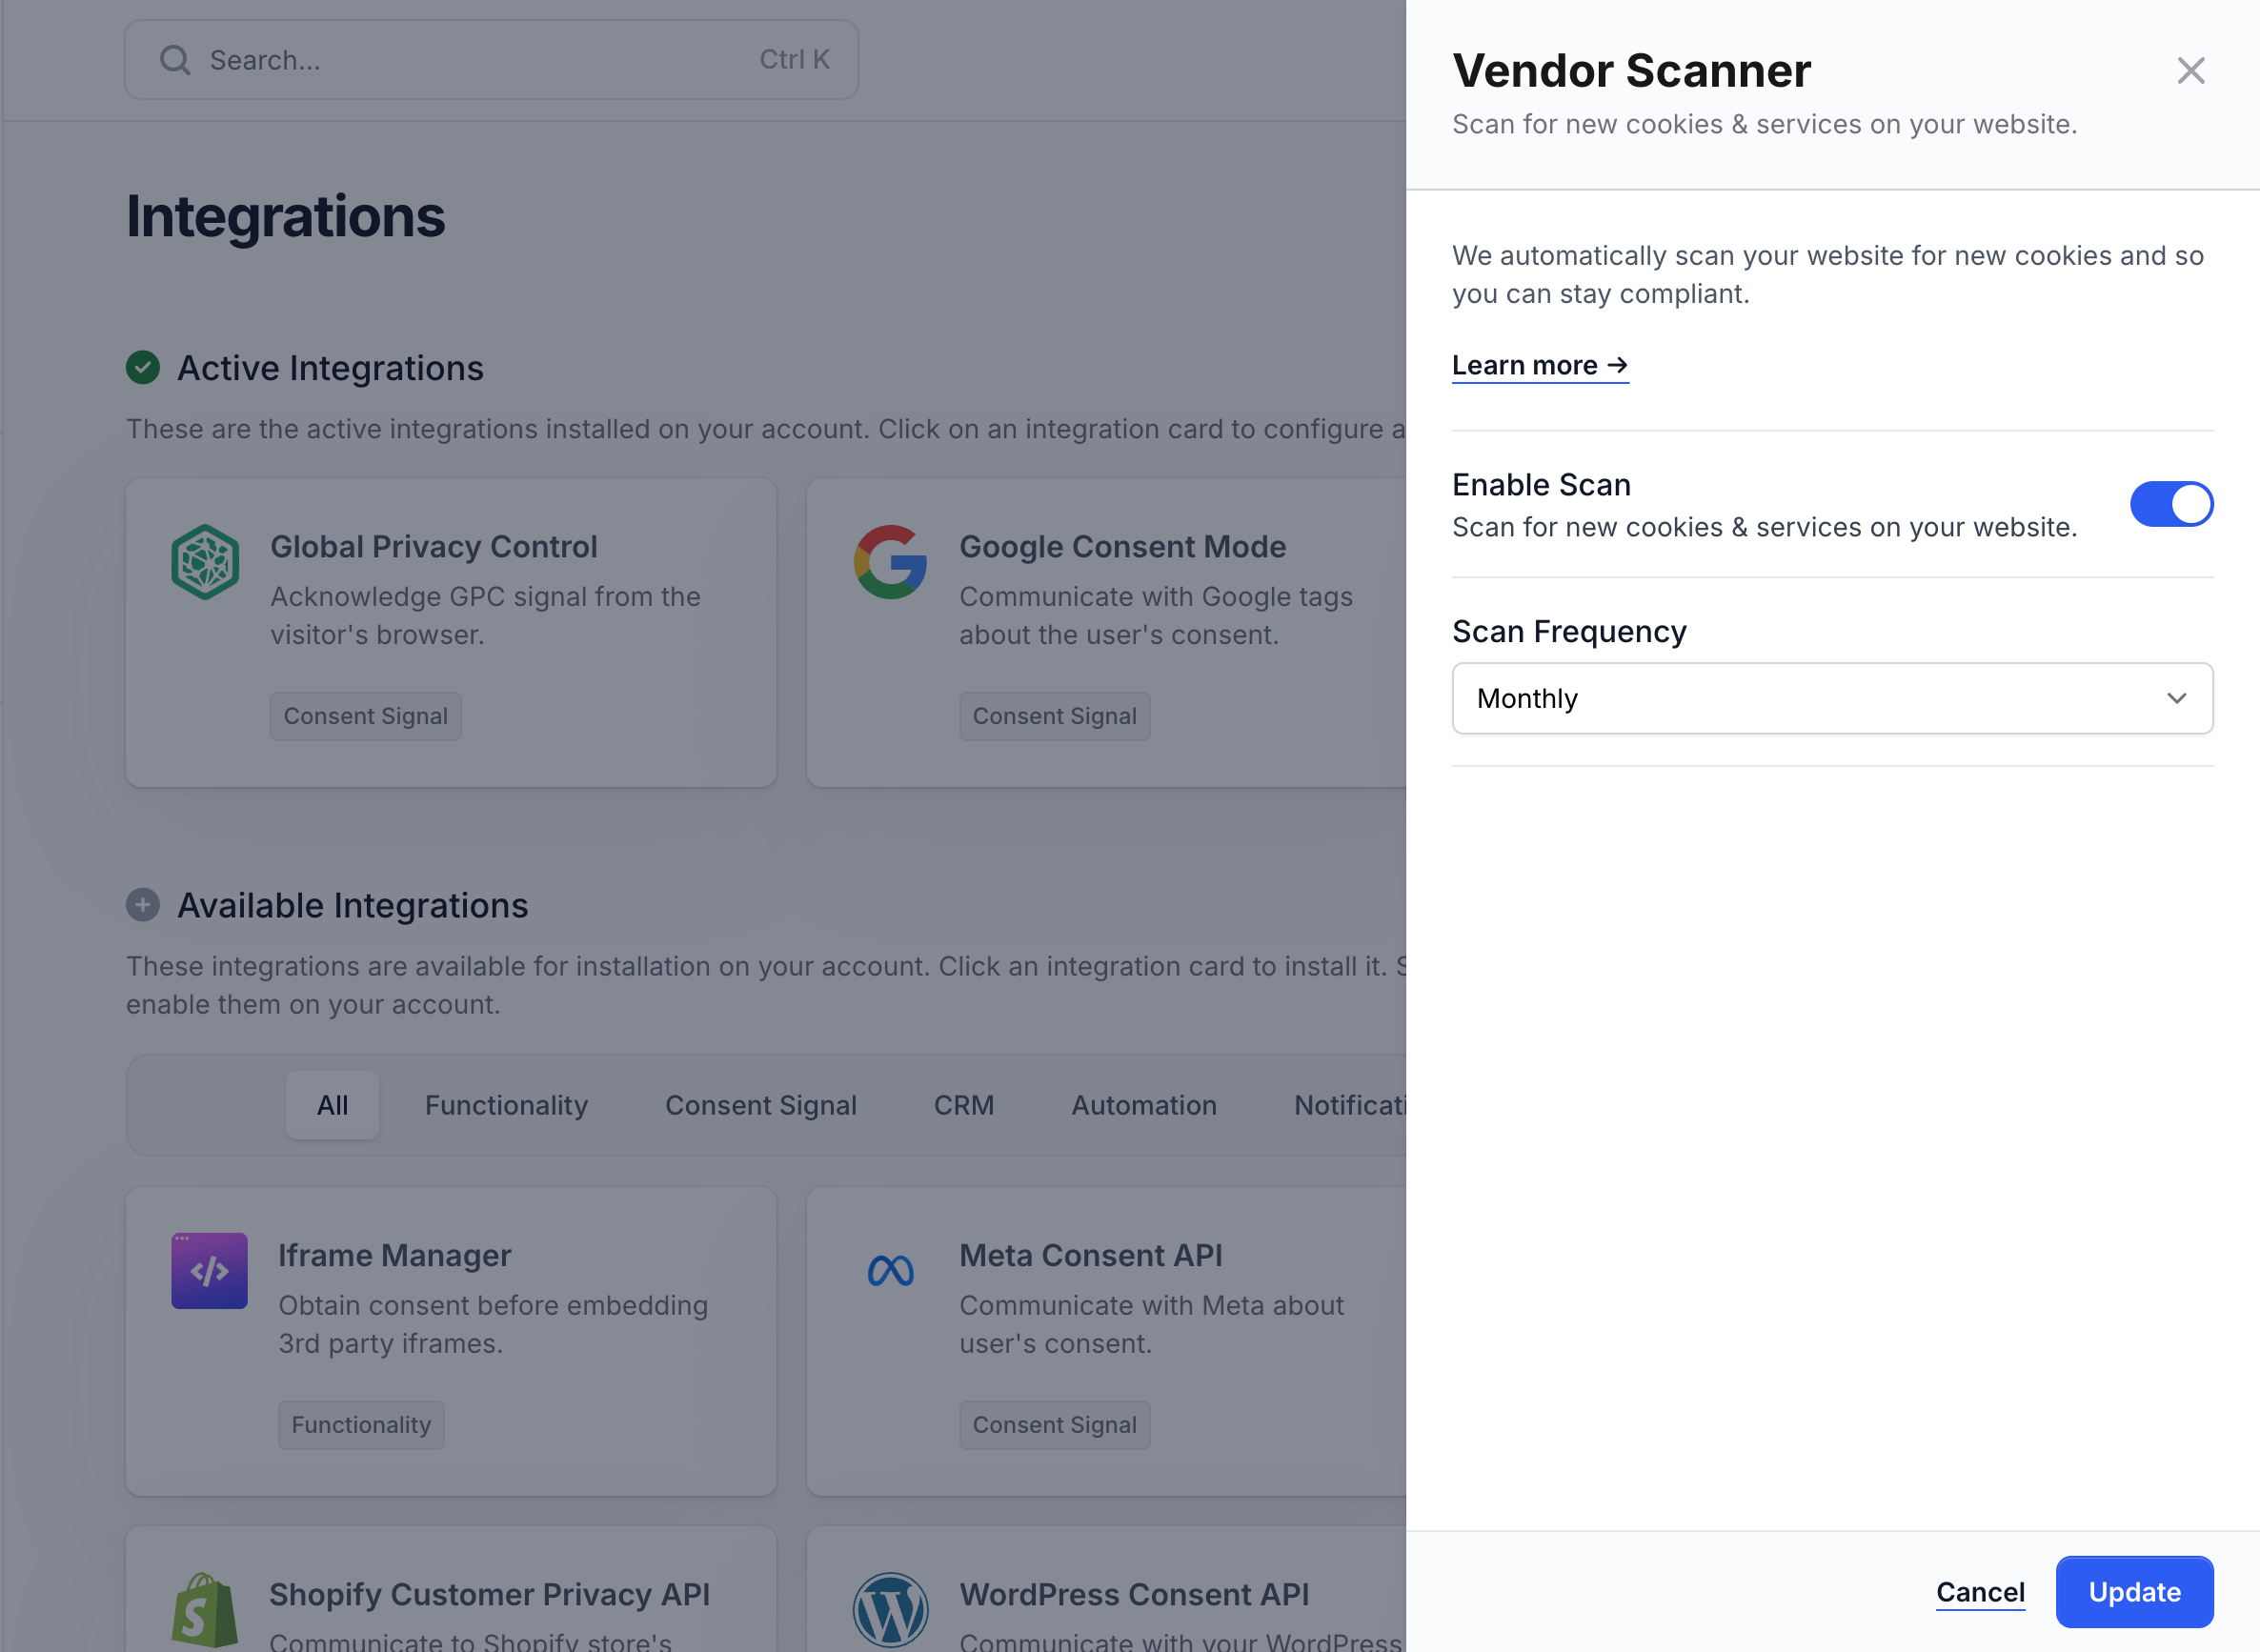
## Auto Scanning
Auto scanning can be enabled through the Vendor Scanner integration.
Automatic weekly scanning is only available to accounts on paid plans.
Accounts on free plans only have access to automatic monthly scanning.
# Wildcards
Source: https://docs.cookiechimp.com/docs/features/wildcard-cookies
Group similar storage items, reducing the need to categorize each one individually.
Platforms that generate unique storage item names, for each session or user, can create an overwhelming number of individual cookies. Wildcards streamline this by grouping these under a single pattern.
Use `*` in storage item names to match any storage item that follows a certain pattern.
## Usage
* Standard Naming: `session_12345`, `session_67890`, etc.
* Wildcard Usage: `session_*`
This wildcard pattern will match any storage item of the same type that starts with `session_`, treating them as a single group.
# Google Tag Manager
Source: https://docs.cookiechimp.com/docs/installation/google-tag-manager
Add CookieChimp with Google Tag Manager
Add your website's CookieChimp JS snippet in the `` tag of your HTML.
Do not add our HTML code via Google Tag Manager since we set the default consent states before Google Tag Manager runs.
The CookieChimp script needs to be added at the top of the `` section, so that it can run first, in order to ensure other scripts are only run based on consent.
If other scripts are added before, they may set cookies and other storage items before consent is granted.
```html
```
You need to replace `abc123` with your website's unique CookieChimp ID.
# Block Tags with Google Tag Manager
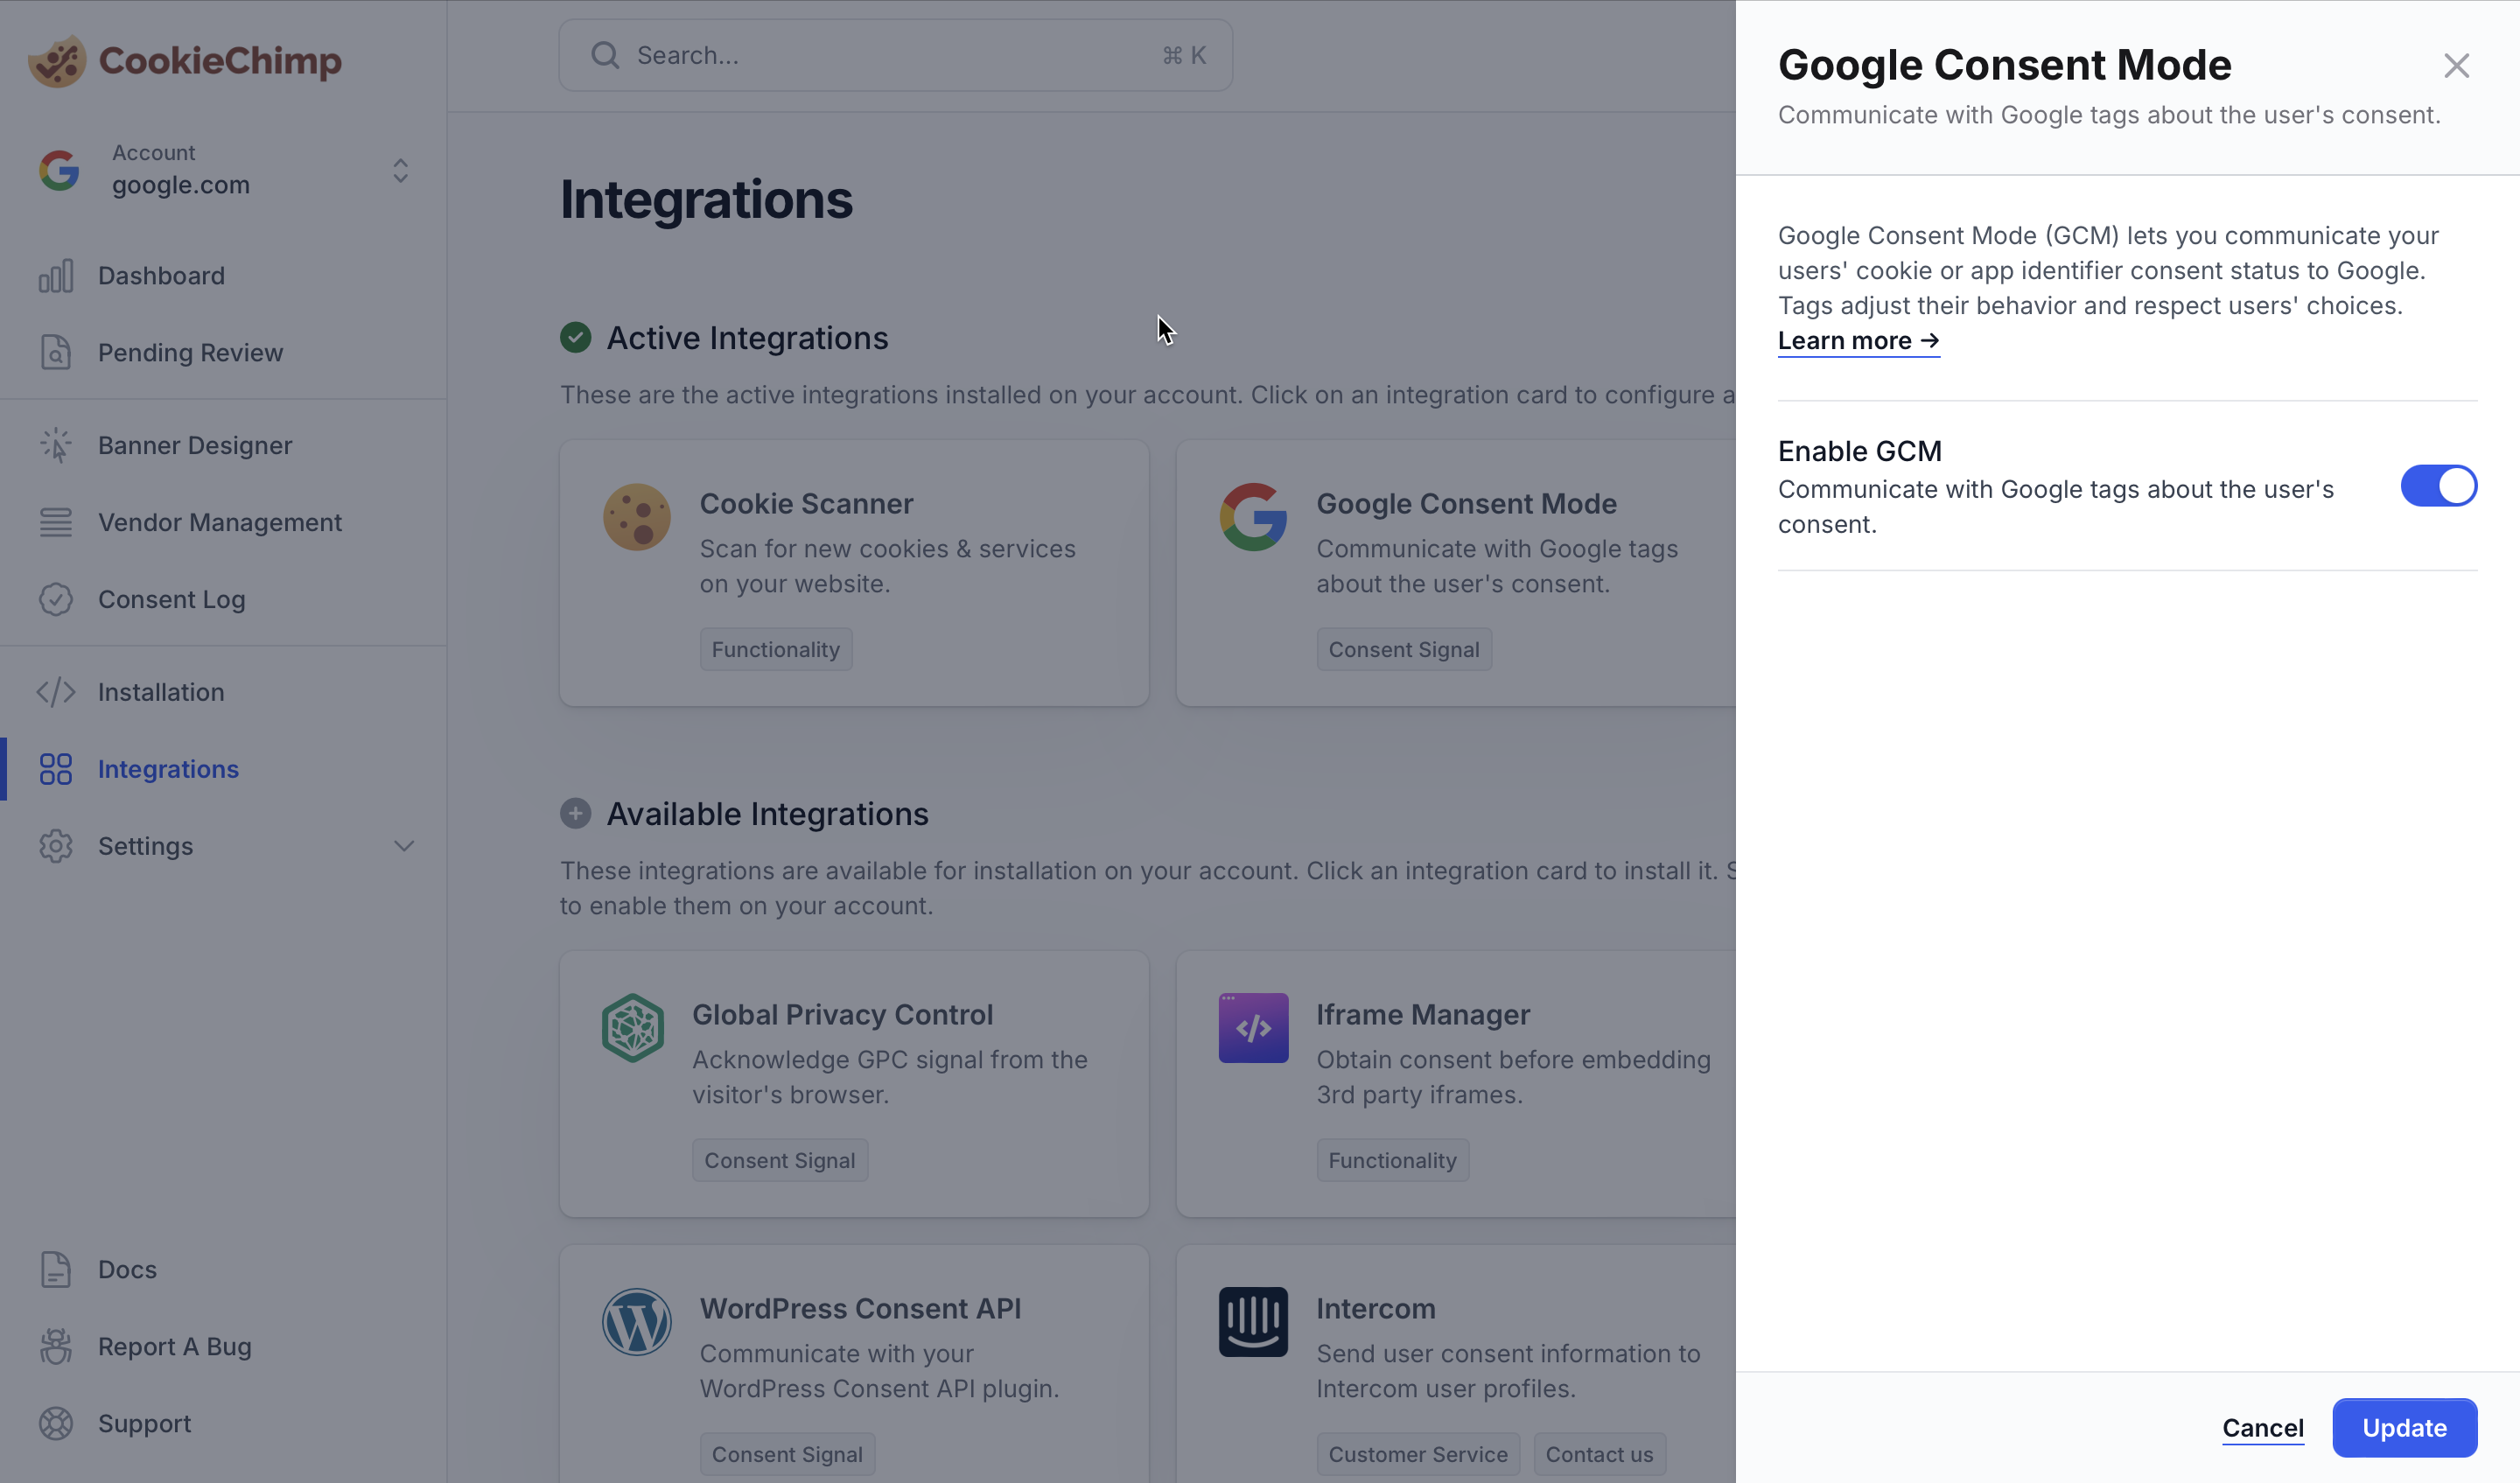
Navigate to "Integrations" from the sidebar and enable the Google Consent Mode integration.
Create or update a tag and add any additional consent checks for the tag to fire.
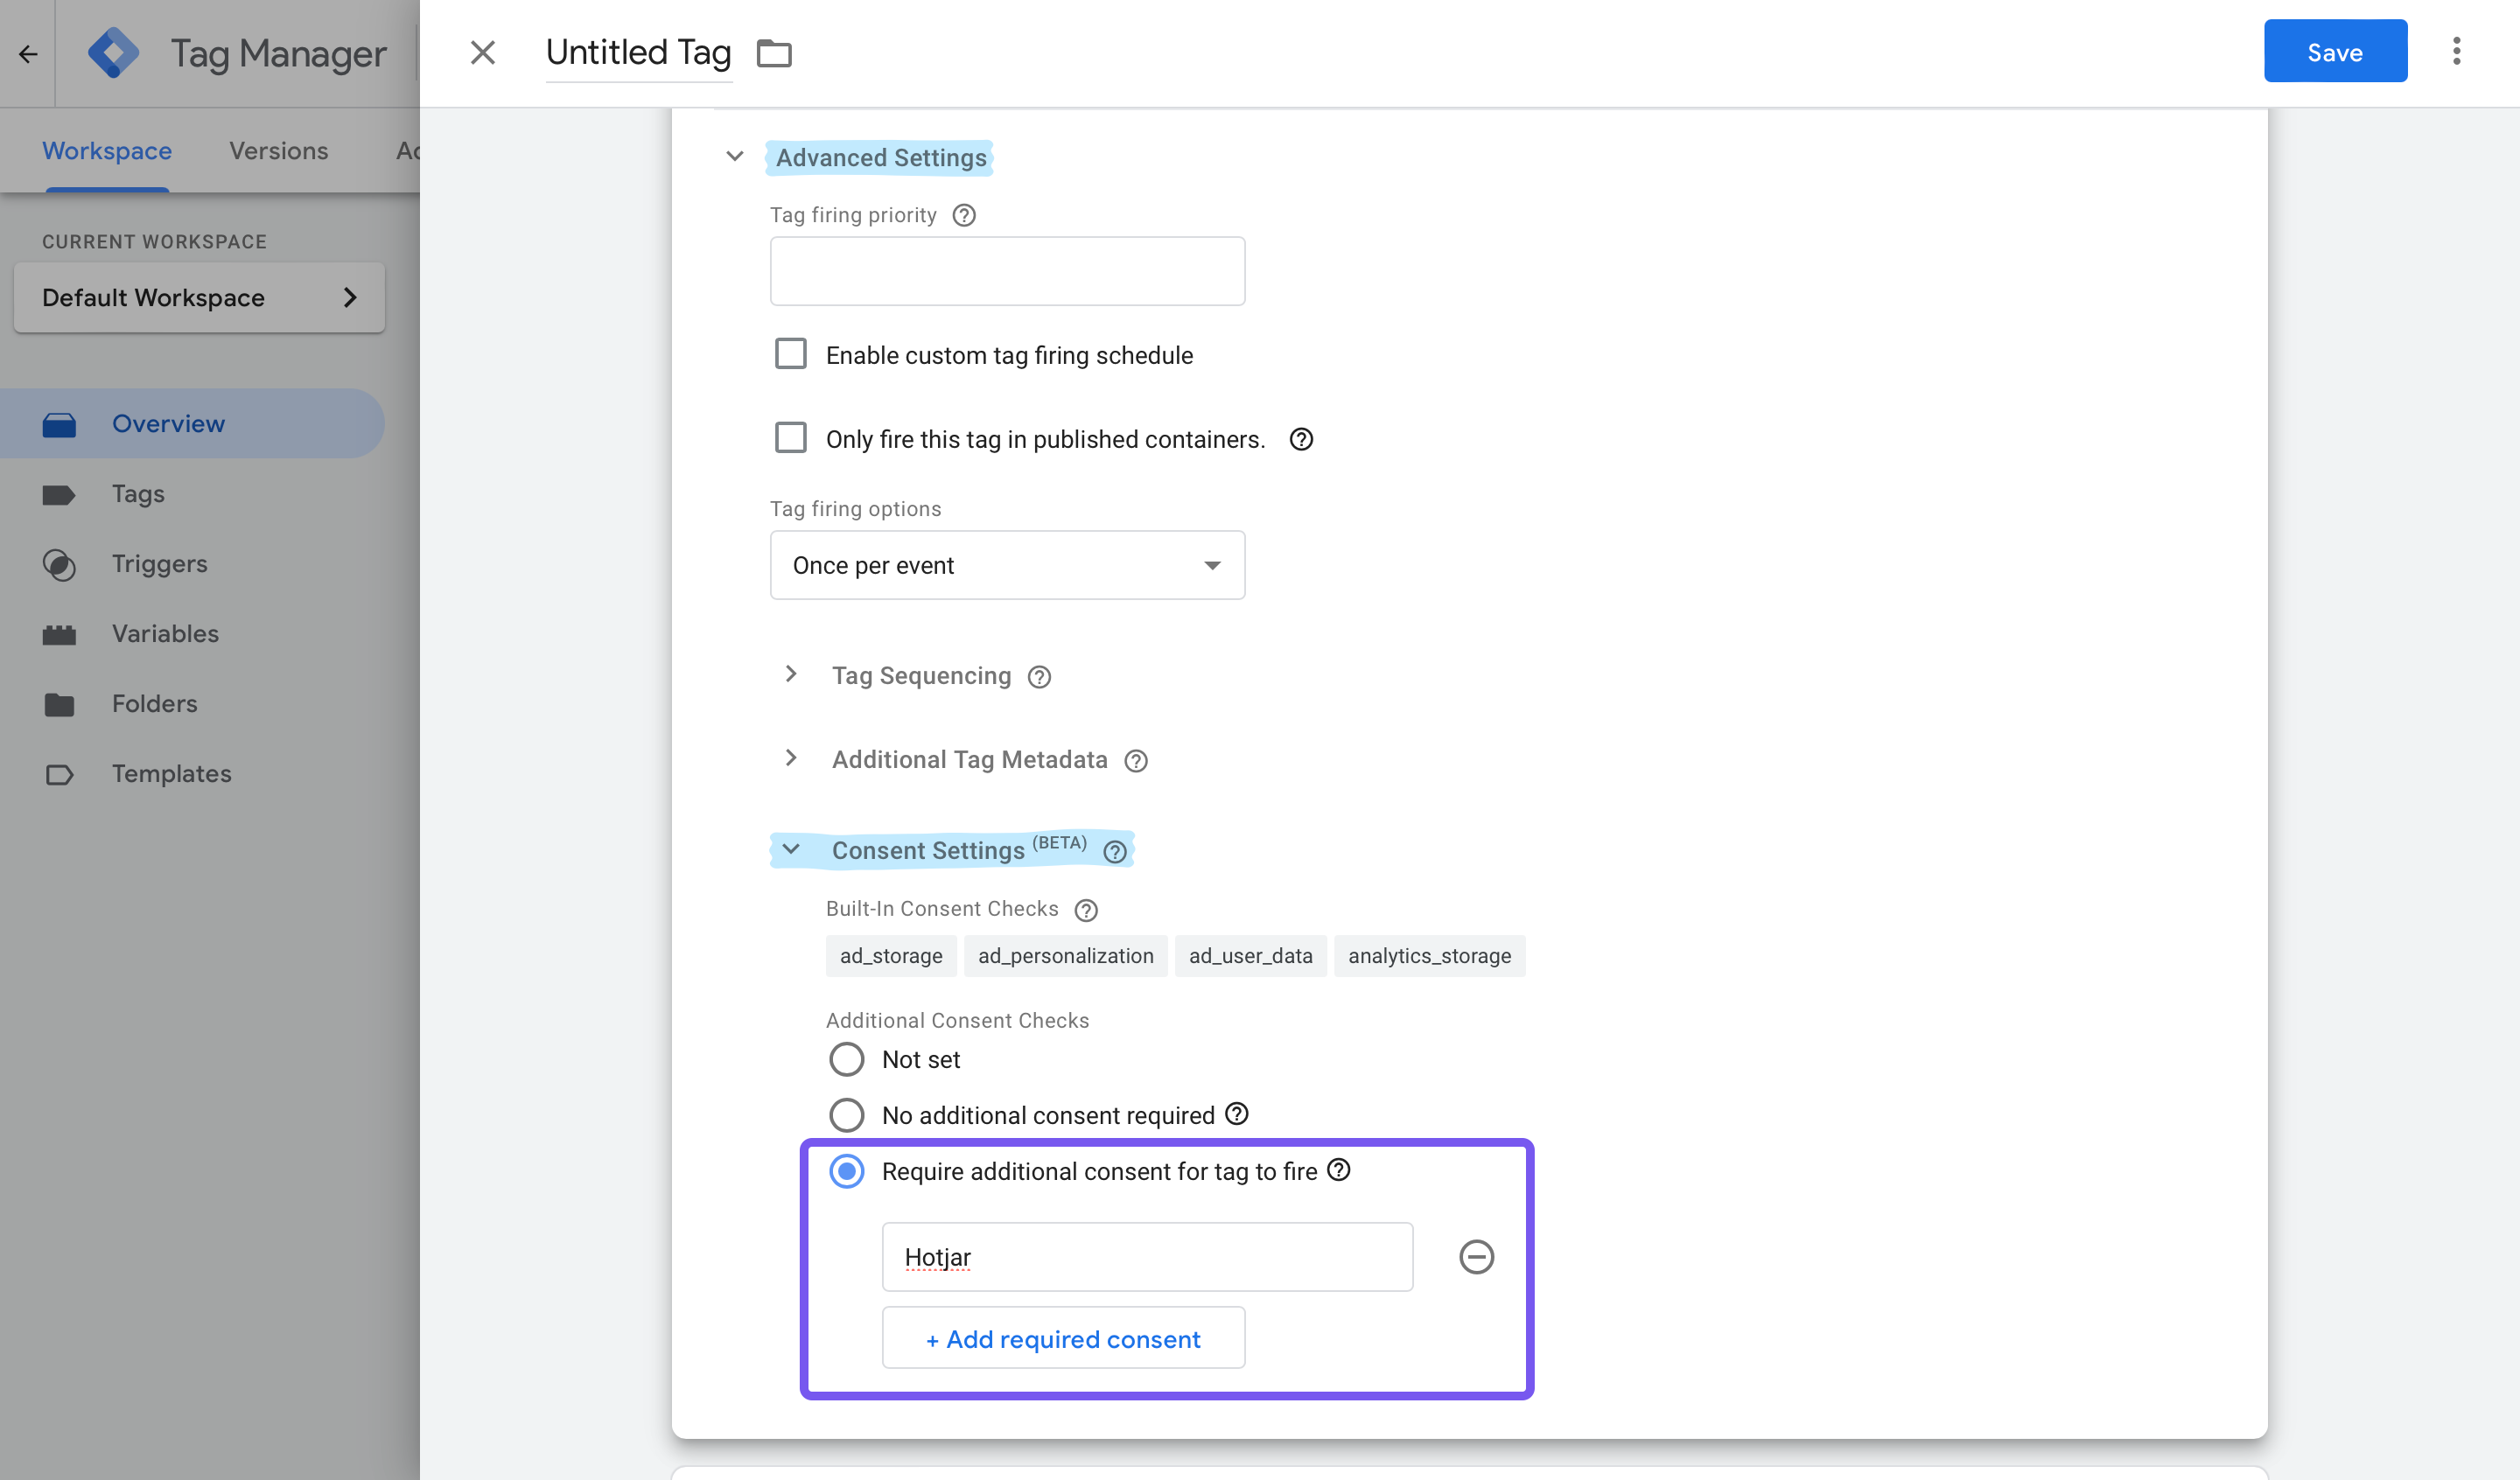
Navigate to "Advanced Settings" > "Consent Settings". Check the "Require additional consent for tag to fire" button and add any additional consent checks from the dropdown of options.
This can be a service name as added on the platform.
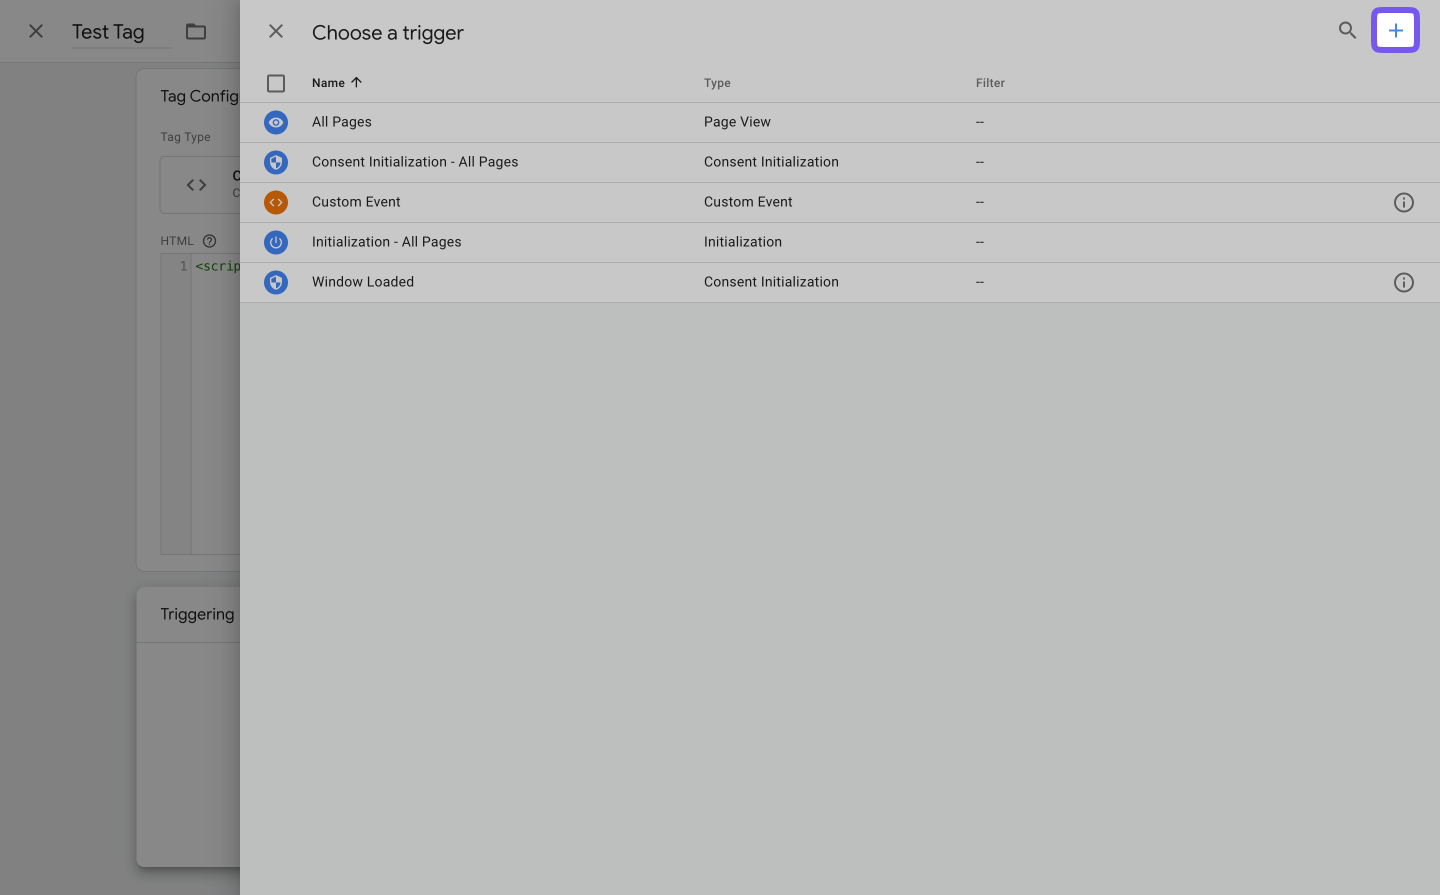
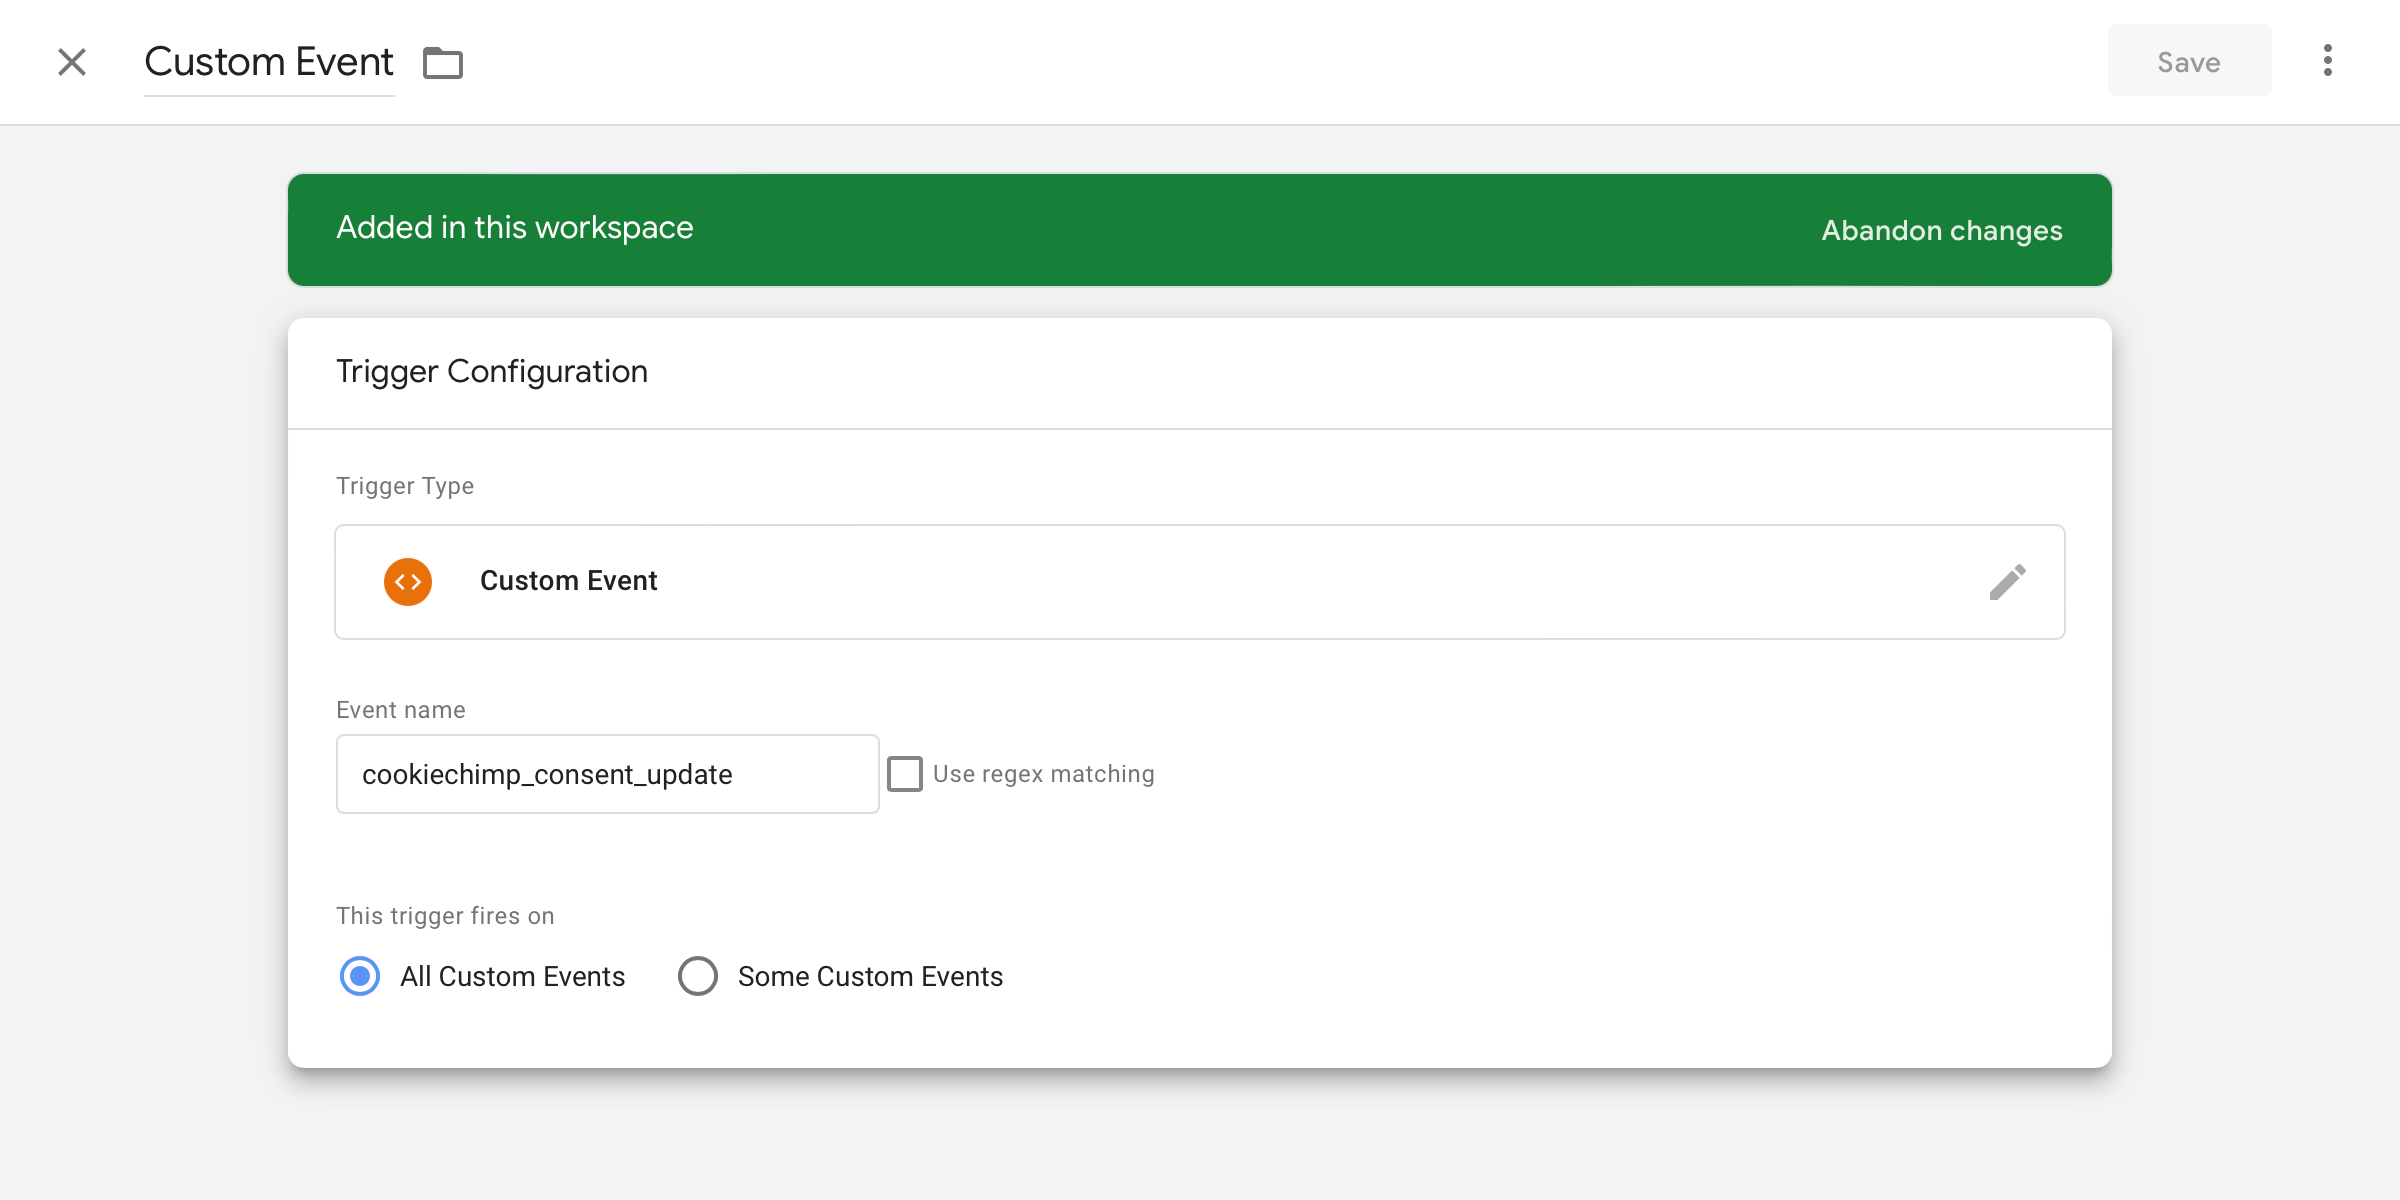
This is required to listen for changes in consent state. This event will be triggered by CookieChimp on page load and when the user changes their consent settings.
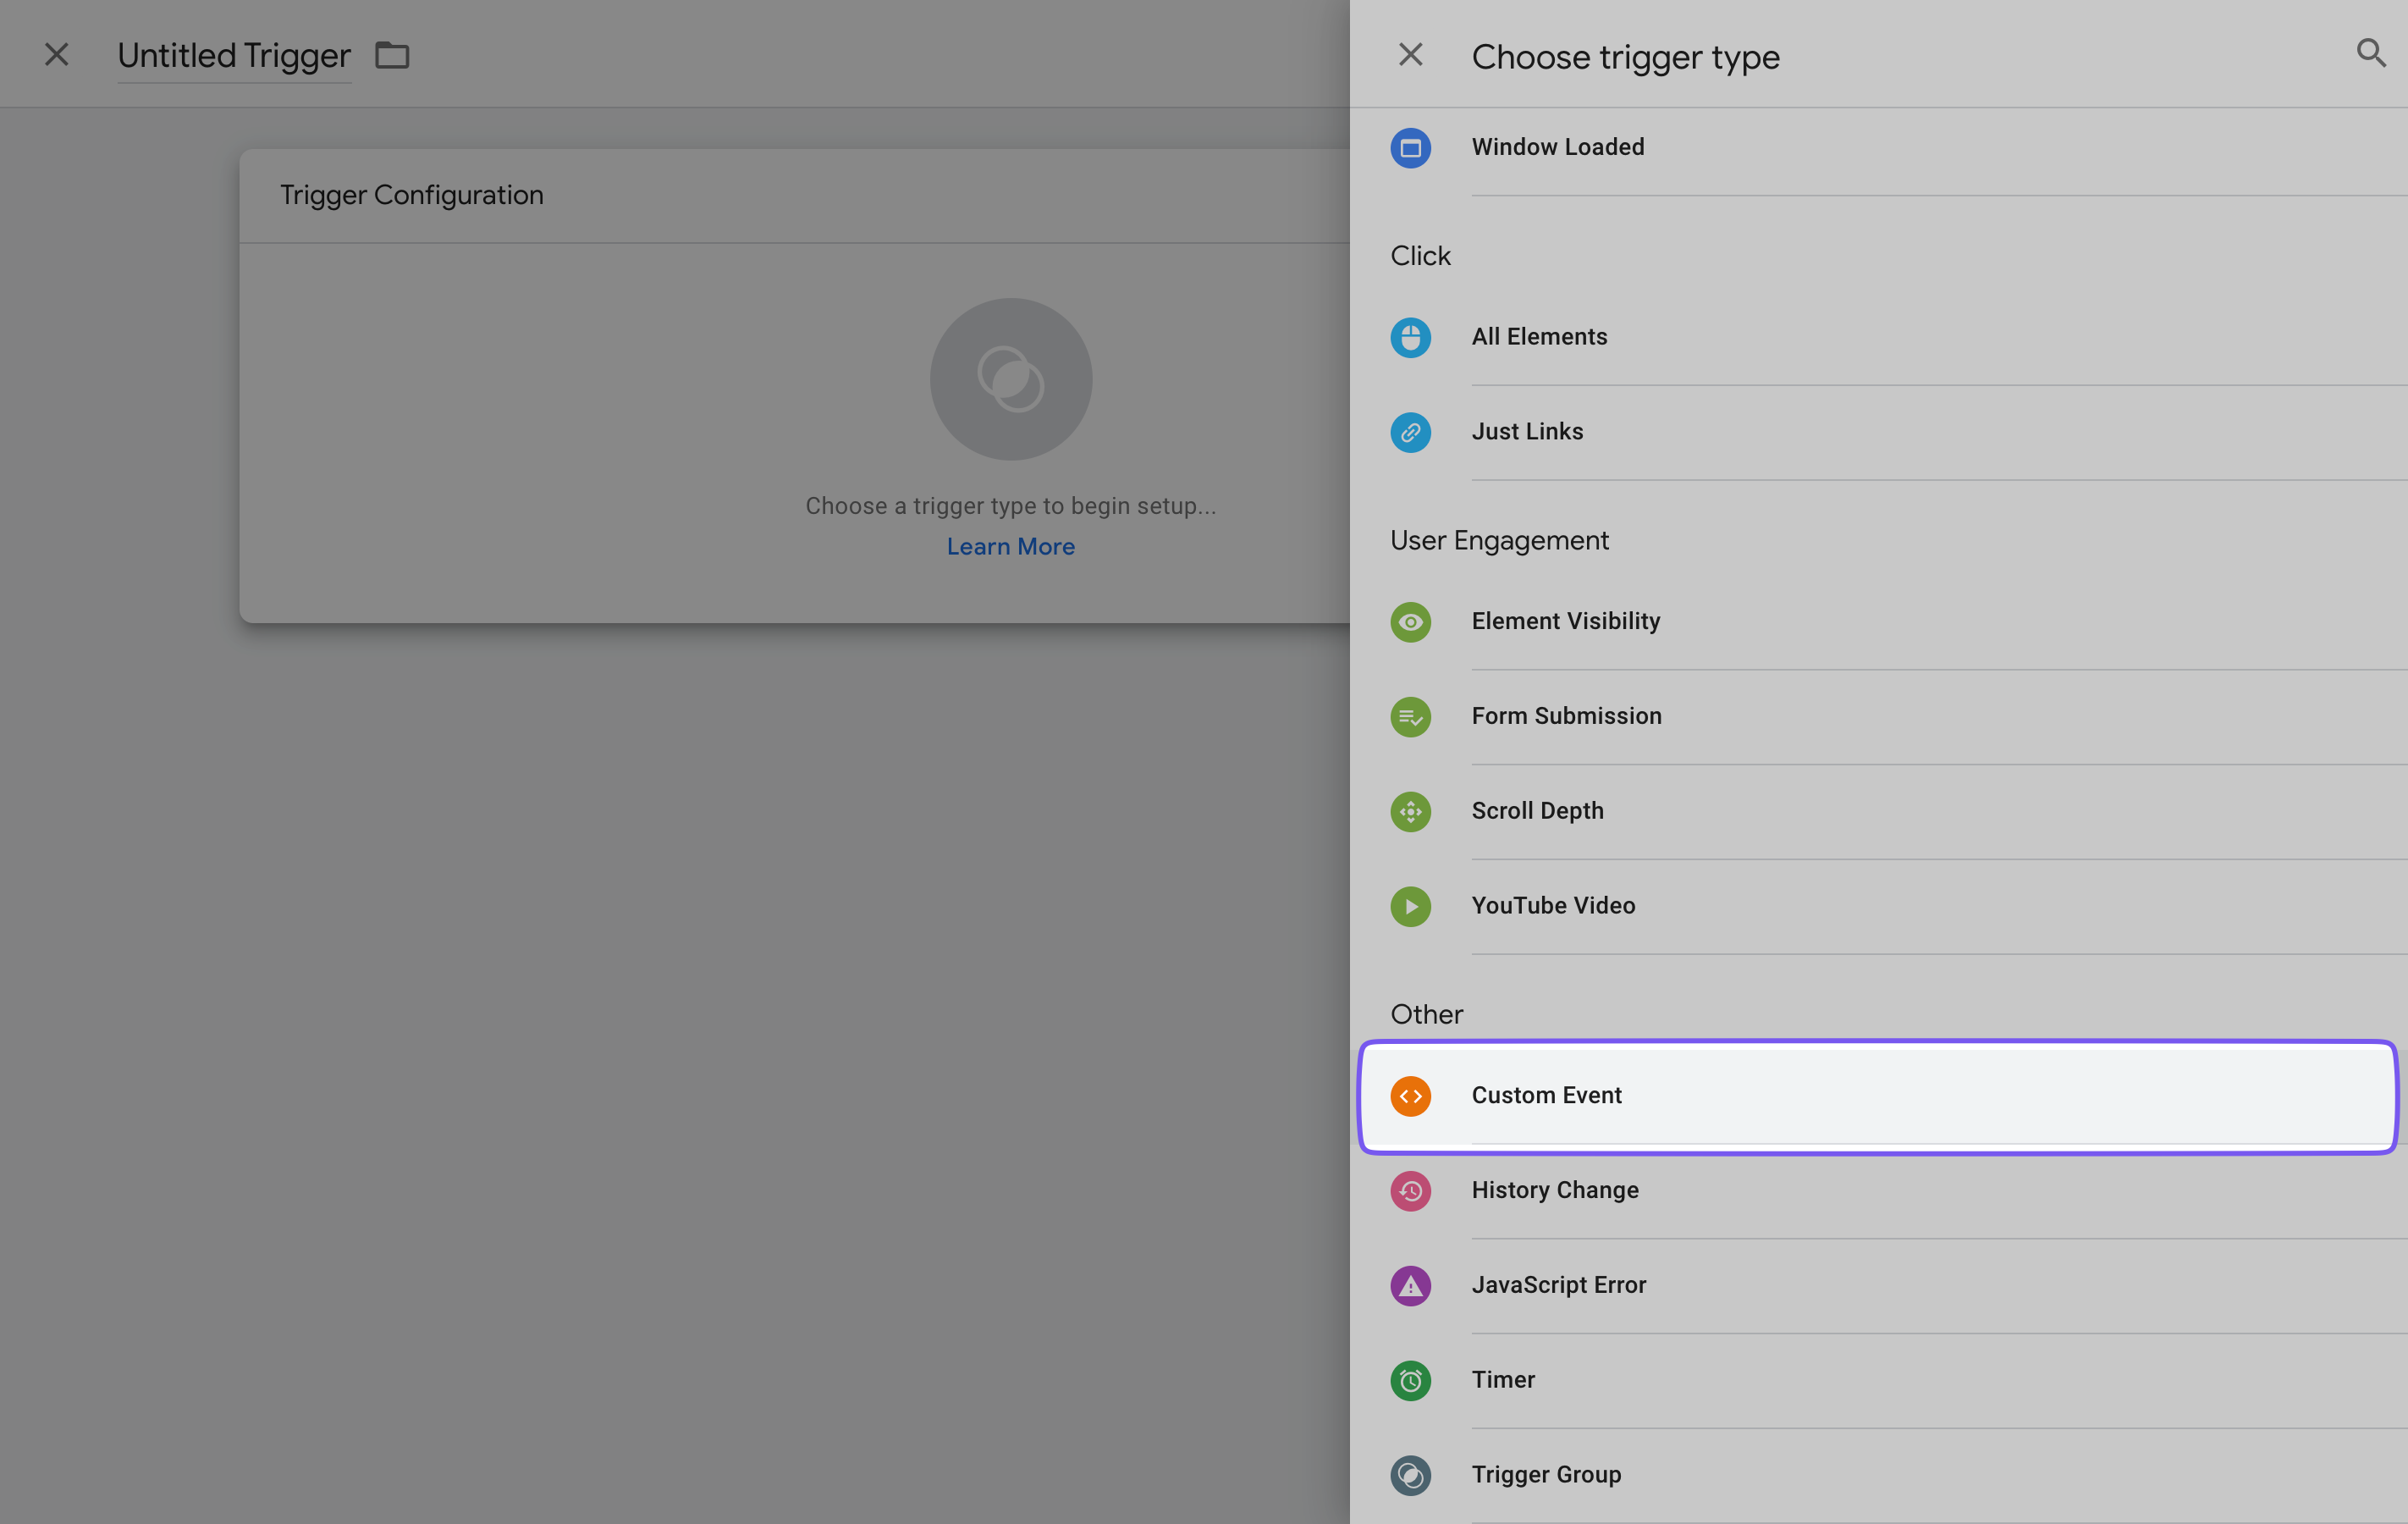
Choose "Custom Event"
Set up the custom trigger with event name `cookiechimp_consent_update` and save the tag.
This tag is now set up and will only fire when the required consent is granted.
## Category Mapping
GTM supports 7 different default consent types. CookieChimp maps these Google consent types into the following categories:
| CookieChimp Category ID | Google Consent Type |
| ----------------------- | ------------------------------------------------ |
| essential | functionality\_storage, security\_storage |
| marketing | ad\_storage, ad\_user\_data, ad\_personalization |
| analytics | analytics\_storage |
| personalization | personalization\_storage |
These categories are setup by default. When a user opts-in to a consent category or a Google service in the category is consented to, the linked Google consent type will change from 'denied' to 'granted' and vice versa.
Apart from the default 7 consent types, we will also send the consent state of your services to Google. e.g. When a user consents to a service named "Hotjar", the consent for this service is updated as 'granted'.
# Installation
Source: https://docs.cookiechimp.com/docs/installation/installation
Add CookieChimp CMP to your website in under 5 minutes
Add your website's CookieChimp JS snippet in the `` tag of your HTML:
The CookieChimp script needs to be added at the top of the `` section, so that it can run first, in order to ensure other scripts are only run based on consent.
If other scripts are added before, they may set cookies and other storage items before consent is granted.
```html
```
You need to replace `abc123` with your website's unique CookieChimp ID.
To ensure compliance with GDPR regulations, it's crucial not only to display a consent banner but also to actively block all non-essential scripts and cookies until the user has given explicit consent.
For comprehensive instructions on how to effectively manage and block scripts and cookies, please refer to our [Scripts Management Section](/docs/block-scripts-cookies/script-attributes).
CookieChimp provides a floating privacy icon (Privacy Trigger) that allows users to manage their cookie preferences at any time.
You can enable this in the banner settings.
Optionally, you can open the preferences modal with a custom link or button by adding a button with the data attribute `data-cc="show-preferencesModal"`:
```html
```
## Troubleshooting
* Check if the domain is allowed in the Settings page on our platform.
* If the widget doesn't display, ensure there are no conflicts with other scripts or styles on your website.
* Clear your browser cache and cookies, then reload the website.
* Enable "Debug mode" from our platform and open JS console to check for any errors.
## Need Help?
If you encounter any issues or require further assistance, please reach out to us via our chat.
# Next.js
Source: https://docs.cookiechimp.com/docs/installation/nextjs
Add CookieChimp to your Next.js application
This page shows the **simplest** way to add CookieChimp to a Next.js app and check whether a **specific service** (e.g., "Google Analytics" in the "analytics" category) has consent to take actions.
**Important Setup Notes**: Before following this guide, ensure you have your correct **Account ID** from your CookieChimp dashboard. If you're testing on `localhost`, make sure to add `localhost` to the **Additional Domains** in your Account Settings > General, otherwise the banner will not show during local development.
Looking for a complete example? Check out our [Next.js example implementation](https://github.com/IdentitySquare/cookiechimp-nextjs-example) on GitHub for a working reference.
***
## Prerequisites
* **Next.js (App Router)** project (`app/` directory).
* Your CookieChimp **Account ID** (replace `YOUR_ACCOUNT_ID` below).
* If testing locally: `localhost` added to **Additional Domains** in Account Settings > General.
***
## What You'll Build
1. Load the CookieChimp script **first** in ``
2. Add the required **trigger container**
3. Listen for consent and **log** if a service is allowed
***
## Step 1 - Load CookieChimp in `` first
Use Next.js `
```
## Privacy Trigger Position
You can specify location where the Privacy Trigger (floating icon to update preferences) is added to the DOM by placing a div with the ID `cookiechimp-container` on the page.
```html
```
This is useful for single page applications (SPA) where you want the floating icon to be persistent across different pages.
Ensure to add this in a location which does not get replaced when navigating between pages.
If you are using [Turbo](https://turbo.hotwired.dev/handbook/building#persisting-elements-across-page-loads) or [Astro JS with View Transitions](https://docs.astro.build/en/guides/view-transitions/), you can add specific attributes to the div to ensure it persists across navigations.
```html
```
## Callbacks & Events
The `cc:onConsented` event can be used to execute code based on user consent.
```javascript
window.addEventListener("cc:onConsented", function (event) {
if (CookieConsent.acceptedCategory("analytics")) {
// "analytics" category enabled
}
if (CookieConsent.acceptedService("Google Analytics", "analytics")) {
// "Google Analytics" service enabled
}
});
```
The `cc:onUpdate` event can be used to execute code when the user changes their consent.
```javascript
window.addEventListener("cc:onUpdate", function (event) {
var detail = event.detail;
/**
* detail.cookie
* detail.changedCategories
* detail.changedServices
*/
if (detail.changedCategories.includes("analytics")) {
if (CookieConsent.acceptedCategory("analytics")) {
// "analytics" category was just enabled
} else {
// "analytics" category was just disabled
}
if (detail.changedServices["analytics"].includes("Google Analytics")) {
if (CookieConsent.acceptedService("Google Analytics", "analytics")) {
// "Google Analytics" service was just enabled
} else {
// "Google Analytics" service was just disabled
}
}
}
});
```
[View all available callbacks & events ›](/callback-events)
# WordPress
Source: https://docs.cookiechimp.com/docs/installation/wordpress
Add CookieChimp to your WordPress site
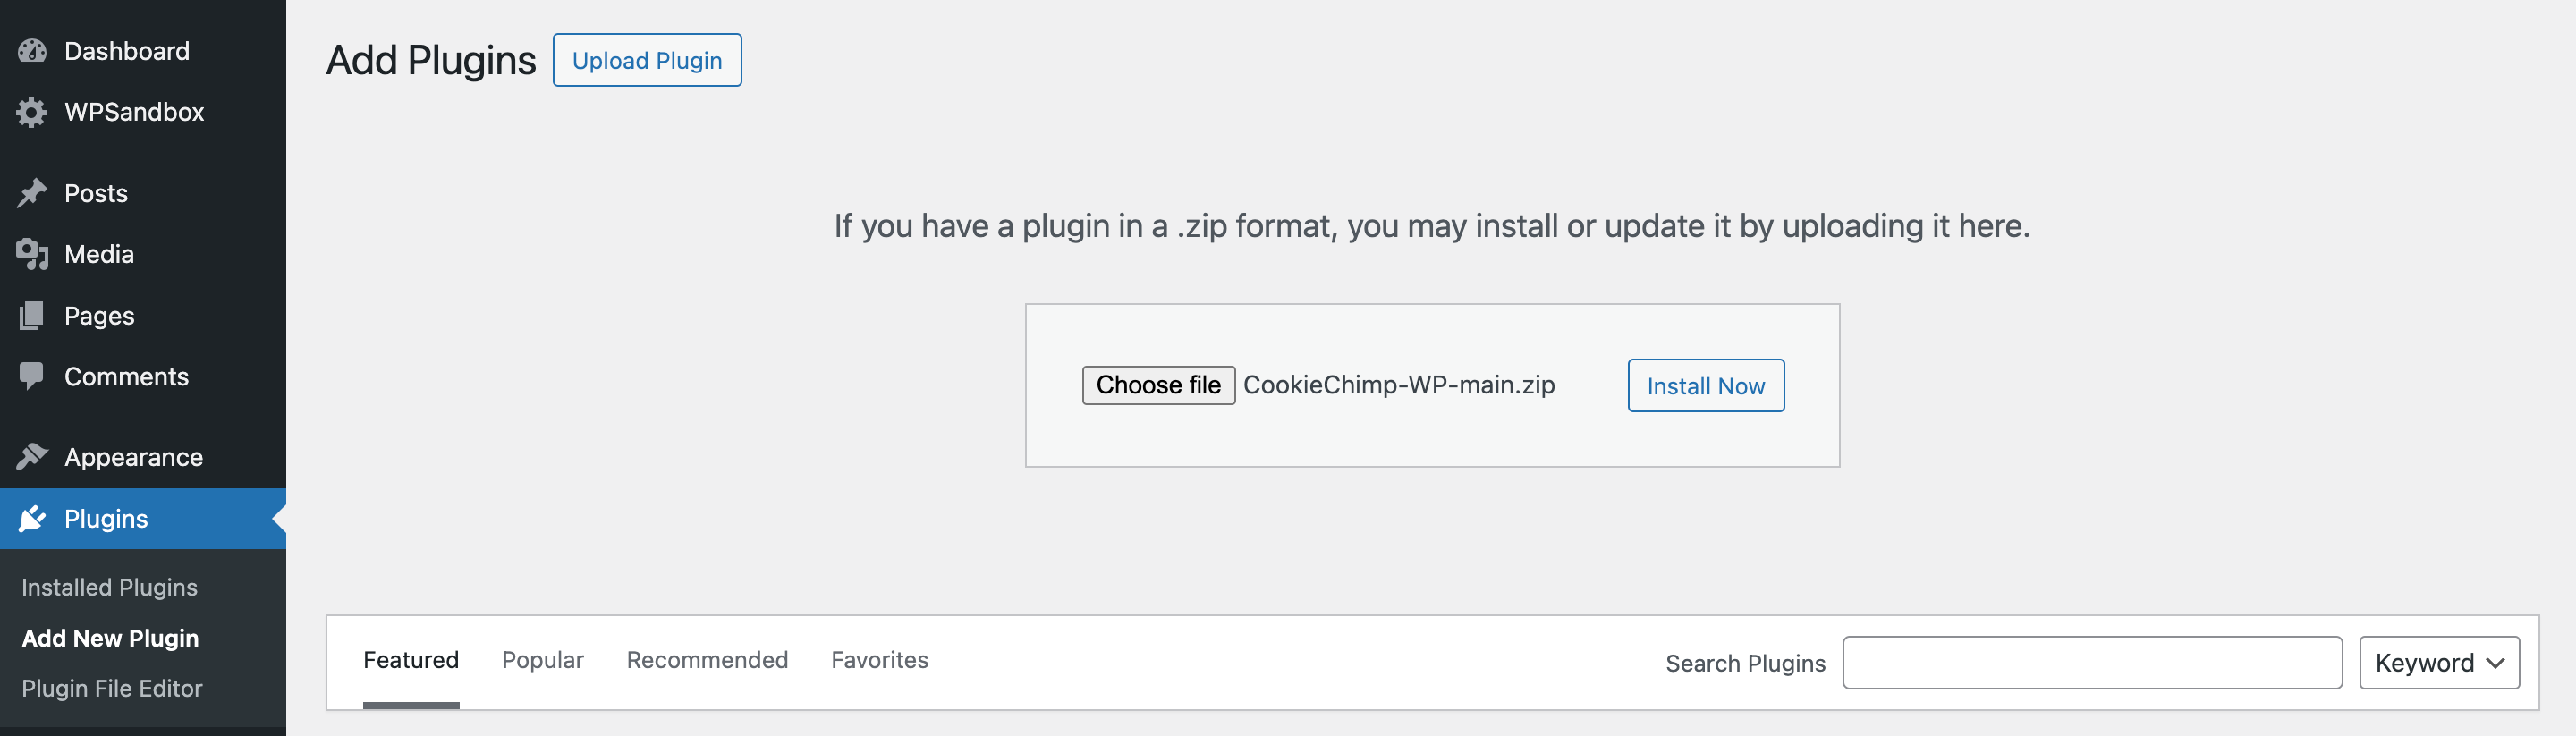
Download the [CookieChimp WordPress Plugin](https://github.com/IdentitySquare/CookieChimp-WP/archive/refs/heads/main.zip).
Our plugin ensures that CookieChimp's JS code is run before other scripts on your Wordpress site.
Upload the file to your WordPress site and install.
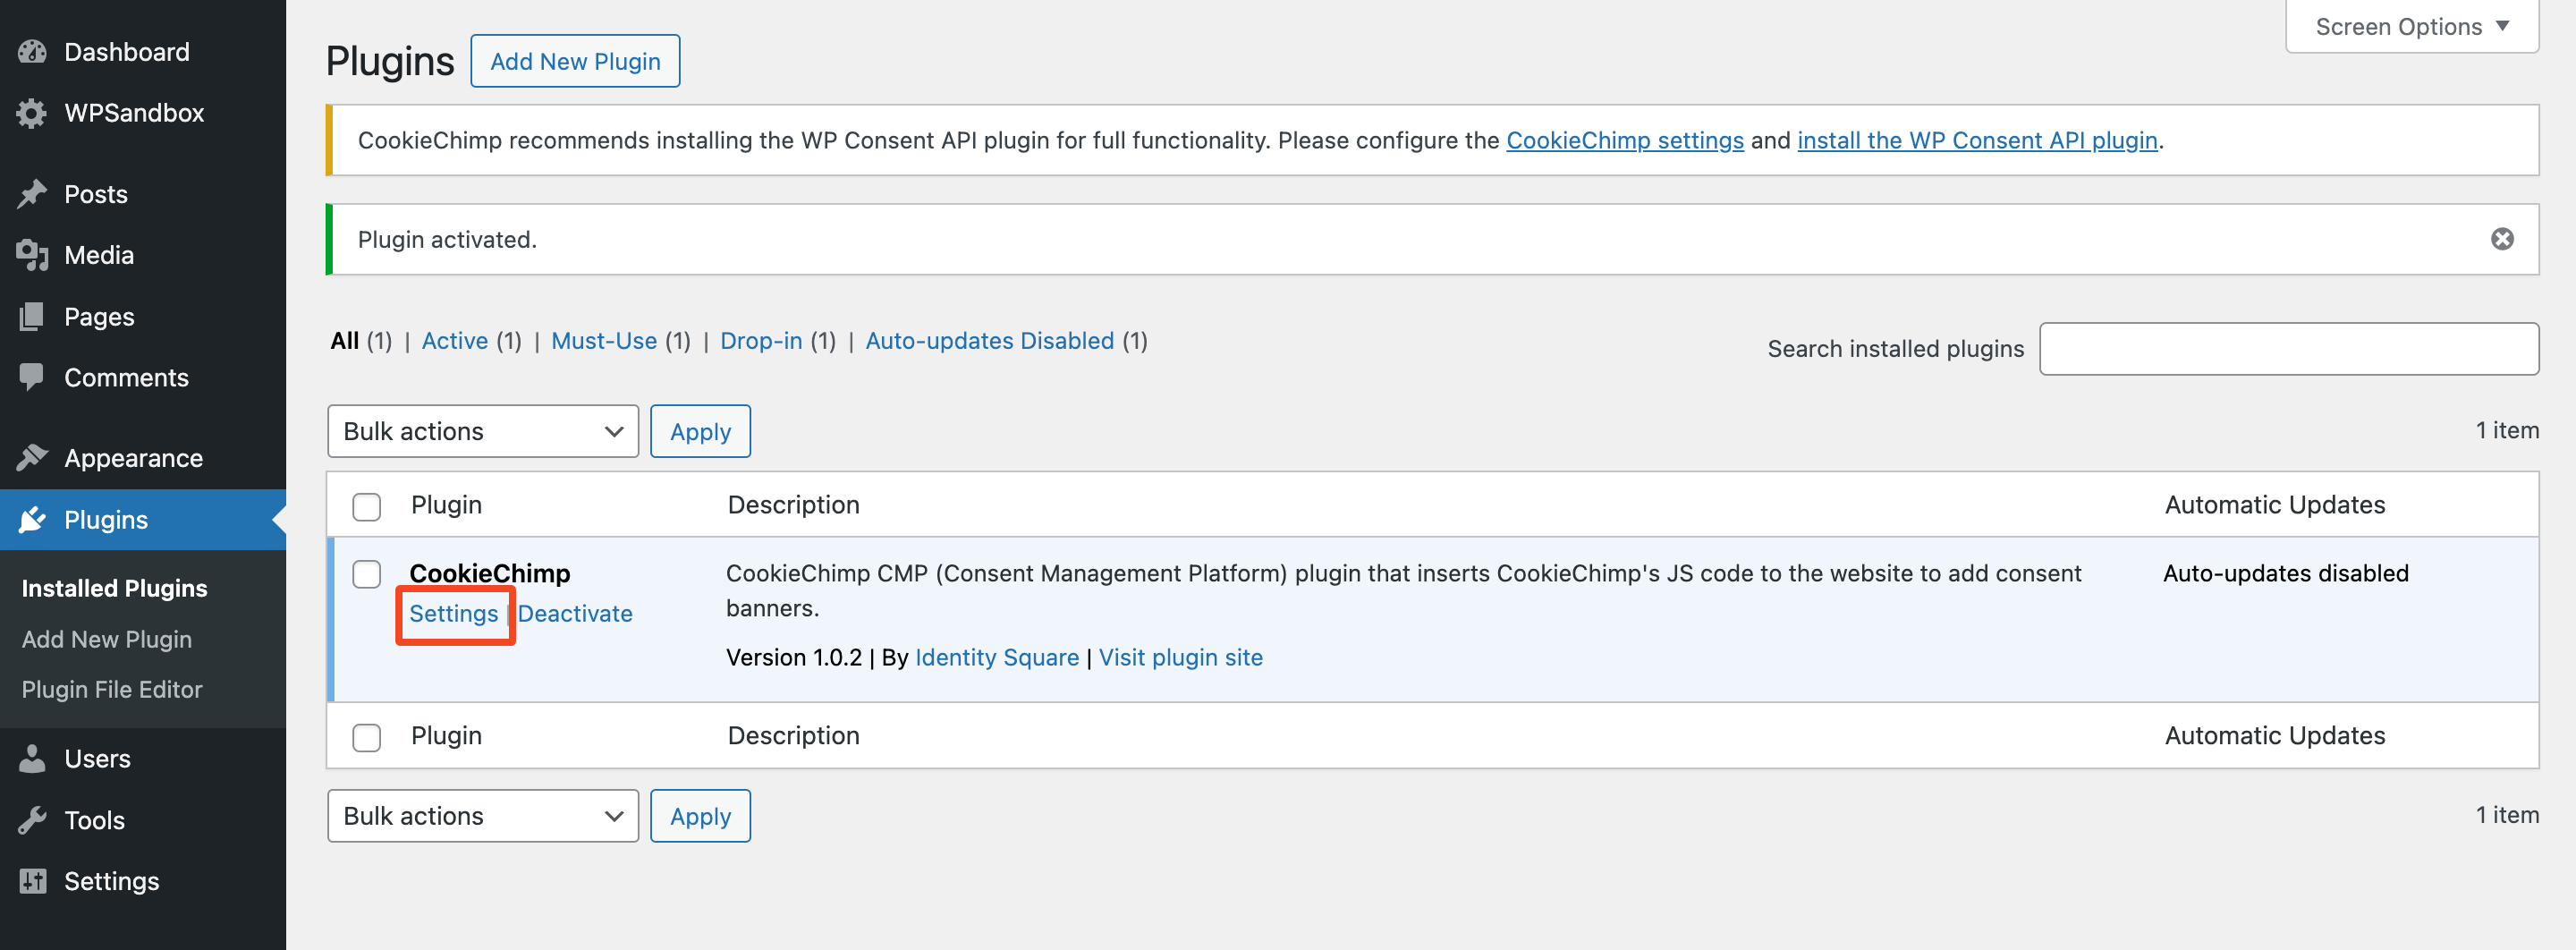
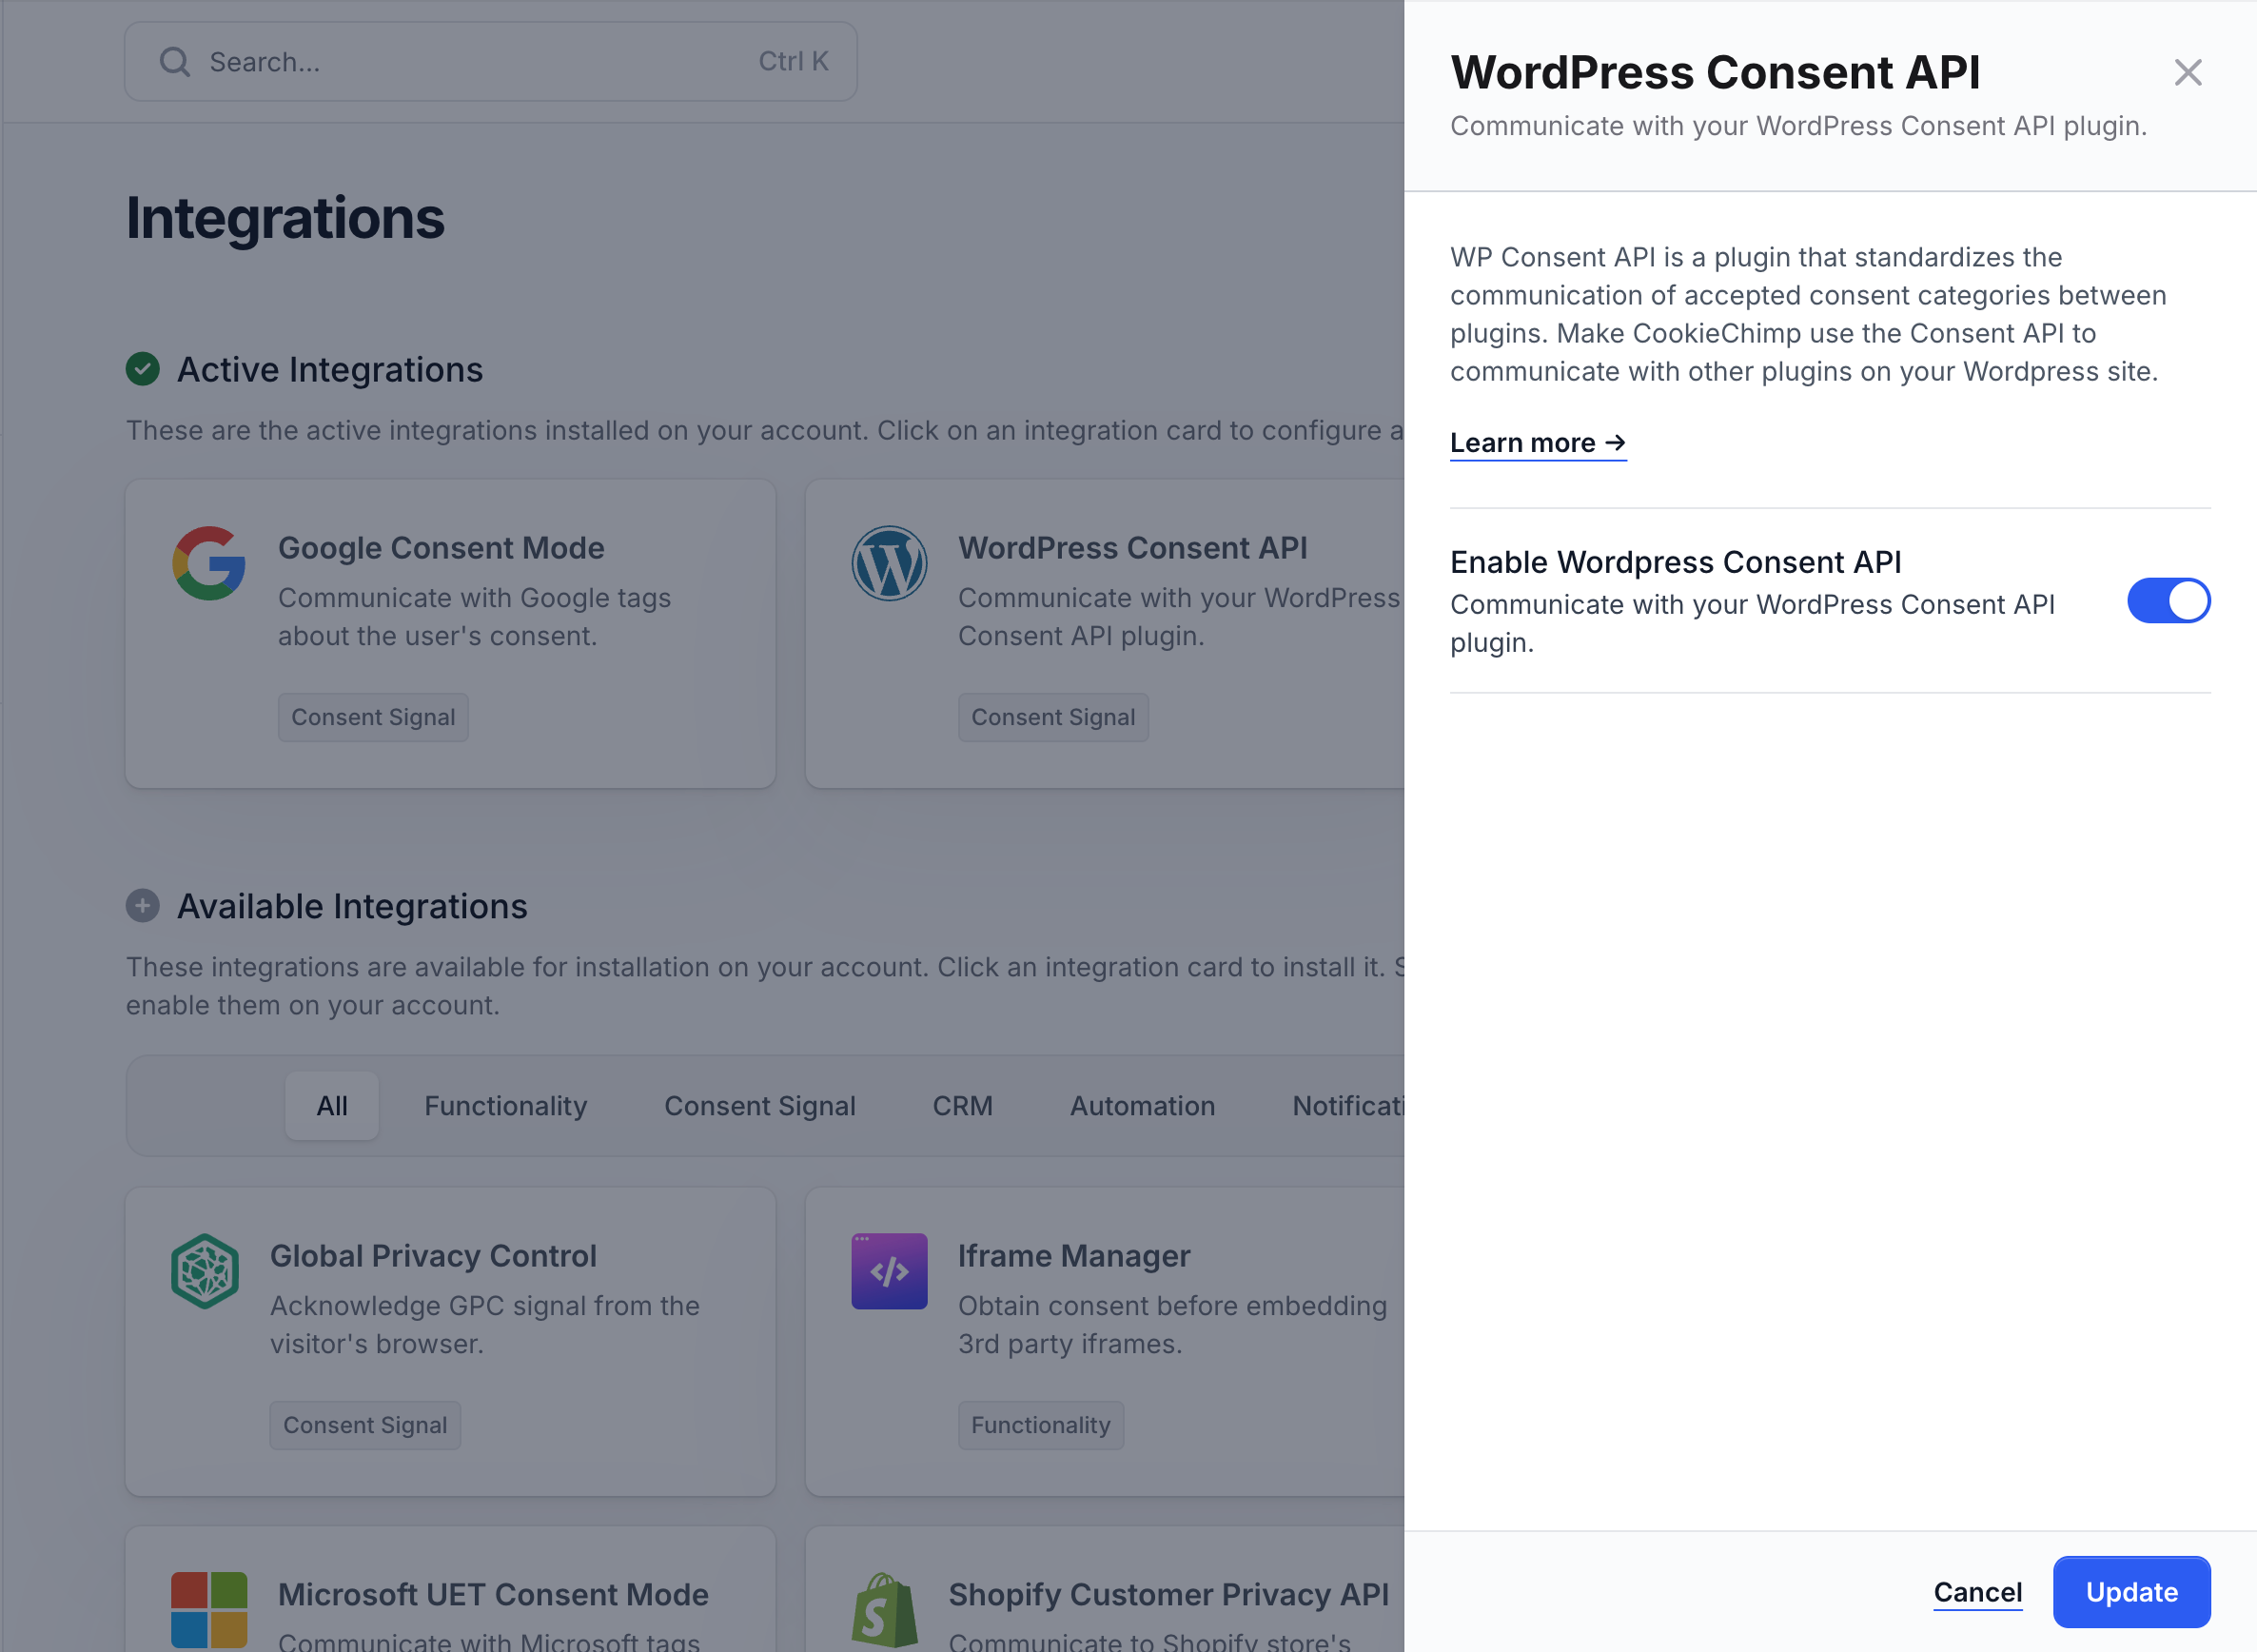
Install the [WP Consent API plugin](https://wordpress.org/plugins/wp-consent-api/) from the WordPress plugin directory.
This allows other Wordpress plugins that support WP Consent API to run tags based on user's consent.
CookieChimp will inform the WP Consent API plugin the user's consent state.
This API is listened to by other WP plugins such as Google Site Kit to enable/disable their scripts.
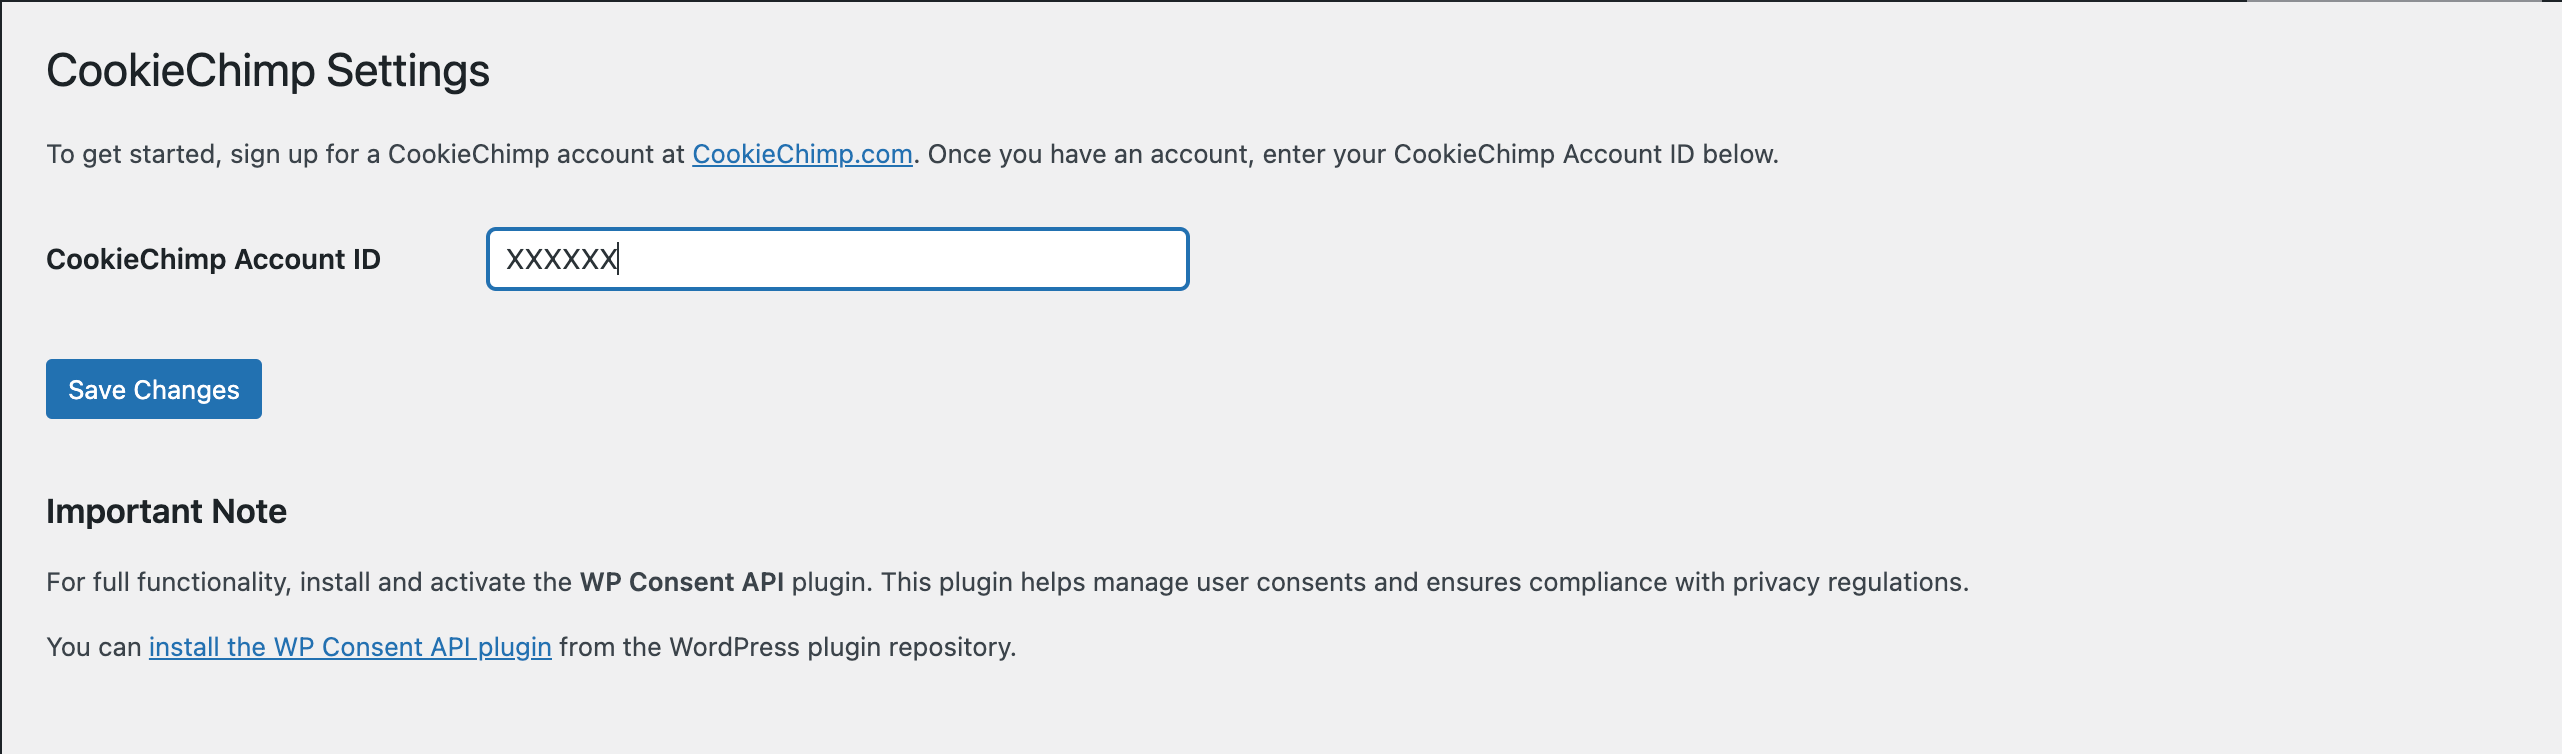
Open the CookieChimp plugin settings.
Enter your CookieChimp account ID and save.
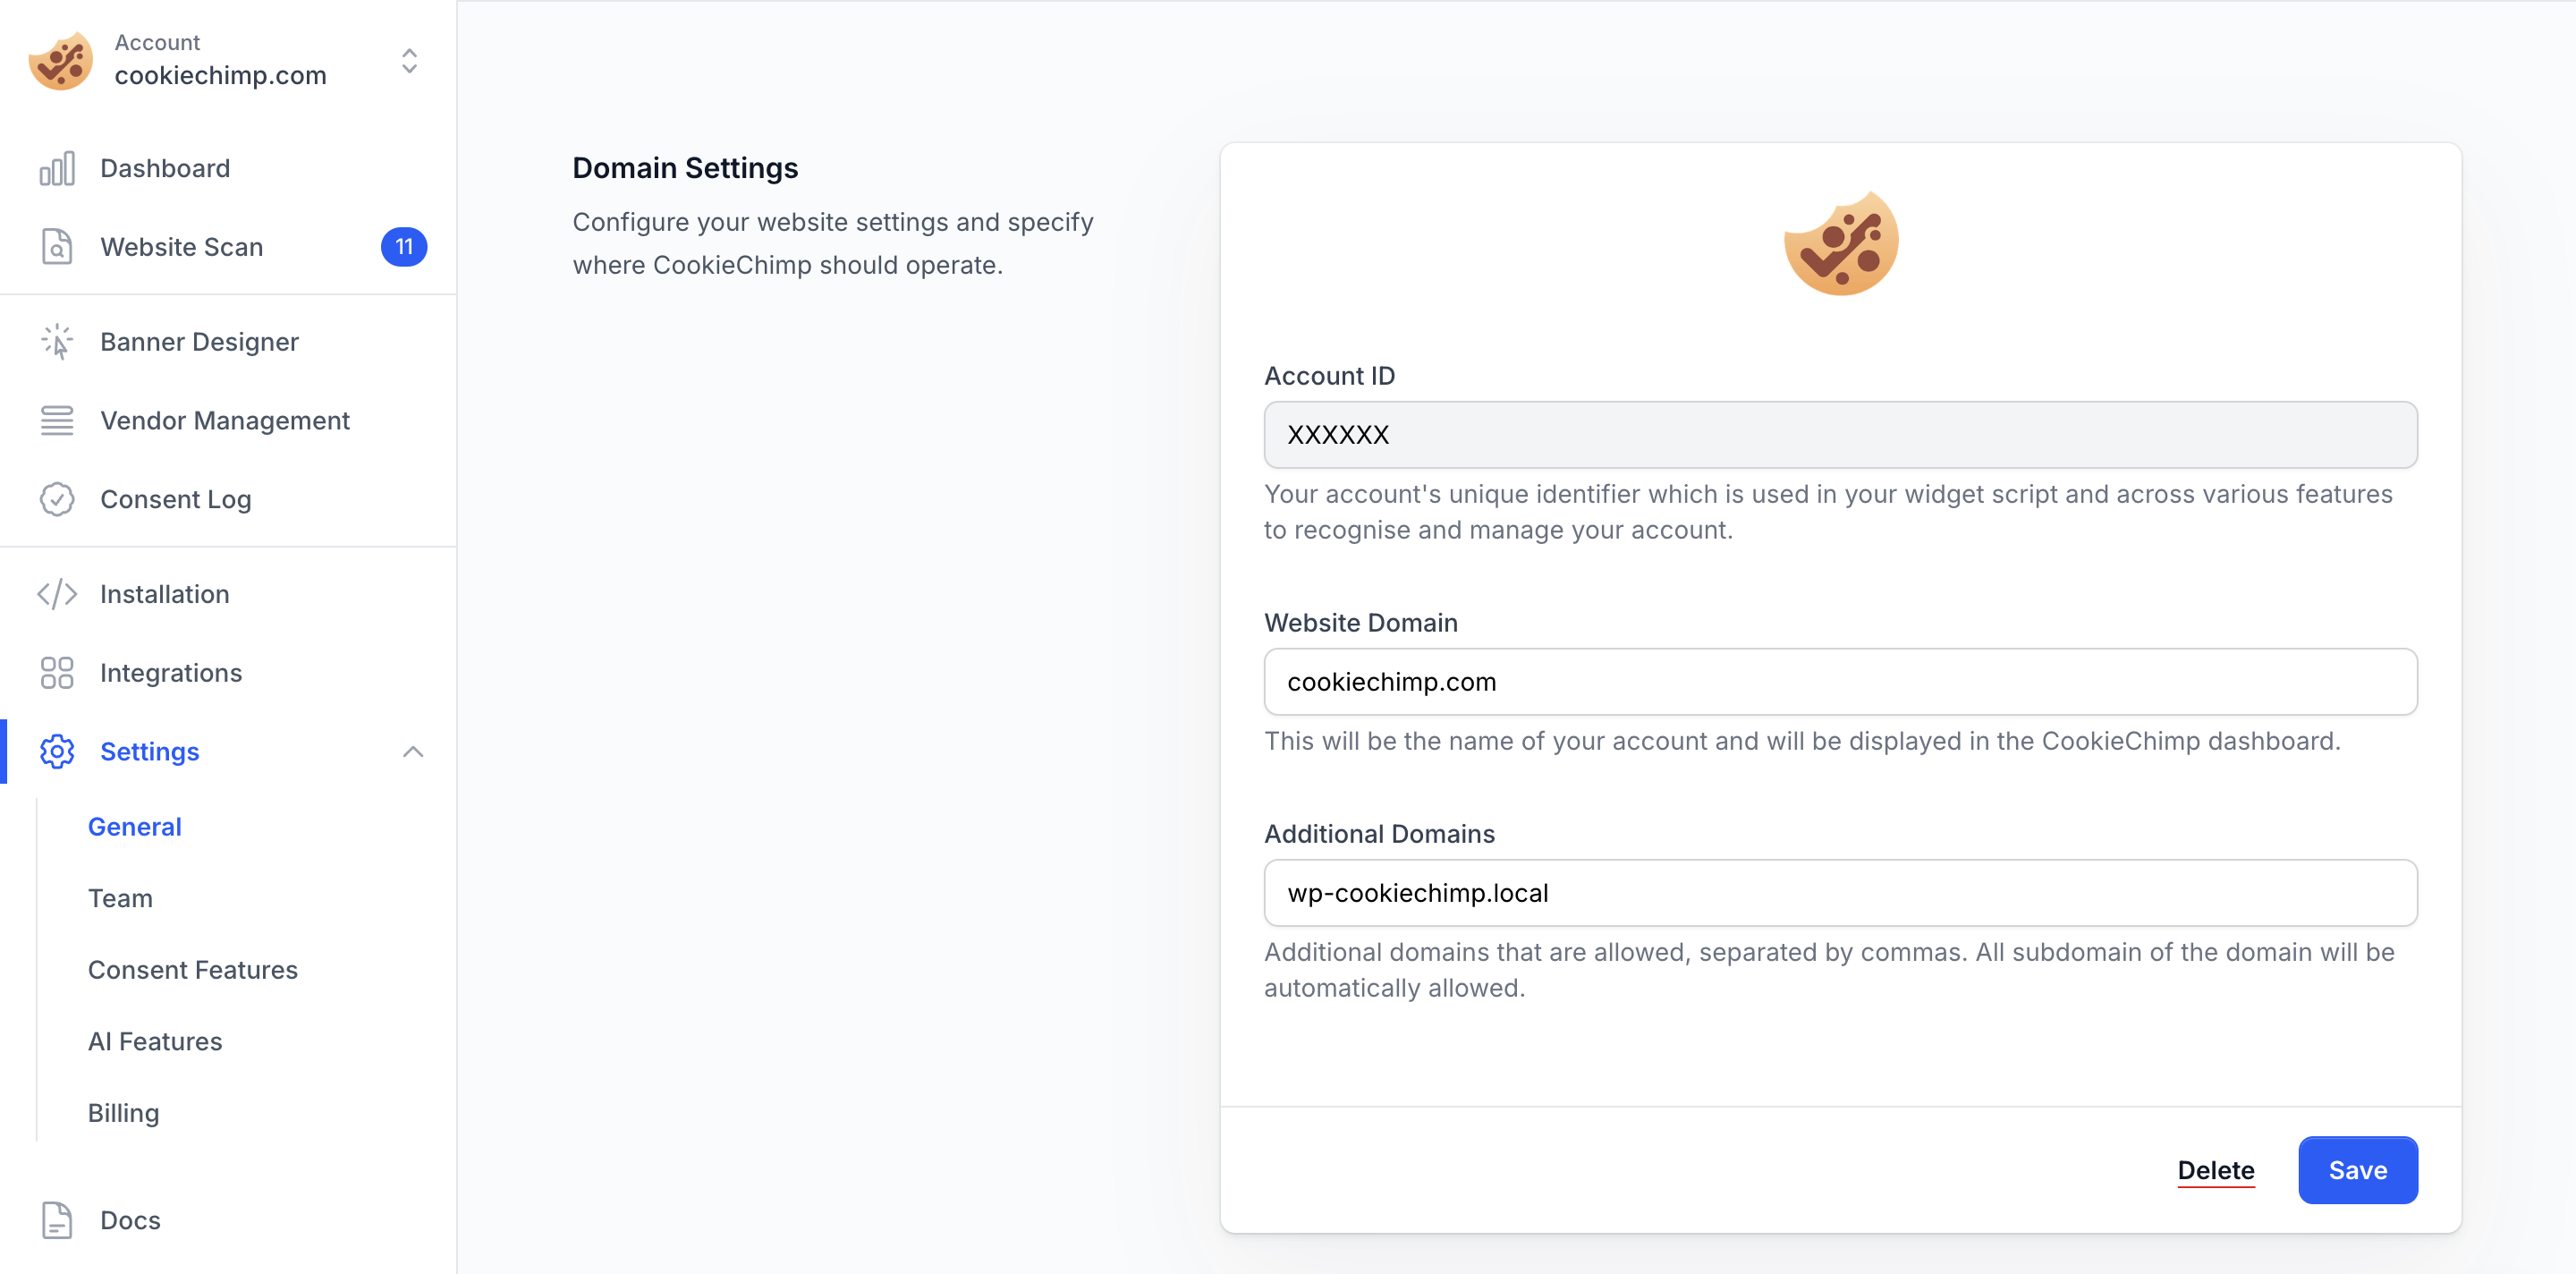
Your account ID can be found in the general settings page on CookieChimp.
Enable the WordPress integration from the Integrations page.
# Overview
Source: https://docs.cookiechimp.com/docs/overview
Developer-First Consent Management Platform (CMP)
CookieChimp is a modern, developer-first Consent Management Platform (CMP) to intelligently block scripts until consent is granted. Seamlessly comply with GDPR, CCPA, Google Consent Mode and other privacy standards.
## Key Features
AI-powered cookie management for effortless compliance.Secure storage and management of user consent records.Full API access for managing consents and data integration.Customisable consent interface with JavaScript and CSS options.Use as a headless platform with your own UI implementation.Works with any web platform or framework.Automatic script blocking and opt-out options for compliance.Privacy-focused with data minimisation and security.
 Choose "Custom Event"
 Set up the custom trigger with event name `cookiechimp_consent_update` and save the tag.
 Now when a page view or consent is recorded, the banner will log the details in the browser console.
 To ensure that the cookies are blocked and added when the consent is recorded, you can use the developer console of your browser.
First, load your website after clearing all the current cookies on the browser or checking from a private browser window.
After the site has been loaded, check the "Storage" tab in the browser console if any cookies have been set.
To ensure that the cookies are blocked and added when the consent is recorded, you can use the developer console of your browser.
First, load your website after clearing all the current cookies on the browser or checking from a private browser window.
After the site has been loaded, check the "Storage" tab in the browser console if any cookies have been set.
 ### Why aren't CookieChimp cookies marked as `HttpOnly`?
`HttpOnly` cookies can only be used in server-side communication.
Since the CookieChimp script is client-side code, in order for it to read these cookies, these cookies cannot be marked as `HttpOnly`.
### Do we support cross-domain consent?
No, we do not support cross-domain consent sharing.
Cross Domain Consent is a type of consent where visitors’ consent preferences are recognised across multiple domains.
To implement this feature, a third-party cookie must be installed and read from all associated domains.
We do not support this feature as many browsers do not allow setting/sharing of third-party cookies.
However, we do support consent sharing across subdomains when the same CookieChimp script is installed in the subdomain.
This is enabled by default.
### How can I obtain the consent ID?
The consent ID is shown in the preferences modal of the banner.
### Why aren't CookieChimp cookies marked as `HttpOnly`?
`HttpOnly` cookies can only be used in server-side communication.
Since the CookieChimp script is client-side code, in order for it to read these cookies, these cookies cannot be marked as `HttpOnly`.
### Do we support cross-domain consent?
No, we do not support cross-domain consent sharing.
Cross Domain Consent is a type of consent where visitors’ consent preferences are recognised across multiple domains.
To implement this feature, a third-party cookie must be installed and read from all associated domains.
We do not support this feature as many browsers do not allow setting/sharing of third-party cookies.
However, we do support consent sharing across subdomains when the same CookieChimp script is installed in the subdomain.
This is enabled by default.
### How can I obtain the consent ID?
The consent ID is shown in the preferences modal of the banner.
 ### How do I enable Global Privacy Control?
Go to the "Integrations" page and enable the Global Privacy Control integration.
### How do I enable Global Privacy Control?
Go to the "Integrations" page and enable the Global Privacy Control integration.
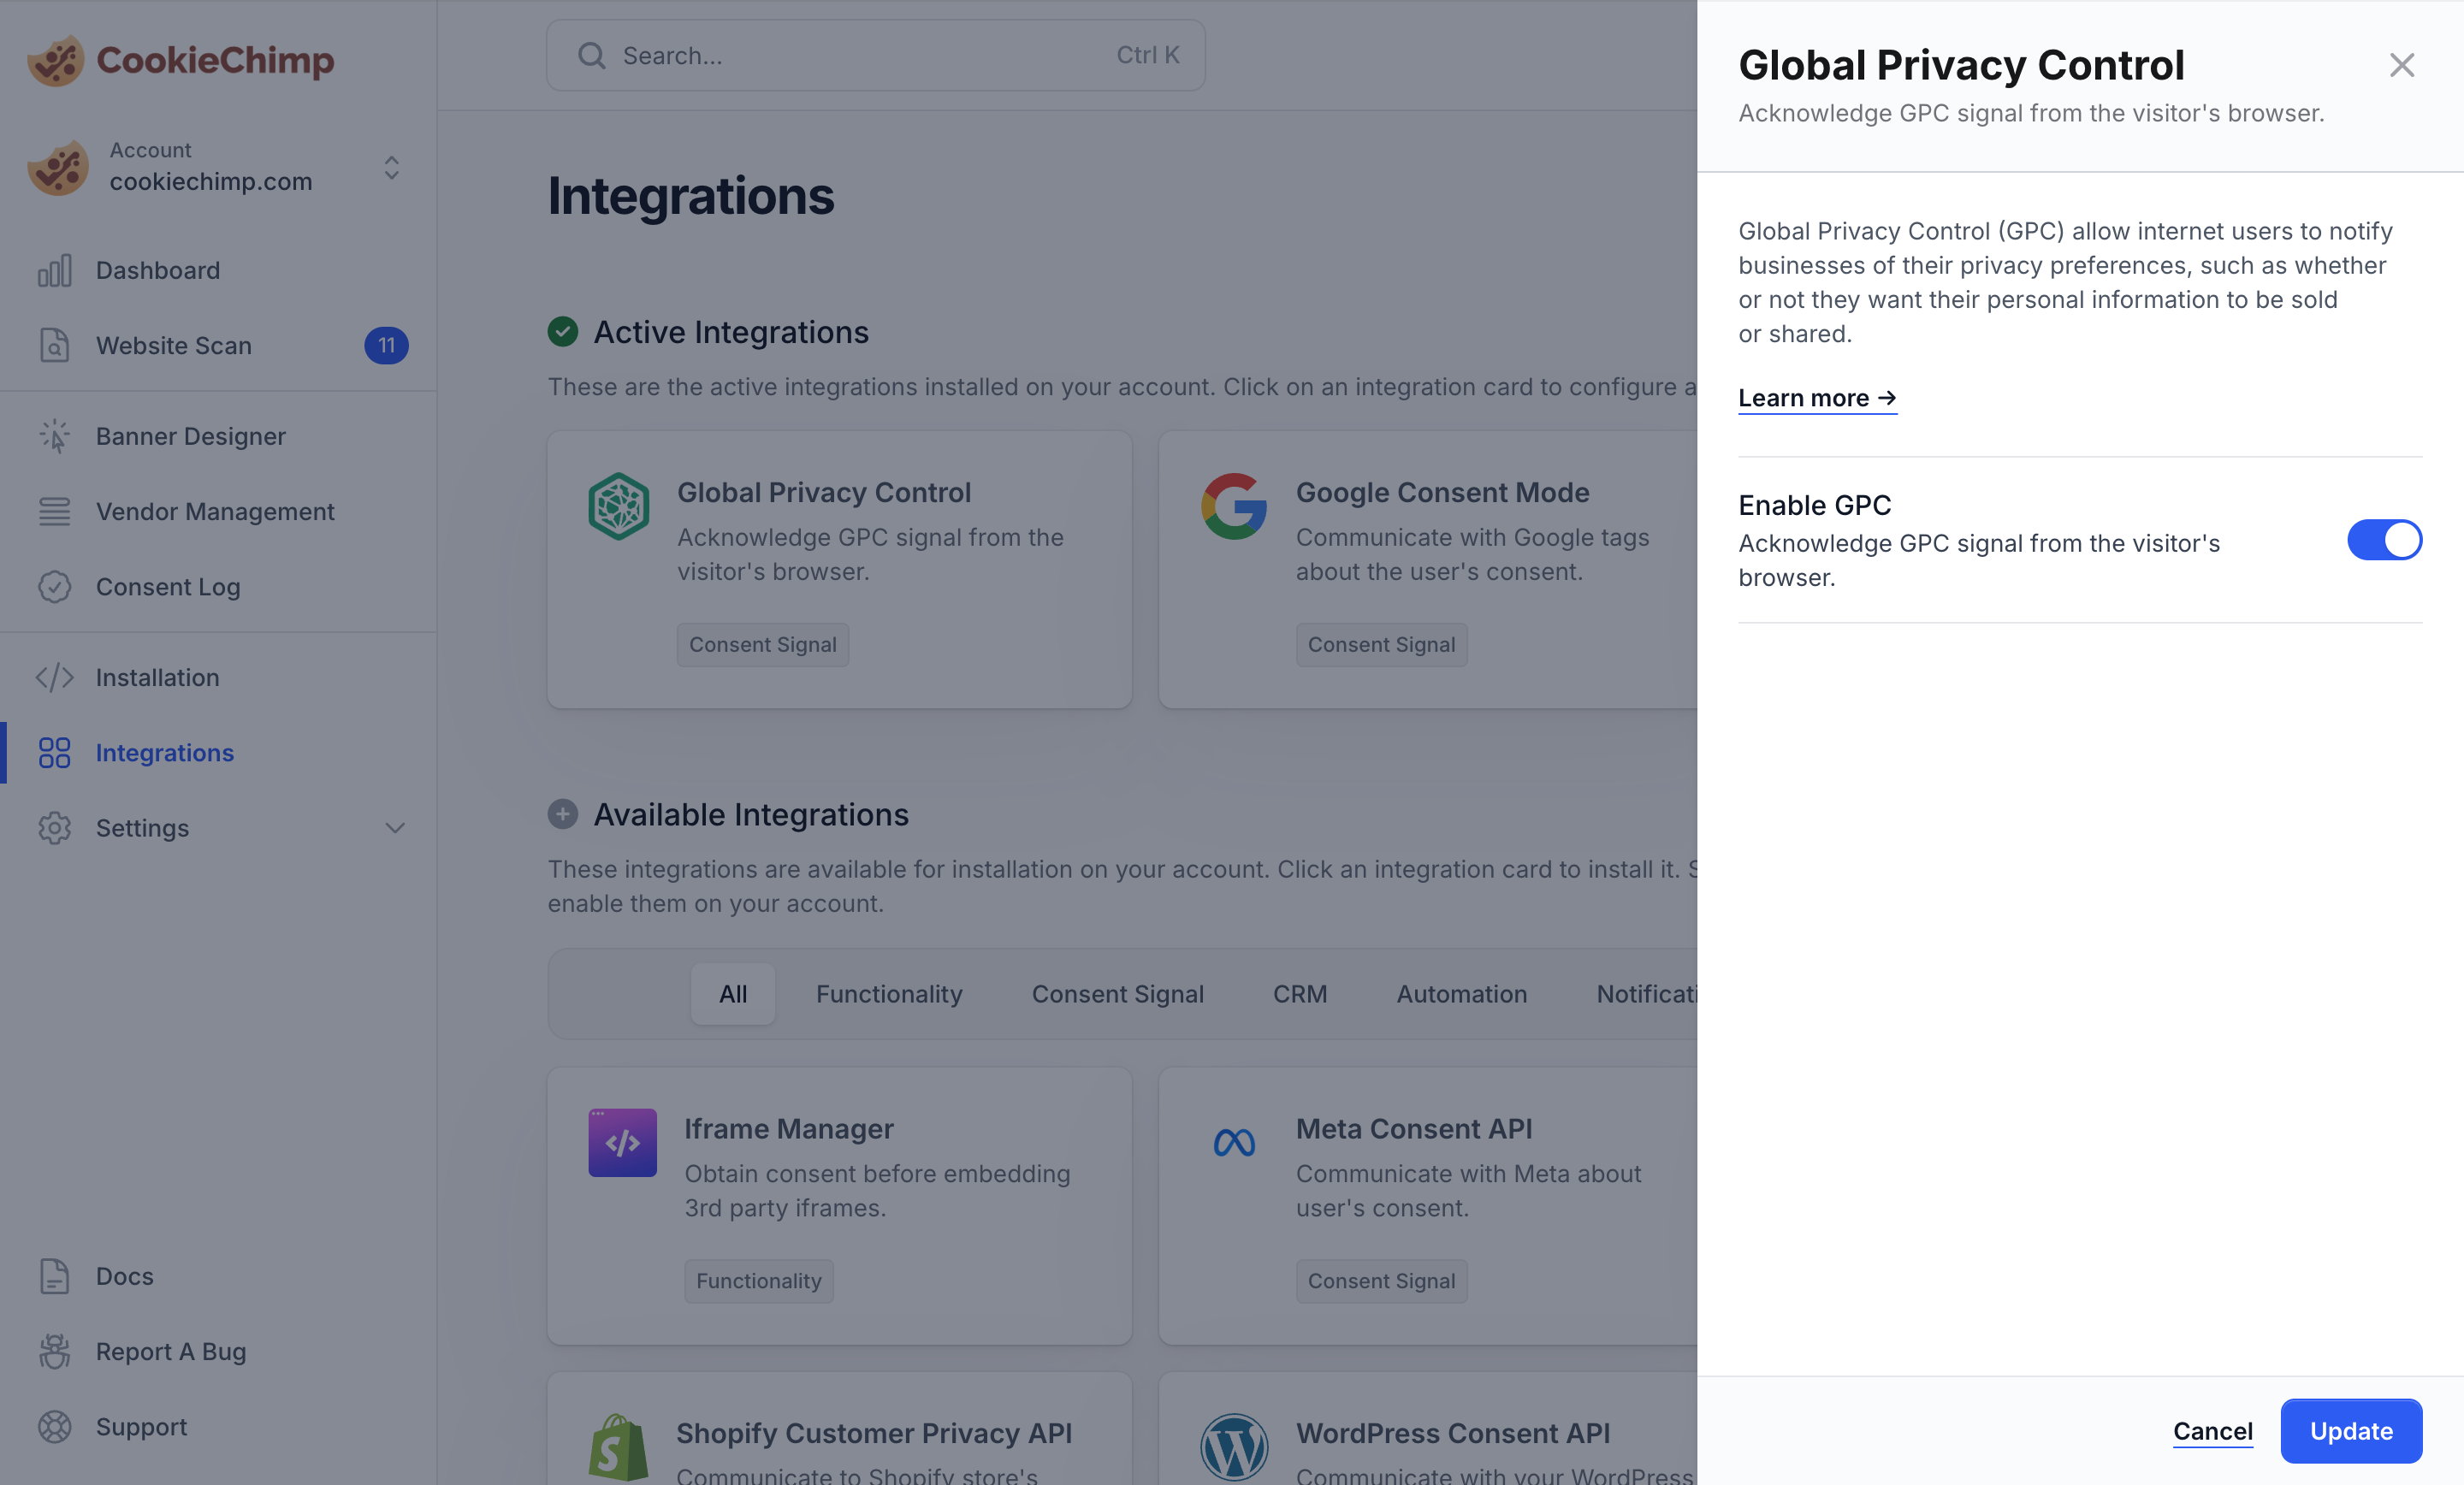 Now if we detect a Global Privacy Control signal from the browser, the opt-out preferences will automatically be set.
# Banner Designer
Source: https://docs.cookiechimp.com/docs/features/banner-designer
Customise the consent banner & preferences modal to match your branding.
Now if we detect a Global Privacy Control signal from the browser, the opt-out preferences will automatically be set.
# Banner Designer
Source: https://docs.cookiechimp.com/docs/features/banner-designer
Customise the consent banner & preferences modal to match your branding.
 ## Geo Targeting
Banners can be configured to show only in specific countries or U.S. states. This lets you create multiple banners customised for different regions and their regulations.
## Geo Targeting
Banners can be configured to show only in specific countries or U.S. states. This lets you create multiple banners customised for different regions and their regulations.
 ## Force Consent
The force consent option can be toggled to increase consent rates.
When this option is enabled, the user is forced to accept/deny consent before interacting with the website.
## Force Consent
The force consent option can be toggled to increase consent rates.
When this option is enabled, the user is forced to accept/deny consent before interacting with the website.
 ## Layouts
The layout, position and button placement of banners can be customised to fit your website's style.
## Layouts
The layout, position and button placement of banners can be customised to fit your website's style.
 Similarly, the layout of the preferences modal can also be customised.
 ## Banner Buttons
The weights, position and text of banner buttons can be customised.
## Banner Buttons
The weights, position and text of banner buttons can be customised.
 ## Privacy Trigger
The privacy trigger is a floating button that allows users to update their consent preferences at any time.
This can be enabled/disabled and its position can be customised.
## Privacy Trigger
The privacy trigger is a floating button that allows users to update their consent preferences at any time.
This can be enabled/disabled and its position can be customised.
 ## Preferences Control Level
The preferences modal can be customised to only show categories or to show their services and cookies and allow users to have more granular control.
## Preferences Control Level
The preferences modal can be customised to only show categories or to show their services and cookies and allow users to have more granular control.
 ## Theme
The banner's appearance can be customised with various theme options:
* Dark/Light mode - Choose between light, dark, or auto mode that follows the user's system preferences
* Colors - Customise the banner's primary colors, text colors, and button colors to match your brand
* Border radius - Adjust the roundness of corners on the banner, buttons and modal
* Logo - Add your company logo to reinforce brand identity
These theme settings apply to both the consent banner and preferences modal to maintain a consistent look across all consent UI elements.
## Theme
The banner's appearance can be customised with various theme options:
* Dark/Light mode - Choose between light, dark, or auto mode that follows the user's system preferences
* Colors - Customise the banner's primary colors, text colors, and button colors to match your brand
* Border radius - Adjust the roundness of corners on the banner, buttons and modal
* Logo - Add your company logo to reinforce brand identity
These theme settings apply to both the consent banner and preferences modal to maintain a consistent look across all consent UI elements.
 For more detailed styling options, refer to the [Custom CSS](/docs/advanced/custom-css) documentation page.
## Banner Languages & Translations
For more detailed information about banner languages and translations, refer to the [Multilingual Banners](/docs/features/multilingual-banners) documentation page.
# Block 3rd Party Iframes
Source: https://docs.cookiechimp.com/docs/features/block-iframes
Disable 3rd party iframes and display a notification regarding their use. Load iframes after user consent is obtained.
For more detailed styling options, refer to the [Custom CSS](/docs/advanced/custom-css) documentation page.
## Banner Languages & Translations
For more detailed information about banner languages and translations, refer to the [Multilingual Banners](/docs/features/multilingual-banners) documentation page.
# Block 3rd Party Iframes
Source: https://docs.cookiechimp.com/docs/features/block-iframes
Disable 3rd party iframes and display a notification regarding their use. Load iframes after user consent is obtained.
 ### Consent Details
You can click on consent records to see more details.
### Consent Details
You can click on consent records to see more details.
 # Identify Users
Source: https://docs.cookiechimp.com/docs/features/identify-users
Set User's ID to match cookie consent records with your database.
Identify consent records stored on CookieChimp with your application's user IDs. This allows you to search for consent records and cookies set on each session.
Add the following code to your HTML page, replacing `your_user_ID_123` with your user's ID. Add this as high up in the `` as possible. This code needs to have executed before CookieChimp loads.
```html
```
# Identify Users
Source: https://docs.cookiechimp.com/docs/features/identify-users
Set User's ID to match cookie consent records with your database.
Identify consent records stored on CookieChimp with your application's user IDs. This allows you to search for consent records and cookies set on each session.
Add the following code to your HTML page, replacing `your_user_ID_123` with your user's ID. Add this as high up in the `` as possible. This code needs to have executed before CookieChimp loads.
```html
```
 The default language is used if the visitor's language is not supported or there is no translation available for the visitor's language.
## Translations
Consent banners can be translated into multiple languages.
We offer AI auto translate for paid accounts to quickly translate into another language.
The default language is used if the visitor's language is not supported or there is no translation available for the visitor's language.
## Translations
Consent banners can be translated into multiple languages.
We offer AI auto translate for paid accounts to quickly translate into another language.
 Similarly categories, services and storage items can be individually translated.
 # Cookie Policy Vendor List
Source: https://docs.cookiechimp.com/docs/features/vendor-list-embed
Embed up-to-date vendor information for your cookie or privacy policy pages.
Copy and paste the following script into the `` section of your website, replacing `{account_id}` with your CookieChimp account ID.
```html
```
Add the following div where you want to embed the vendor list.
```html
```
# Vendor Management
Source: https://docs.cookiechimp.com/docs/features/vendor-management
Organize and manage storage items used your website.
## Categories
Categories are used to organize vendors into groups.
You can create as many categories as you need and edit the default ones.
The default categories are:
* Essential
* Analytics
* Marketing
* Personalization
# Cookie Policy Vendor List
Source: https://docs.cookiechimp.com/docs/features/vendor-list-embed
Embed up-to-date vendor information for your cookie or privacy policy pages.
Copy and paste the following script into the `` section of your website, replacing `{account_id}` with your CookieChimp account ID.
```html
```
Add the following div where you want to embed the vendor list.
```html
```
# Vendor Management
Source: https://docs.cookiechimp.com/docs/features/vendor-management
Organize and manage storage items used your website.
## Categories
Categories are used to organize vendors into groups.
You can create as many categories as you need and edit the default ones.
The default categories are:
* Essential
* Analytics
* Marketing
* Personalization
 A category becomes active when it contains an active service or storage items. Only active categories are shown to visitors in the banner.
## Vendors
Storage items set by a vendor/service can be grouped together.
Services must be associated with a category and each service will have a toggle inside its category section to allow users to opt-in or opt-out of the service.
You can then use the services attribute to [block scripts until consent](/docs/block-scripts-cookies).
CookieChimp offers a vendor library of popular services that contain storage items set by the service.
Simply select the ones used in your site and add.
A category becomes active when it contains an active service or storage items. Only active categories are shown to visitors in the banner.
## Vendors
Storage items set by a vendor/service can be grouped together.
Services must be associated with a category and each service will have a toggle inside its category section to allow users to opt-in or opt-out of the service.
You can then use the services attribute to [block scripts until consent](/docs/block-scripts-cookies).
CookieChimp offers a vendor library of popular services that contain storage items set by the service.
Simply select the ones used in your site and add.
 If you are using a service that is not in our vendor library, you can create a service manually.
## Storage Items
Storage items can be of three types:
* Cookie
* Local Storage
* Session Storage
Storage items can be grouped together into a service or be added to a category directly.
If you are using a service that is not in our vendor library, you can create a service manually.
## Storage Items
Storage items can be of three types:
* Cookie
* Local Storage
* Session Storage
Storage items can be grouped together into a service or be added to a category directly.
 # Vendor Scanning
Source: https://docs.cookiechimp.com/docs/features/vendor-scanning
Understand how CookieChimp scans your website for vendors.
# Vendor Scanning
Source: https://docs.cookiechimp.com/docs/features/vendor-scanning
Understand how CookieChimp scans your website for vendors.
 We scan your website to find the vendors and storage items used on your site.
We detect services and storage items set before and after consent was granted.
We will flag each service with one of the following status:
* `Ran before consent` - A service that is not part of a required category ran before consent is granted.
* `Not shown in banner` - We detected storage items from a service that is not shown in your banner.
* `Not part of a category or service` - We detected storage items that are not in your banner and we cannot match to a vendor/service.
* `All good` - Everything is set up correctly.
We also check if users can update their preferences after their initial consent.
## Manual Scanning
Scans can be created from the Website Scan page.
We scan your website to find the vendors and storage items used on your site.
We detect services and storage items set before and after consent was granted.
We will flag each service with one of the following status:
* `Ran before consent` - A service that is not part of a required category ran before consent is granted.
* `Not shown in banner` - We detected storage items from a service that is not shown in your banner.
* `Not part of a category or service` - We detected storage items that are not in your banner and we cannot match to a vendor/service.
* `All good` - Everything is set up correctly.
We also check if users can update their preferences after their initial consent.
## Manual Scanning
Scans can be created from the Website Scan page.
 Accounts on free plans are limited to 1 scan per day.
Accounts on paid plans have access to 5 scans per day.
## Auto Scanning
Auto scanning can be enabled through the Vendor Scanner integration.
Accounts on free plans are limited to 1 scan per day.
Accounts on paid plans have access to 5 scans per day.
## Auto Scanning
Auto scanning can be enabled through the Vendor Scanner integration.
 Automatic weekly scanning is only available to accounts on paid plans.
Accounts on free plans only have access to automatic monthly scanning.
# Wildcards
Source: https://docs.cookiechimp.com/docs/features/wildcard-cookies
Group similar storage items, reducing the need to categorize each one individually.
Platforms that generate unique storage item names, for each session or user, can create an overwhelming number of individual cookies. Wildcards streamline this by grouping these under a single pattern.
Use `*` in storage item names to match any storage item that follows a certain pattern.
## Usage
* Standard Naming: `session_12345`, `session_67890`, etc.
* Wildcard Usage: `session_*`
This wildcard pattern will match any storage item of the same type that starts with `session_`, treating them as a single group.
# Google Tag Manager
Source: https://docs.cookiechimp.com/docs/installation/google-tag-manager
Add CookieChimp with Google Tag Manager
Add your website's CookieChimp JS snippet in the `` tag of your HTML.
Automatic weekly scanning is only available to accounts on paid plans.
Accounts on free plans only have access to automatic monthly scanning.
# Wildcards
Source: https://docs.cookiechimp.com/docs/features/wildcard-cookies
Group similar storage items, reducing the need to categorize each one individually.
Platforms that generate unique storage item names, for each session or user, can create an overwhelming number of individual cookies. Wildcards streamline this by grouping these under a single pattern.
Use `*` in storage item names to match any storage item that follows a certain pattern.
## Usage
* Standard Naming: `session_12345`, `session_67890`, etc.
* Wildcard Usage: `session_*`
This wildcard pattern will match any storage item of the same type that starts with `session_`, treating them as a single group.
# Google Tag Manager
Source: https://docs.cookiechimp.com/docs/installation/google-tag-manager
Add CookieChimp with Google Tag Manager
Add your website's CookieChimp JS snippet in the `` tag of your HTML.
 Enter your CookieChimp account ID and save.
 Your account ID can be found in the general settings page on CookieChimp.
 CookieChimp is a modern, developer-first Consent Management Platform (CMP) to intelligently block scripts until consent is granted. Seamlessly comply with GDPR, CCPA, Google Consent Mode and other privacy standards.
## Key Features
CookieChimp is a modern, developer-first Consent Management Platform (CMP) to intelligently block scripts until consent is granted. Seamlessly comply with GDPR, CCPA, Google Consent Mode and other privacy standards.
## Key Features